Social Icons

Saturday 25 August 2012

How to Solve : Can't Create The Filename.ext Right-Click the folder you want to Create the file in, and than click properties on the shortcut menu


When opening an attachment directly from within Outlook you could get an error message saying that it can’t create the file and to that you need check the permissions on the folder you want to save it in. In most cases the permissions on the folder isn’t the issue but the fact that the folder is “full”. When you open an attachment directly from within Outlook it will first save a copy to a subfolder of the Temporary Internet Files folder. Cleaning out the folder will solve the issue.

Outlook Secure Temp folder

Unfortunately this is easier said than done. The subfolder name Outlook creates (on installation of Outlook) in the Temporary Internet Files folder is quite random. In Outlook 2003 and previous, the name starts with OLK and is followed by up to 4 random numbers or letters. In Outlook 2007 and Outlook 2010, this folder is called Content.Outlook and then has a subfolder which is named with with 8 random numbers and letters. In addition, by default, you cannot simply browse to the folder to clean it out. Getting to the Temporary Outlook Folder can still be accomplished in 2 easy steps though.

Step 1: Locate the folder
The folder location is stored in the registry in the following key;

Outlook 97 HKEY_CURRENT_USER\Software\Microsoft\Office\8.0\Outlook\Security
Outlook 98 HKEY_CURRENT_USER\Software\Microsoft\Office\8.5\Outlook\Security
Outlook 2000 HKEY_CURRENT_USER\Software\Microsoft\Office\9.0\Outlook\Security
Outlook 2002/XP HKEY_CURRENT_USER\Software\Microsoft\Office\10.0\Outlook\Security
Outlook 2003 HKEY_CURRENT_USER\Software\Microsoft\Office\11.0\Outlook\Security
Outlook 2007 HKEY_CURRENT_USER\Software\Microsoft\Office\12.0\Outlook\Security
Outlook 2010 HKEY_CURRENT_USER\Software\Microsoft\Office\14.0\Outlook\Security

Step 2: Get to the folder

  1. Open the OutlookSecureTempFolder registry key from the location provided in Step 1.
  2. Copy the path from the key.
  3. Open Run
  4. Paste the address in the Run and press Enter
  5. Create The New Folder with the same folder name and rename the Original Folder
  6. Thanks It Now Run MS Outlook It Done....

how to Find the Microsoft Outlook OLK Folder, OutlookSecureTempFolder

Microsoft Outlook 2007

When you open file attachments that are considered safe, Outlook places these attachments in a sub directory under the your Temporary Internet Files directory as an extra precaution. When Outlook first tries to use a temporary file, it examines the registry to determine whether or not the TEMP OLK folder has already been created. If yes, it uses the folder. If no, it creates a random folder then stores the path.

The location:

Registry key OutlookSecureTempFolder using the MAP below:

Outlook 97 HKEY_CURRENT_USER\Software\Microsoft\Office\8.0\Outlook\Security
Outlook 98 HKEY_CURRENT_USER\Software\Microsoft\Office\8.5\Outlook\Security
Outlook 2000 HKEY_CURRENT_USER\Software\Microsoft\Office\9.0\Outlook\Security
Outlook 2002/XP HKEY_CURRENT_USER\Software\Microsoft\Office\10.0\Outlook\Security
Outlook 2003 HKEY_CURRENT_USER\Software\Microsoft\Office\11.0\Outlook\Security
Outlook 2007 HKEY_CURRENT_USER\Software\Microsoft\Office\12.0\Outlook\Security
Outlook 2010 HKEY_CURRENT_USER\Software\Microsoft\Office\14.0\Outlook\Security

Friday 24 August 2012

How to Use Java Application Form in MacBook Pro, MacBook Air, iMac


  • Just Download the firefox for your MacBook Pro, MacBook Air, iMac to run java Application on your Mac Book Click Here

    How to Change Default Browser for Browsing with Mozila Firefox,Chrome or IE


    As you install a new browser on your computer like Internet Explorer,Firefox or chrome after completing the installation there a option appear on your screen to making your browser as a default browser.

    If you are working with Internet Explorer as a default browser now u want to make Firefox or Chrome as a default browser just follow the step how to make your browser default.

    Make your Firefox as a default browser:

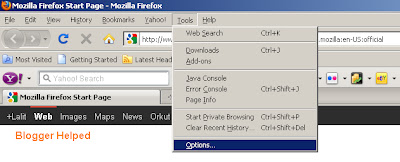
    1. Double click on your Firefox after opening your Firfox just see at the top of your browser a link Tool than Click onOptions.

    Or

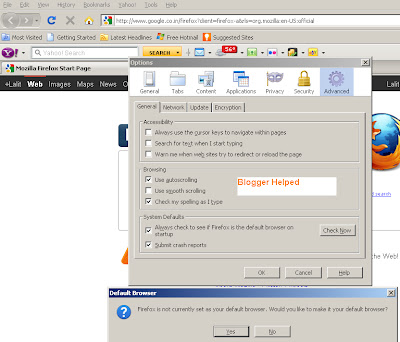
    Use these key to open the options quick Alt+T+O As you press these keys at a time the Options window will appear on your screen.see below.


    2. Click on the Advanced tab under this tab you will find another button named Check Now click on it a separate window will open which will ask for making your browser as a default browser Click on yes see picture below.


    You have Done.

    Make your Internet Explorer as a default browser:

    Initially with your operating system Internet Explorer Installed as a default browser Unfortunately if it is not as a default just see how to make your IE Default.

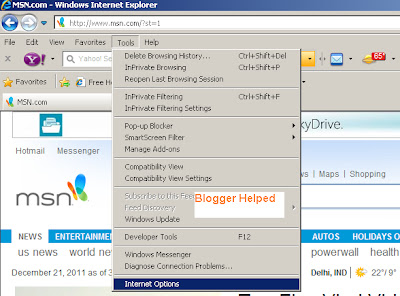
    1. Double click on your IE after opening your IE just see at the top of your browser a link Tool than Click on Options.

    Or

    Use these key to open the options quick Alt+T+O As you press these keys at a time the Options window will appear on your screen.see below.


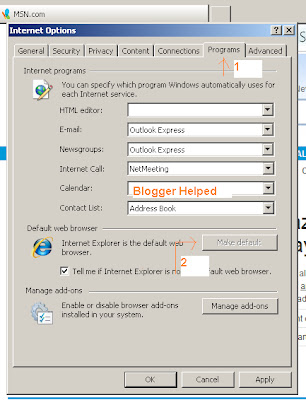
    2. Click on the Programs tab under this tab you will find another button named Make Default click on it see picture below.


    You have done

    Make your Opera as a default browser:

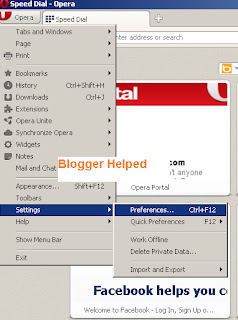
    Open your Opera see at the top left side Opera button Just click over the button than follow the bellow step.

    1. Go to Settings than select Preferences see picture below.


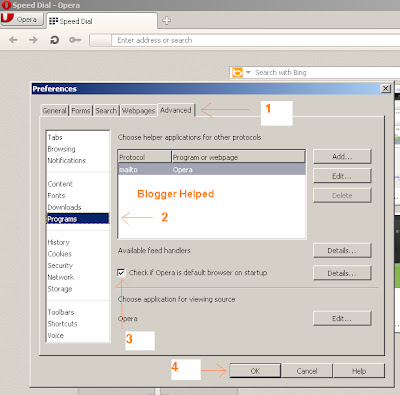
    2. Than a separate window will open click on Advanced tab Than Programs.

    3. Tick the checkbox for "Check if Opera is default browser on startup" see picture below.


    4. Next time you start Opera, answer "Yes" when the dialog asks you if you want Opera to be the default browser on your computer.

    You have done.

    Make your Chrome as a default browser:

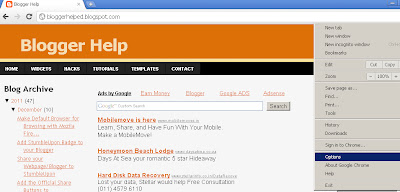
    1. Click on the Chrome "wrench" icon, placed at the top right hand side of your browser window. click on it than the drop-down menu appears, select the Options see picture below.


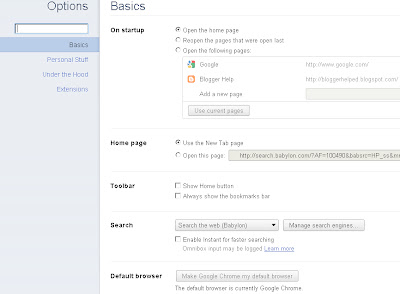
    2. Click on the Basics tab if it is not already selected. At the bottom of the dialog is the Default browser section To change that setting, click on the button labeled Make Google Chrome my default browser see picture below.


    You have done.

    How to Set Default Browser In IE (Internet Explorer), Netscape, Mozilla and Opera Browser


    Internet Explorer 6.x and 5.x:
    • Select "Tools | Internet Options" from the main menu in Explorer.
    • Change to the "Programs" tab.
    • Check the "Internet Explorer should check to see whether it is the default browser" option.
    • Click "OK".
    • Close all Explorer windows and restart the system. Once the system comes back up, restart Explorer.
    • When the "Would you like to make [Internet Explorer] your default browser?" prompt appears, click "Yes" to make Explorer the default browser.
    Internet Explorer 4.x:
    • Select "View | Internet Options" from the main menu in Explorer.
    • Change to the "Programs" tab.
    • Check the "Internet Explorer should check to see whether it is the default browser" option.
    • Click "OK".
    • Close all Explorer windows and restart the system. Once the system comes back up, restart Explorer.
    • When the "Would you like to make [Internet Explorer] your default browser?" prompt appears, click "Yes" to make Explorer the default browser.
    Mozilla 1.x:
    • Select "Edit | Preferences" from the main menu in Mozilla.
    • Change to the "Navigator" tab/section.
    • Click the "Set Default Browser" button.
    • Click "OK".
    • Close all Mozilla windows (for best results, restart the system). Finally, restart Mozilla.
    Mozilla Firefox 1.x:
    • Select "Tools | Options" from the main menu in Firefox.
    • Change to the "General" tab/section.
    • Check the "Firefox should check to see if it is the default browser when starting" option.
    • Click "OK".
    • Close all Firefox windows (for best results, restart the system). Finally, restart Firefox.
    • When the "Would you like to make [Firefox] your default browser?" prompt appears, click "Yes" to make Firefox the default browser.
    Mozilla Firebird 0.x:
    • Select "Tools | Options" from the main menu in Firebird.
    • Change to the "General" tab/section.
    • Click the "Set Default Browser" button.
    • Click "OK".
    • Close all Firebird windows (for best results, restart the system). Finally, restart Firebird.
    Netscape 7.x:
    • Select "Edit | Preferences" from the main menu in Netscape.
    • Change to the "Navigator" tab/section.
    • Click the "Set Default Browser" button.
    • Click "OK".
    • Close all Netscape windows (for best results, restart the system). Finally, restart Netscape.
    • When the "Netscape 7.x is not currently set as your default browser. Would you like to make it your default browser?" prompt appears, click "Yes" to make Netscape the default browser.
    Netscape Navigator/Communicator 4.x:
    • Open the prefs.js file located in [Communicator installation directory]\users\[profile name] (for example: C:\Program Files\Netscape\users\prefs.js) using a text editor.
    • Make sure that the following line exists and has the value false. If it does not exist, insert it at the end of the file.
      user_pref("browser.wfe.ignore_def_check", false);
    • Save changes to the file and close it.
    • Close all Communicator windows and restart it.
    • When the "Would you like to make [Communicator] your default browser?" prompt appears, click "Yes" to make Communicator the default browser.
    Opera 7.x:
    • Select "File | Preferences" from the main menu in Opera.
    • Change to the "Default Application" tab.
    • Check the "Check if Opera is default browser on startup" option.
    • Click "OK".
    • Close all Opera windows (for best results, restart the system). Finally, restart Opera.
    • When the "Would you like to use Opera as your default application for viewing web Linkpages?" prompt appears, click "Yes" to make Opera the default browser.

    Wednesday 22 August 2012

    How to Transform an iPad into a MacBook Air

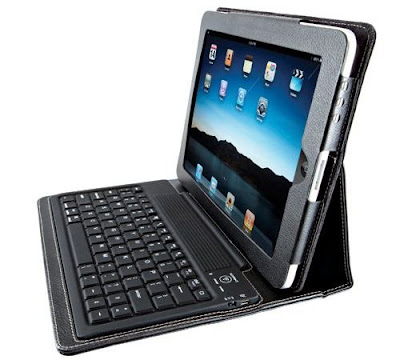
    keyboards for iPad

    Everyone know that the main intention of having a touchscreen is the terminate physical keyboards.

    But on the iPad is concerned that certain moments in which we would like to have a physical keyboard, above all people that we use to labour issues; many times the keyboard "virtual" that presents the iPad makes us a little bit difficult the task of taking certain notes (this can also apply for students).

    Then it is why it is always good to have on hand, or at least be aware of where we can get a good keyboard for iPad.

    In this atmosphere of keyboards for iPad there's one that drew me much attention, especially for its design which due to the colour and material does, to be integrated with the iPad, it seems as if we transform the iPad in a MacBook Air.

    This keyboard for the iPad that I am referring is buddy Case.

    Google Chrome Browser for iPhone, iPad and iPod iOS Devices Features, Details and information

    Google Chrome Web Browser user of Desktop PC version than you must know the features, specification, performance and unlimited useful extensions of it, now good news for Apple iOS devices users that new Google Chrome Web Browser for iPhone, iPad and iPod has been released for iOS Smartphones and Tablets and i recommended iOS device users to try it once because it will boost up your Web Browsing experience on Mobile Platform. As of now Apple Safari Web Browser is the default and built-in Web Browser for iPhone, iPad and iPod iOS devices and iOS device users didn't have anyother option till yet but now iOS device users have got the Best Web Browser option for their Mobile Platform which is Google Chrome Web Browser for Apple iPhone, iPad and iPod devices with unlimited useful extensions available for iOS Mobile Platform.


    Google Chrome Web Browser was launched in year 2008 with the aim to overtake other Web Browsers and it got successful, Google Chrome have already overtook Internet Explorer by Microsoft and Mozilla Firefox web browsers and became the most popular web browser in the world after that its enjoying the top position and positive status from their users. Google’s only and most downloaded Web Browser along with the Google's Drive (a cloud storage service) is available on the App Store for easy download by the users. Google's Chrome browser is also available in the app store since Thursday, 28th June 2012. Google Chrome for iPhone, iPad and iPod is seems to be a great browser just like Android and Desktop PC versions. The great part is that the browser is available for the Apple iOS Devices that has iOS 4.3 or even higher.

    How to Install and Run Chromium OS On MacBook Air & MacBook Pro Laptop

    Chromium-OS-for-MacBook-Air
    MacBook Pro and MacBook Air Laptops users How to Download and Install Chromium (Chrome) OS On Apple MacBook Pro and MacBook Air with simple easy steps and guide. Hexxeh has made it possible for every Mac Laptop users to install Chromium OS on any MacBook Laptops. First of all users need to know that installation process of Chromium needs careful attention, we don’t want and expect newbies to apply this method because advanced computer-related knowledge is necessary for this tutorial and guide. We at TechGlobeX are not responsible for any damage incurred to your device as a result of following this tutorial and guide because you’re going to remove all of your data by following this guide! We are not responsible for any data loss; make sure you backup your data first. Before you start this process, please note that in order to install Chromium OS on your MacBook Pro and MacBook Air Laptops you will have to wipe out your existing Mac OS X installation. So let's start the Tutorial and Guide of Download and Install Chromium (Chrome) OS On Apple MacBook Pro and MacBook Air Laptops.

    How to Download, Setup, Install and Run Chromium (Chrome) OS On Apple MacBook Pro and MacBook Air Laptops?

    First you should check out and read the guidelines and instructions involved with Development and Testing of Chromium (Chrome) OS for MacBook Pro and MacBook Air Laptops from here. Now follow the following Steps and Guidelines to Download, Setup, Install and Run Chromium (Chrome) OS On Apple MacBook Pro and MacBook Air Laptops.

    Step 1: Download the 237MB ISO Image File of Chromium OS from here. Extract it with any suitable decompression software.

    Step 2: Using dd, burn the download image of Chromium on a USB (a simple Google will guide you through how it’s done)

    Step 3: With your MacBook Air/Pro switched off, plug in the USB on which Chromium OS’s image is burned along with the OS X install drive.

    Step 4: Now hold down the “C” key on your keyboard and simultaneously press the power button, once you see the Apple logo, let go of the “C” key.

    Step 5: You should now see the language section, choose the one that’s right for you and click on next. Once the install wizard appears, now you’re going to click “Utilities” which should be at the top, and after that run Terminal.

    Step 6: Now you’re going to add in the following commands as:
    “umount /dev/disk*”
    dd if=/dev/rdisk1 of=/dev/rdisk0 bs=4m count=512
    “bless –device /dev/disk0s2 –setBoot –legacy”

    Step 7: Once it’s done doing its thing, hold down the power button of your Air/Pro till the point of shut down.

    Step 8: Remove OS X install drive and as well as the Chromium OS bearing USB from your MacBook Pro or MacBook Air.

    Step 9: Now power on your Air/Pro Laptop, and wait for round about 22 seconds.

    Step 10: Congratulations!! You're done and now you should see Chromium (Chrome) OS Contents On Apple MacBook Pro and MacBook Air Laptops.

    Troubleshooting: If you're still getting any problem or error when implementing the above methods than you should refer to this link.


    BEWARE: This Is only for information purpose this blog is not responsible for any damage do any thing at your own risk

    Latest Microsoft Office for iPad

    Microsoft Office for iPadThis is one of the best news that I've heard in recent days and is it seems that Microsoft is released a version of Microsoft Office for iPad in the next year 2012.

    While it is true that we have the option of using Pages, Keynote, and Numbers in the iPad, is also true that habemos many that we would like to count with Office automation package most popular of all time: Microsoft Office.

    Microsoft Office for iPad would be released in individual applications Word, Excel, Powet Point and Outlook for iPad at a cost of 9.99 dollars.

    To be honest, I think that would be a good move by Microsoft and that it would help consolidate as a device suitable for the dumb business (which has been one of the main approaches to Apple) to the iPad.

    Microsoft Office Application From iPad 2, 3, 4 for Free - Edit, Save, Share Supports

    Microsoft Office for Nokia Symbian OS Smartphones and now we are come up with another Microsoft Office App for Apple iPad owners. If you're proud Apple iPad owners than you must be getting frustrating for not finding any perfect free apps that can access and open Microsoft Office files securely and correctly and if you can't wait for the official version of Microsoft Office suite for Apple iPad release from Microsoft than you can try Free CloudOn 2.0 Office App for iPad with Create, Edit, Save and Share features. CloudOn 2.0 is the perfect app for all iPad users who uses their iPad for business purpose and don’t want to lose their documents files. Apple iPad is clearly a popular device for serious business consumers and content creators. There is also another app available for iPad users to access Microsoft Office App called OnLive Office But it’s not better than CloudOn 2.0.


    CloudOn 2.0 Office App has its own interface and self-structure that gives its users more direct access to create, edit, save and share Microsoft Word, Excel, and PowerPoint documents with other devices or platforms, unlike OnLive Microsoft Office App, which tries to mirror the Windows Desktop interface. New features of CloudOn 2.0 Office App version includes share files via email, additional support for storing office files in a person's Box cloud storage account (previously had Dropbox) and support for reading PDF files. There's also a new image viewer for people to view pictures in various formats and much more. So if you want to try Free Microsoft Office App for iPad than CloudOn 2.0 is best choice for you.


    Click here to Get CoudOn 2.0 Office App for iPad for FREE.

    Tuesday 21 August 2012

    Download and Installous From Cydia For Jalibreaked iOS 5.0.1

    iOS 5.0.1 Untethered jailbreak has already been released by iPhone Dev-Team. After jailbreaking your iDevice, Installous is one of the must have Cydia apps you should install. Updated version Installous 4.4.2 is now compatible with iOS 5/5.0.1.
    Installous is used to install cracked iPhone apps on your iDevices. Following is the step by step guideline abouthow to install Installous 4.4.2 on iPhone, iPad or iPod Touch running iOS 5/5.0.1 and Older Versions of iOS.
    Step 1: First of all your iDevice should be jailbroken. Here is a quick guide for iOS 5 untethered jailbreak.
    Step 2: Now launch Cydia on your jailbroken iDevice.Step 3: Tap on “Manage” tab at the bottom, and then tap on the “Sources”.

    Step 4: Now tap on the “Edit” button at the top right corner and then on “Add” button on the top left corner of the screen.Step 5: Now add http://cydia.hackulo.us repository in field and tap on “Add Source” button.
    Step 6: Now Cydia will update its repo list. Once it is done, tap on the Search tab at the bottom and type Installous in the search field and select the Installous 4 from the search result.
    Step 7: Now tap on the “Install” button and then on the “Confirm” button to install Installous.
    Step 8: At last tap on the Restart SpringBoard to reboot your device and you are done.
    That’s all! Installous 4.4.2 is successfully installed to enjoy any app for free from the App Store.

    How to Remove Programs That Start With Your Computer Auto in WIndows Xp / Windows 7

    Using this tip, you can minimize the startup time of windows XP and Vista also. You can disable some optional windows applications like windows messenger, Yahoo messenger, QuickTime and many others auto startup programs that run automatically when you start your computer.
    Follow the given steps to disable the windows auto run applications:
    To use this feature, you will need to be logged into your computer with administrative rights.
    Click Start button and type msconfig in Run option then press Enter for next.
    A small System Configuration Utility dialog box will appear with many options like General, System.ini Win.ini, Boot.ini, Services, Startup and Tools.
    Now select Startup tab and uncheck the applications that you want to disable from windows startup.
    Now click on Apply button to implement the changes then click on Ok button to end the configuration process.
    Again close the all program and restart your computer after any changes to go into effect.

    How to disable to Windows key on keyboard

    Automated method


    Disable the Windows key
    Step 1: Download the Microsoft Fix it program 50465 from Microsoft at http://go.microsoft.com/?linkid=9738719.
    Step 2: Double-click on the file you just downloaded, MicrosoftFixit50465.msi, and click Run to install the fix.
    Step 3: Follow the short installation prompts and restart your computer.
    Microsoft Fix it program to disable Windows key(Credit: Screenshot by Ed Rhee)

    Enable the Windows key
    Step 1: Download the Microsoft Fix it program 50464 from Microsoft at http://go.microsoft.com/?linkid=9738718.
    Step 2: Double-click on the file you just downloaded, MicrosoftFixit50464.msi, and click Run to install the fix.
    Step 3: Follow the short installation prompts and restart your computer.

    Manual method

    Caution: Please take care when working in the registry. Mistakes made in the registry can cause serious problems. If you are not comfortable working in the registry, consider using the automated method.

    Disable the Windows key
    Step 1: Click Start, then type regedt32 in the search box.
    Start registry editor
    Click image to enlarge
    (Credit: Screenshot by Ed Rhee)
    Step 2: Double-click on HKEY_LOCAL_ MACHINE, then SYSTEM, CurrentControlSet, Control.
    Click image to enlarge
    (Credit: Screenshot by Ed Rhee)
    Step 3: Click on Keyboard Layout, then in the Registry Editor menu, click on Edit, New, Binary Value.
    New binary value
    Click image to enlarge
    (Credit: Screenshot by Ed Rhee)
    Step 4: Name the new entry as Scancode Map.
    Step 5: Double-click on the new entry and type in 00000000000000000300000000005BE000005CE000000000as the value data, then click OK. You must type it in manually; copying and pasting will not work. It might be easier to look at it in pairs, as three rows of 16 digits:
    00 00 00 00 00 00 00 00
    03 00 00 00 00 00 5B E0
    00 00 5C E0 00 00 00 00
    Edit binary value
    Click image to enlarge
    (Credit: Screenshot by Ed Rhee)
    Step 6: Close the Registry Editor and restart your computer.

    Enable the Windows key
    Step 1: Click Start, then type regedt32 in the search box.
    Step 2: Double-click on HKEY_LOCAL_ MACHINE, then SYSTEM, CurrentControlSet, Control.
    Step 3: Click on Keyboard Layout and right-click on Scancode Map. Click Delete then click Yes.
    Delete registry key
    Click image to enlarge
    (Credit: Screenshot by Ed Rhee)
    Step 4: Close the Registry Editor and restart your computer.
    make-money-468x60