Social Icons

Saturday, 22 September 2012

HTC One TE tablet specs revealed: quad-core processor, 10.1 inch screen, Android OS 5.0

The famous designer Hasn Kaymak has designed several concept smartphones before, which could even compete with the existing flagships of Samsung in functions and design. The list of concepts made by him continues, and this time comes a HTC One tablet. This new concept HTC One tablet adopts the HTC One TE model, being reported to have 10.1 inch SLCD 2 screen display, which supports 720P video playback. Users could freely watch HD videos on HTC One tablet or play DVD movies on HTC One tablet device. It will run on the new Android OS 5.0 (as reported to be codenamed as Jelly Bean), with quad-core processor and the latest HTC Sense UI interface.
There’s also an 8 megapixel camera on board of this HTC concept tablet, with which you can freely record videos and snap pictures as you like. Still, this HTC One TE tablet supports WiFi b/g/n at 60 GHz, Gorilla Glass 2 protection, a micro HDMI port and HTC Sense 4.5. Beats streaming, a bundled in ear headset and iBeats are all included, which makes it excellent for you to enjoy audio or music video on this tablet. However, the latest news reveals that HTC officially announced this week that it will stop bundling Beats headphones with HTC devices, so this model will most likely remain a fantasy, at least on the headset side.
HTC One TE tablet specs
Since the HTC disappointed the public at the MWC 2012 with only One series smartphones announced, it would be the right time for HTC to launch a new tablet, not only the One series of handsets. The rumored HTC Quattro quad core tablet has been talked about for a while now, but no results have appeared. Will this model turn into reality? It looks pretty nice and its back shows that it’s keeping the already famous One series design legacy.

how To Transfer Photos to iPad from Any Sources

"I just gifted an iPad to my son as a birthday gift today. We had a very wonderful day and took a lot of wonderful family pictures with camera. My son is very happy. He wanted to sync photos to iPad to store these photos on iPad for convenient future review. I have tried iTunes and found it troublesome to do this. Is there any way or better software to help transfer pictures to iPad from camera directly?

There are always questions like the above one. In fact, I have written a post about transferring pictures from computer to iPad. In this post, I would like to talk about transferring pictures to iPad from various sources. The large screen and the high screen resolution of iPad make it really wonderful choice to view pictures. Thus, it is quite common for iPad users to wander how to transfer pictures to iPad from camera, computer, iTunes, Android devices, Microsoft Windows devices, and many other devices to realize picture sharing easily. So, is there any way to sync photos to iPad from various sources? Of course Yes. The below three ways are the most convenient methods I could think to help you easily and freely transfer photos to iPad.
The first method is to use iCloud. iCloud is a cloud storage and cloud computing service from Apple Inc. The service allows you to store data such as music files on remote computer servers for download to multiple devices such as iOS-based devices (except older iPhones), and personal computers running OS X or Microsoft Windows. What you need is only an Apple ID and WiFi network connectivity. Once you take photos with iPhone, you can sync photos to iPad via iCloud quickly. The disadvantage of iCloud is that it only supports to transfer pictures to iPad from computer and Apple products like iTunes, iPhone and iPod. You can't directly sync photos to iPad from your camera. 
Secondly, I would like to recommend iTunes. As the control center of all Apple iOS devices like iPod, iPhone and iPad, iTunes could help you easily transfer pictures to iPad from other iOS devices and computer. It could connect to the iTunes Store to purchase and download music, music videos, television shows, iPod games, audiobooks, podcasts, movies and movie rentals, ringtones and download application from the App Store for the iPhone, iPad and iPod Touch. But, if you want to transfer pictures to iPad from camera, you have to firstly move pictures in camera to computer folder or iTunes and then iTunes could help you transfer pictures to ipad, which makes the transferring a little bit troublesome. 

Well, it seems that iCloud and iTunes both could not perform well exactly on transferring pictures to iPad directly from camera. We have to look for some third-party tools to do this. From my personal experience, I would like to recommend a professional iPad photo transfer app. This iPad photo transfer program could be considered as enhanced iTunes. It could sync photos to iPad from iPad, iPod, iPhone, iTune, computer, and other non-iOS devices like Android smartphones, tablets, cameras, etc. Transferring pictures to iPad from camera is very easy with this iPad photo transfer. After starting this program on computer, you only need to drag pictures or folders in camera directly to Photo option under iPad device inside this app, no other operations needed. 

We can't say which one of the above three methods is the best. Different people have different requirements. The method that meets your requirements most would be your best choice.

How to Update to ICS 4.0.4 from 2.3.4/2.3.6 (Without Rooting) Samsung Nexus S i9020a

Update from 2.3.4 (GTJ61)/2.3.6 (GRK39C) to 2.3.6 (GRK39F)


  1. Download this file
  2. Rename the downloaded file to update.zip
  3. Put it update.zip you have downloaded on your sd card. 
  4. Turn off your device 
  5. Go to Bootloader (press&hold volume up button then press&hold power button) 
  6. When in Fastboot mode navigate to Recovery using volume up/down buttons 
  7. Press the power key to select Recovery 
  8. If you see a warning logo, press the power button and then press volume up button then release both to go to the Main Recovery menu
  9. From the menu, select Apply update from /sdcard, and choose update.zip from the list. 
  10. When update is finished go back and select reboot system now
Update from 2.3.6 (GRK39F) to 4.0.4 (IMM76D)

  1. Download this file
  2. Use the above steps again to update.

Apple iphone 5 Launch on September 21, 2012.

Apple Store on 5th Avenue after purchasing an Apple iPhone 5 in New York, September 21, 2012. Apple fans queued around city blocks worldwide on Friday to get their hands on the new iPhone 5

Apple iPhone 5 - Stylopics

Apple iPhone 5 - Stylopics
Apple iPhone 5 Real photos, images, wallpapers, snapshots, pics, snaps and pictures, HD wallpapers, high quality, large, small and original Apple iPhone5 version.
 
http://news.cnet.com/i/tim/2011/11/28/iphone5_bezel.png
best apple iphone 5
http://pinoytutorial.com/techtorial/wp-content/uploads/2010/08/iphone-payment.jpg
Apple iphone 5 photos
http://gadgetsmarket.com/wp-content/uploads/151219-iphone5render_500.jpghttp://techngadgetz.com/wp-content/uploads/2011/04/OmniVision_New_12.6_Megapixel_Camera_Sensor_iphone5.jpg
https://blogger.googleusercontent.com/img/b/R29vZ2xl/AVvXsEiC7Q4Z9VFTRna15Si4WOvLyUhd11XbLMy1vNuzKQH47Ond0lyloPUl0gRwabQB6RkzYPIFEJnugXogokQDQtSKoTOMHvMRSmf4Fwxg7GNVNcKjaIhcpLJa1cy7DqfzY7dr0u9B7frjwYY/s1600/iPhone5_metal_backing_NFC.jpeg

Friday, 21 September 2012

Download Dell Latitude | D610, 620, D630 Drivers For Windows Xp


Download Dell Latitude D610 Lan-Audio Drivers WindowsXP


Dell Latitude D610 Broadcom 57XX Gigabit Integrated Controller Aplications  Download
***
Dell Latitude D610 Broadcom 570x Gigabit Integrated Controller Driver Download
***
Dell Latitude D610 SIGMATEL STAC 975X AC97 Audio Sound  Download
***
Dell Latitude D610 Intel Mobile Chipset Download

Thursday, 20 September 2012

All Common Router Default IP Address

ROUTER IP ADDRESS
3Com 192.168.1.1
Apple 10.0.1.1
Asus 192.168.1.1, 192.168.1.220
Belkin 192.168.2.1, 10.1.1.1
Buffalo 192.168.11.1
Dell 192.168.1.1
D-Link 192.168.0.1, 0.30, 0.50, 1.1, 10.1.1.1
Linksys 192.168.0.1, 1.1
Microsoft 192.168.2.1
Motorola 192.168.10.1, 20.1, 30.1, 62.1, 100.1, 102.1, 1.254
MSI 192.168.1.254
Netgear 192.168.0.1, 0.227
Senao 192.168.0.1
SpeedTouch 10.0.0.138, 192.168.1.254
Trendnet 192.168.0.1, 1.1, 2.1, 10.1,
U.S. Robotics 192.168.1.1, 2.1, 123.254
Zyxel 192.168.1.1, 2.1, 4.1, 10.1, 1.254, 10.0.0.2, 0.138

Download Latest Apple iTunes 10.6.3 for Windows XP, Vista and Windows 7 2012

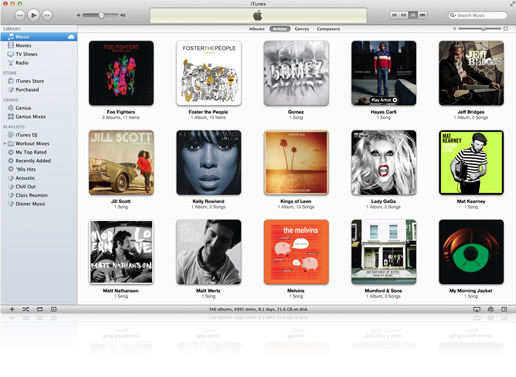
iTunes is a free application for Mac and PC. It plays all your digital music and video. It syncs content to your iPod, iPhone, and Apple TV.

Your music, movies, TV shows, apps, and more. The best way to follow your favorite artists and friends — and discover the music they’re talking about, listening to, and downloading. iTunes is home to everything that entertains you
Features:
Forget rifling through stacks of CDs or flipping through channels. iTunes puts your entire music and video collection a mere click away, giving you an all-access pass to thousands of hours of digital entertainment. Browse. Organize. Play. All from your Mac or PC.
View your library by artist, album, episode, year, rating — any way you want. Find what you’re looking for with a quick search that reveals results as you type.
Turn CDs into digital music by importing them to iTunes. Organize your entire collection with custom playlists.
Shuffle songs to mix up your groove. Listen to music from other computers on your network. Play video using onscreen controls.
iTtunes | Infolane
iTunes Match
If you want the benefits of iTunes in the Cloud for music you haven’t purchased from iTunes, iTunes Match is the perfect solution. It’s built right into the iTunes app on your Mac or PC and the Music app on your iOS devices. And it lets you store your entire collection, including music you’ve imported from CDs or purchased somewhere other than iTunes. For just $24.99 a year.
Here’s how it works: iTunes determines which songs in your collection are available in the iTunes Store. Any music with a match is automatically added to iCloud. Since there are more than 20 million songs in the iTunes Store, most of your music is probably already in iCloud. All you have to upload is what iTunes can’t match. Which is much faster than starting from scratch. Once your music is in iCloud, you can stream and store it on any of your devices. Even better, all the music iTunes matches plays back from iCloud at 256-Kbps AAC DRM-free quality — even if your original copy was of lower quality.
What's New:
  • iTunes 10.6 adds the ability to play 1080p HD movies and TV shows from the iTunes Store.
  • This release also includes many improvements for iTunes Match including:
    • Improved song matching
    • Improved album artwork handling, downloading, and displya
    • Addresses an issue where songs may skip when playing from iCloud
  • For information on the security content of this update please visit: http://support.apple.com/kb/HT1222
What's New in Previous Versions:
  • iTunes in the Cloud. iTunes now stores your music and TV purchases in iCloud and makes them available on your devices anywhere, any time, at no additional cost.
    • Automatic Downloads. Purchase music from any device or computer and automatically download a copy to your Mac and iOS devices.
    • Download Previous Purchases. Download your past music, TV, app, and book purchases again, at no additional cost. Previous purchases may be unavailable if they are no longer on the iTunes Store.
  • Sync with your iPhone, iPad, or iPod touch with iOS 5.
  • Wi-Fi Syncing. Automatically sync your iPhone, iPad, or iPod touch with iTunes any time they're both on the same Wi-Fi network.
  • Addresses an issue where iTunes may become unresponsive when syncing an iPad.
  • Resolves an issue which may cause syncing photos with iPhone, iPad, or iPod touch to take longer than necessary.
  • Fixes a problem where video previews on the iTunes Store may skip while playing.
  • Addresses other issues that improve stability and performance.
  • iTunes gets a speed boost. Now when it comes to loading large libraries, browsing the iTunes Store, and syncing your devices, iTunes responds faster than before.
  • Now the convenience of Autofill works with any iPod. Let iTunes choose what songs fill your pocket and enjoy your music at random.
  • Automatically import music from your CDs as higher quality, 256-Kbps iTunes Plus files. Watch a tutorial to find out how to import music from CDs.

How to Track Your Laptop If Stolen...

Anti-virus software developer company "Quick Heal" has launched their new service, which helps Individuals with the help of law enforcement agencies in tracking and recovering stolen laptop. To avail the service, a laptop owner has to first register with ‘Quick Heal’ website through a Mac-id, and it keeps continuous track of the laptop.

If the laptop is stolen, the tracker service traces it on the basis of Mac-id and IP addresses. This information can then be used by the police to track the laptop down and retrieve it. The service  totally free and can be availed by anybody.
The method is aimed at helping police by providing them an interface with the website. “This technology from Quick Heal will provide a powerful tool to the society at large and to the police.
Launched as part of corporate social responsibility, the service is free of charge and can be availed by anybody, whether a ‘Quick Heal‘ user or not, he said. The service, already launched in Indore and Jaipur, would soon be started in other cities. Besides, the company also aims to create a database of stolen laptops for the help of users and potential buyers.
This Information is Only for Information Purpose. and Found on internet. The Parents Site is Giving Blow.
Parents Site

How To FIx Computer Common Errors & Troubleshooting It...!!!

The computer troubleshooting tips those are given bellow if applied carefully will save your day and working time. 

Tips is Given Here:


1. The computer isn't  starting :
If the computer does not turn on when you press the power button, the following suggestions may help you to determine why the computer will not start up. First of all, check if the computer is plugged in to an AC outlet properly. Plug another electrical device into the outlet to be sure that the outlet is providing adequate power.
2. The computer screen is blank:
If the screen is blank, the computer may not be set to display the image on the computer screen. First, check if the monitor is plugged in to a power outlet and is connected to the computer securely and make sure the monitor power button is on. If the power light is not on, it means that the outlet is not delivering power to the monitor. Fixing the power outlet in such cases should help you.
3. Trouble with Graphics card: If the power light of the computer and monitor is on and nothing comes up on the screen when you start your computer then there must be something wrong with video card. You should take your computer to a repair shop or change its video or the graphics card with a new one.
4. OS or some Software is functioning abnormally: If the Operating System (OS) or some other software is unresponsive or responds abnormally, follow these tips. Restart your computer and run a virus scan. For this purpose you should have a reliable antivirus software installed on the computer to fix this issue.
5. Windows do not boot properly: If windows do not boot properly then you should reinstall windows with the windows recovery disk. Most of the times, this should help you get rid of the problem.
6. The computer is on but not responding: If the computer is turned on but not responding to software or keyboard commands, then it must be frozen or halted. Press and hold the power button for at least 5 seconds, it will be turn off. Now restart your computer. This should fix things up.
7. Any Removable device is not working: If an external device does not function as expected, turn it on according to Manufacturers instruction; be sure that all device connections are secure and receiving electrical power and compatible with the operating system. And that the correct drivers are installed and updated.
8. Slow working internet: To increase your browser performance, you must frequently clear cookies and internet temporary files. In the Windows search bar type – %temp% and hit enter to open the temporary files folder. You can use Ctrl+A to select all of them and then press Delete. Please note that some of the files may not get deleted if they are being used by the OS; but that is fine.
9. Internet network problem: If your computer can not get connected to internet then check IP address, check network cables are connected properly, make sure that servers or gateways firewall application is not blocking http requests from your PC.

How To Convert Hard Disk Partition From FAT to NTFS..!!!

Just follow this simple steps. It's easy.

1. Click Start, click Programs, and then click Command Prompt. In Windows XP, click Start, click Run, type cmd and then click OK.
2. At the command prompt, type CONVERT [driveletter]: /FS:NTFS. Convert.exe will attempt to convert the partition to NTFS.

NOTE:
Although the chance of corruption or data loss during the conversion from FAT to NTFS is minimal, it is best to perform a full backup of the data on the drive that it is to be converted prior to executing the convert command

Speed Up Your Browser Browsing..


  Just follow these steps:

Click Start then Run and type "gpedit.msc" without quotes.This opens the group policy
editor. Go to=>Local Computer Policy=>Computer Configuration=>Administrative Templates=>Network=>QOS Packet Scheduler and=>to Limit Resealable Bandwidth.

Double click on Limit Resealable bandwidth. It will say it is not configured."By default, the Packet Scheduler limits the system to 20 percent of the bandwidth of a connection, but you can use this setting to override the default."
So the trick is to ENABLE resealable bandwidth, then set it to ZERO. This will allow the
system to reserve nothing, rather than the default 20%.It works on Win 2000 as well.
"This information is only for knowledge Purpose"

How to Create Blog On Blogspot Free Complete Tuter With Pics


Hello Viewers, after so many days, I'm again with so popular & essential subject, "HOW TO MAKE A SITE IN BLOGSPOT.COM." But why we blog? Now it's the time of Globalization means the whole world have turned into a small village because of ICT & blog is the most powerful digital media to share your thoughts, opinion, comment's about any subject around the world. It's also the optional way to make some extra money from home. So why r we late?


After reading this post carefully you will be able 100% to make your one & own blogsite, under the tech giant Googles Unlimited hosting service & free blogspot domain. I'm saying again, "IT'S TOTALLY FREE!!" So no more delay, grab a chair & hook up with me. Now let's start........


First go to BLOGSPOT. Then SIGN UP for a free account and it's simple, needs no extra knowledge to create. Just like an email account creation. After completing your account SIGN IN. Then you'll see a page like this.


Means you got it. Then click on NEW POST. After that you'll see a page like this.


FOLLOW steps as shown in the pics. Give a name for your post in the title box. Then write/create the main article or anything by your CHOISE. You are not bound to select any topic. Allow readers comment by the allow/disallow radio button. After completing click on FINISH POST at the end of the page. You can edit your post by clicking on the tab named EDIT POSTS. You can edit & add pictures, videos and many more things as shown. Upload/directly select videos from worlds largest video sharing site YOUTUBE.COM


Blogspot.com has one more exclusive built in feature like create pages. As for example HOME, ABOUT ME, CONTACT US etc. All you have to do, click on EDIT PAGES, then create new page. Give a title, create information then publish. Then you'll see a Horizontal bar above your blog site like this.


You can create up to 10 different pages like it. It gives a more attractive look to your site. 


You are free to choose your own settings & personalization by the SETTINGS tab like this. There are so many options under this tab & very easy to understand & use. Just try it. If problem arises just inform me.


Blogspot.com is offering some attractive templates & advanced design to design your site freely. Just try, click on DESIGN as shown on the page.


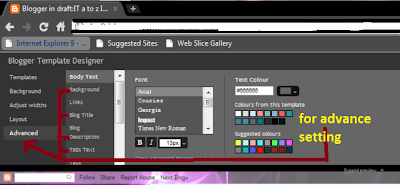
Set up page elements, add exclusive & wonderful free gadgets from Googles gadgets store. Design your site, make attractive it to your viewers. Here you'll find a sub tab named template designer. From here you can select a template that fit with your subject and can apply advance settings. There are so many templates, chose your own.


Give a background.


Adjust width for your main blog and side banners.


Choose a layout.


Then click on advance menu, set advance options to your site. Click on APPLY TO BLOG. 
Then finish and BACK TO BLOGGER.


Now just enjoy. Finally your site is ready to show. Checkout by clicking on VIEW BLOG.

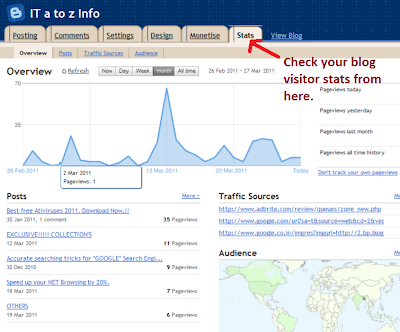
If you want to check your site visitor stats, just click on STATS, then view by month, week or by All time.


Your site is completed finally. If you need any help, just contact me or click on HELP.


How To Windows 7 Security and Maintenance with Action Center

Security and Maintenance are important with any computer, and Windows 7 has made a number of improvements that make it easier than ever to keep your computer in good shape.

In this lesson, you will learn how to use the Action Center, User Account Control Settings, and Troubleshooting to keep your computer running as smoothly as possible. You will also learn how to recover your system settings with System Restore to fix more serious issues.

To Use the Action Center:

If you have any important messages, the flag icon on the taskbar will display a red "X" symbol.
  1. To open the Action Center, click on the small flag icon on the taskbar.
  2. Review the messages.
  3. Click Open Action Center to respond to messages.


To Access the Action Center from the Control Panel:

  1. Click Start.
  2. Go to the Control Panel.
  3. Click Review Your Computer's Status under System and Security.

Fixing problems using the Action Center:

Your messages are displayed in the Action Center pane. Important messages will have a red bar, and less important ones will have a yellow bar. If a security or maintenance issue has a solution, there will be a button on the right side of the message.
Some messages are just notifications and do not indicate a problem with your computer. Those messages will not include a solution button, but they may still have important information or instructions.
  • To fix a problem, click the (solution) button and follow the directions on the screen. When you are done, the message will disappear from the Action Center.   


What is User Account Control?

User Account Control warns you when a program or user is trying to change your computer's settings. It puts a temporary lock on your computer until you confirm that you want to allow the changes. This helps to protect your computer from malicious software. When it was introduced in Windows Vista, many users found that it generated too many disruptive pop-up warnings. Windows 7 now lets the user decide how often they will receive those warnings.

To Change Your User Account Control Settings:

  1. Open the Action Center.
  2. Click Change User Account Control settings.

Use the slider to choose the level of protection you want from User Account Control. It is recommended that you use one of the top two settings. The other two should only be used in special circumstances. It may be best to choose the highest setting and if you end up getting too many pop-ups, you can always lower it to the second setting.


Not all computer problems will be shown in the Action Center. For example, you may be having trouble with aparticular program or device, or with connecting to the internet. For these types of problems, you will want to view the Troubleshooting options.
  • To get there, click Troubleshootingat the bottom of the Action Center pane.


make-money-468x60