Social Icons

Friday, 14 September 2012

How to Create and Configure VPN Site to Site On ISA Server 2006


F.1
The first, we need setup
Configure IP Address at lab machines as figure 1
Join server ISA-msviet to DCmsviet (msviet.com)
Join server ISA-vispro to Dcvispro (vispro.com)
Step 2:
At ISA-msviet create new user: vispro / password
At ISA-vispro create new user: msviet / password
At the moment, confer these user have allow access in Dial-in Tab
Step 3:
Install Isa 2006 standar to ISA-msviet and ISA-vispro
Configure ISA rule, the following figure:
F.2

The IP range: 100.100.100.1 – 100.100.100.254 (customize) is virtual range IP which assigned automatic for clientvpn access to Internal (192.168.10.0/24)
To continue, select Remote sites Tab: create new connection

F.3


Note: site name = username which create at last step, here( ISA-mviet) sitename= vispro

Select Point-to-Point at next table.
In table Remote Site Gateways, enter the IP Address of Remote site VPN server that allow Internal connect out site, here we type 192.168.1.201 – interface WAN in ISA-vispro.
Click next, we to Remote Authentication tab, at that type user remote is created out site (vispro) – msviet / password
The part Network Address, specify IP range Internal on out site, at here we type 192.168.11.1 - 192.168.11.254
To continue, click next and select protocol (all outbound traffic), the end click finish.
Step 4:
Right mouse on Virtual Private Network and select properties, at tab access network we tick EXT, vispro as following figure:

F.4

Ok, we configure successful in ISA-msviet. Analog simulator, we’ll configuration on server ISA-vispro


Step 5: at both ISA server,
Start Routing and Remote access, ensure Network interface is connected

F.5


Note, in ISA2006, we must edit system policy on Firewall Policy ( both isa server)

F.6
Now, we can access resource from site msviet to site vispro.a

The Ultimate Post Installation Utility for Apple, Mac Book

MultiBeast is an all-in-one post-installation tool designed to enable boot from hard drive, and install support for Audio, Network, and Graphics. It contains two different complete post-installation solutions: EasyBeast and UserDSDT. In addition it includes System Utilities to rebuild caches and repair permissions and a collection of drivers, boot loaders, boot time config files and handy software.

Choose one of the following options directly following a fresh installation and update:

EasyBeast is a DSDT-free solution for any Core/Core2/Core i system. It installs all of the essentials to allow your system to boot from the hard drive. Audio, Graphics and Network will have to be enabled separately.

UserDSDT is a bare-minimum solution for those who have their own pre-edited DSDT. Place your DSDT.aml on the desktop before install. Audio, Graphics and Network will have to be enabled separately.

For full guide and method, check out iBoot + MultiBeast.

For demonstration videos and updates, check out MultiBeast 2.0.

How to Install Mac OS X on any Intel Based PC By iBoot and MultiBeast

Any OSx86 installation guide can seem daunting at first glance, especially when trying to remember cryptic terminal commands and sorting through volumes of misinformation on the web. This guide requires no coding, terminal work, or Mac experience of any kind. You will not need access to a Mac. In fact, it's easier and faster for me to install Snow Leopard with fully working components on my system than it is to install Windows 7. And more fun.

The iBoot + MultiBeast method is designed and tested for any desktop or laptop running the latest line of Intel processors, the Core i3/i5/i7s. I have had reports of success with older machines as well including CoreDuo, Core2Duo, and even Pentium 4. However, AMD processors are not supported.

YOU WILL NEED

  • A computer running an Intel Processor
  • A blank CD
  • A Mac OS X Snow Leopard Retail DVD
  • To leave any fear of your computer at the door.
  • Patience and humility- it may not work out perfectly the first time- but with enough tenacity and grit, you'll reach the promised land. It's easy to get frustrated, but don't give up! There are a community of users with similar hardware in the tonymacx86 Forum to provide support if you get stuck.
BEFORE YOU BEGIN
  • If you have greater than 4gb of RAM, remove the extra RAM for a maximum of 4gb. You can put back any extra RAM in after the installation process.
  • Use only 1 graphics card in the 1st PCIe slot with 1 monitor plugged in.
  • Remove any hard drives besides the blank drive being used for OS X.
  • Remove any USB peripherals besides keyboard and mouse.
  • Remove any PCI cards besides graphics- they may not be Mac compatible.
  • If using a Gigabyte 1156 board, use the blue Intel SATA ports- not the white Gigabyte SATA ports.
  • It's best to use an empty hard drive- you will have to partition and format the drive.
  • Always back up any of your important data.
STEP 1: BIOS SETTINGS
You will need to set your BIOS to ACHI mode and your Boot Priority to boot from CD-ROM first. This is the most important step, and one many people overlook. Make sure your bios settings match these. It's not difficult- the only thing I did on my Gigabyte board besides setting Boot Priority to CD/DVD first was set Optimized Defaults, change SATA to AHCI mode, and set HPET to 64-bit mode.

STEP 2: INSTALL MAC OS X

In order to boot the Mac OS X Retail DVD, you'll need to download and burn iBoot. For desktops and laptops using unsupported Intel CPUs and graphics, a legacy version of iBoot can be downloaded here.
  1. Download iBoot
  2. Burn the image to CD
  3. Place iBoot in CD/DVD drive
  4. Restart computer
  5. At boot prompt, eject iBoot


  6. Insert your Mac OS X Snow Leopard Retail DVD and press F5
  7. When you see the screen below, press enter to begin the boot process
  8. When you get to the installation screen, open Utilities/Disk Utility. NOTE: If you cannot get to the installation screen, retry from Step 4, type PCIRootUID=1 before hitting enter. If that doesn't work then try PCIRootUID=1 -x or just -x which will enter Mac OS X Safe Mode and will allow you to proceed. For some graphics cards, use GraphicsEnabler=No boot flag to proceed.
  9. Partition your hard drive to GUID Partition Table
  10. Format your hard drive to Mac OS Extended (Journaled). NOTE: The bootloader can only boot from a disk or partition of 1 TB or less. Partition larger drives.
  11. For the purposes of this guide, name it Snow Leopard. You can rename it later.
  12. Close Disk Utility
  13. When the installer asks you where to install, choose Snow Leopard
  14. Choose Customize‚ and uncheck additional options. This will hasten the install process. You can always install this stuff later.
  15. Restart computer.
  16. Place iBoot back in drive.
  17. When you get to the boot selection screen, choose your new Snow Leopard installation.
  18. View the super-cool Mac OS X Snow Leopard Welcome Video, and set up your computer!

STEP 3: UPDATE TO 10.6.8
If you have a Sandy Bridge system, please follow these specialized instructions to update to 10.6.8.
  1. Open Finder and navigate to your Snow Leopard drive.
  2. Download the Mac OS X 10.6.8 Combo Update
  3. Download MultiBeast
  4. Open MultiBeast- don't run it yet, just leave it open. Set up windows as shown.
  5. Mount MacOSXUpdCombo10.6.8.dmg
  6. Install MacOSXUpdCombo10.6.8.pkg
  7. Upon completion, the installer will ask you to reboot. DO NOT REBOOT.
  8. Switch to the already open MultiBeast. If it closes, just re-open it.
STEP 4: MULTIBEAST
MultiBeast is an all-in-one post-installation tool designed to enable boot from hard drive, and install support for Audio, Network, and Graphics. It contains two different complete post-installation solutions: EasyBeast and UserDSDT. In addition it includes System Utilities to rebuild caches and repair permissions and a collection of drivers, boot loaders, boot time config files and handy software.

Choose one of the following options directly following a fresh installation and update:

EasyBeast is a DSDT-free solution for any Core/Core2/Core i system. It installs all of the essentials to allow your system to boot from the hard drive. Audio, Graphics and Network will have to be enabled separately.

UserDSDT is a bare-minimum solution for those who have their own pre-edited DSDT. Place your DSDT.aml on the desktop before install. Audio, Graphics and Network will have to be enabled separately. HINT: Check the DSDT Database for a pre-edited DSDT.
  1. Run MultiBeast.
  2. If you have a custom DSDT that's been edited, place the file on your desktop and choose UserDSDT.
  3. All others select EasyBeast
  4. Select System Utilities.
  5. Optionally, you may install further drivers via Advanced Options to enable ethernet, sound, graphics, etc... Be sure to read the documentation provided about each installation option. NOTE: EasyBeast, and UserDSDT install the bootloader by default, so you'll not need to check that option.
  6. MultiBeast Demo Videos
  7. Install to Snow Leopard- it should take about 4 minutes to run scripts.
  8. Eject iBoot.
  9. Reboot- from your new Snow Leopard installation drive.
If your drive doesn't boot on its own, and you get an error referencing boot0, fix it using the methods listed here.

Congratulations! You're done!!

Your PC is now fully operational, while running the latest version of Mac OS X Snow Leopard! And you have a nice Boot CD to get into your system in case things go awry. Boot your system from iBoot if you have issues. You may run MultiBeast as often as you like.

If you can't boot, try typing -x at the boot prompt to enter safe mode, or just boot with iBoot. When you get to the desktop, you can make all of the changes you need to. The best way to start fresh is delete whatever you're trying to get rid of- including the whole /Extra folder, as most kexts are installed there. Then you can re-run MultiBeast. As long as you rebuild caches and repair permissions after you're done, you can do just about anything you want to /Extra/Extensions and /System/Library/Extensions. Anything can be tweaked and enabled upon subsequent uses of MultiBeast.

If you've had success using iBoot + MultiBeast, consider a contribution to help keep the sites going. We're constantly updating and tweaking our tools to help you.

Thanks in advance!

-tonymacx86 & MacMan
For our most current workarounds and solutions for issues such as USB and audio, check out the Mac OS X 10.6.3 Update, Mac OS X 10.6.4 Update, Mac OS X 10.6.5 Update, Mac OS X 10.6.6 Update, Mac OS X 10.6.7 Update, and Mac OS X 10.6.8 Update articles. Good luck, and see you on the forum!

How to Install Mac OS X Lion Using an All In One Bootable USB Drive : UniBeast :

Introducing UniBeast- our new tool to create a bootable USB drive from your Mac App Store purchased copy of Install Mac OS X Lion or Apple Store purchased Mac OS X Lion USB Thumb Drive. This all-in-one bootable USB drive can also be used as a rescue boot drive for system recovery.

UniBeast + MultiBeast is the easiest method to do a clean install of Mac OS X Lion or update any Snow Leopard system. The following guide requires no coding, terminal work, or Mac experience of any kind.

You Will Need


8GB or larger USB Drive

Install Mac OS X Lion Application

OR
Mac OS X Lion USB Thumb Drive
STEP 1: Purchase Mac OS X Lion
The operating system is not free. There are two ways to purchase your copy of Mac OS X Lion. The simplest way is to download the Application from the Mac App Store. Alternately, the OS X Lion USB Thumb is available online at Apple.com or any Apple Store retail location.

STEP 2: Create a Bootable USB Drive Using UniBeast
Take a deep breath and take your time- this is pretty simple, but it's easy to miss things if you rush. Follow each step to the letter.

1. Insert USB drive
2. Open /Applications/Utilities/Disk Utility
3. Highlight USB drive in left column
4. Click Partition tab
5. Click Current and choose 1 Partition

6. Click Options...
7. Choose Master Boot Record
8. Under Name: type USB (You can rename it later)
9. Under Format: choose Mac OS Extended (Journaled)
10. Click Apply then Partition
11. If using the Install Mac OS X Lion Application, it must be in /Applications folder.
12. If using the Mac OS X Lion USB Thumb Drive, make sure it's plugged in and mounted.
13. Download and run UniBeast
14. Click Continue, Continue, Continue, Agree
15. At Destination Select, choose USB and click Continue
16. If using the Mac App Store "Install Mac OS X Lion" App choose that option.
17. If using the Apple Store "OS X Lion USB Thumb Drive" choose that option.
18. If using a laptop, choose Laptop Support in addition to one of the above options.
19. Click Continue
20. Enter password and click Install

The process will take about 10-15 minutes, depending on system and drive speed, but will show hours. Do not unplug or stop during this time.

STEP 3: Install Mac OS X Lion
You're almost done! All you need to do is boot from the USB drive and install! Your hard drive should be set in BIOS to AHCI mode. For recommended BIOS settings and screenshots, check out iBoot + MultiBeast.

1. If you have a Gigabyte motherboard press F12 to choose boot device.


2. Choose USB-HDD
3. At Chimera Boot Screen, choose USB

You may have to type extra command line flags to reach the installer.
  • Asus Motherboard + NVIDIA Graphics - type PCIRootUID=0
  • Unsupported graphics - type GraphicsEnabler=No
  • Boot in Single-user mode - type -s
  • Boot in Verbose mode - type -v
  • Boot in Safe mode - type -x

4. When you arrive at the Installer, choose language.

If updating an existing Snow Leopard install, skip 5-14.

5. In the top menubar choose Utilities, and open Disk Utility
6. Highlight your target hard drive for the Lion installation in left column.
7. Click Partition tab
8. Click Current and choose 1 Partition
9. Click Options...
10. Choose GUID Partition Method
11. Under Name: type Lion (You can rename it later)
12. Under Format: choose Mac OS Extended (Journaled)
13. Click Apply then Partition
14. Close Disk Utility
15. When the installer asks you where to install, choose Lion, or your existing install.
16. Upon completion, restart system

The installation is complete, but the drive isn't bootable yet. Boot from the USB again, this time choosing Lion.

17. If you have a Gigabyte motherboard, press F12 to choose boot device.
18. Choose USB-HDD
19. At Chimera Boot Screen, choose your new Lion installation.


STEP 4: Post-Installation Using MultiBeast
MultiBeast is an all-in-one post-installation tool designed to enable boot from hard drive, and install support for Audio, Network, and Graphics. In addition it includes System Utilities to repair permissions and a collection of drivers, bootloaders, config files and handy software.

1. Complete Mac OS X Lion setup.
2. When you arrive at desktop, open Safari
3. Browse to tonymacx86.com and log in. If you don't have a user account, create one!
4. Go to tonymacx86.com/downloads to download the latest MultiBeast
5. Go to the DSDT Database to download your motherboard's DSDT
6. Open Downloads folder and move the .aml file to the Desktop
7. Open and run Multibeast's UserDSDT
8. Restart system

If your drive doesn't boot on its own, and you get an error referencing boot0, fix it using the methods listed here.


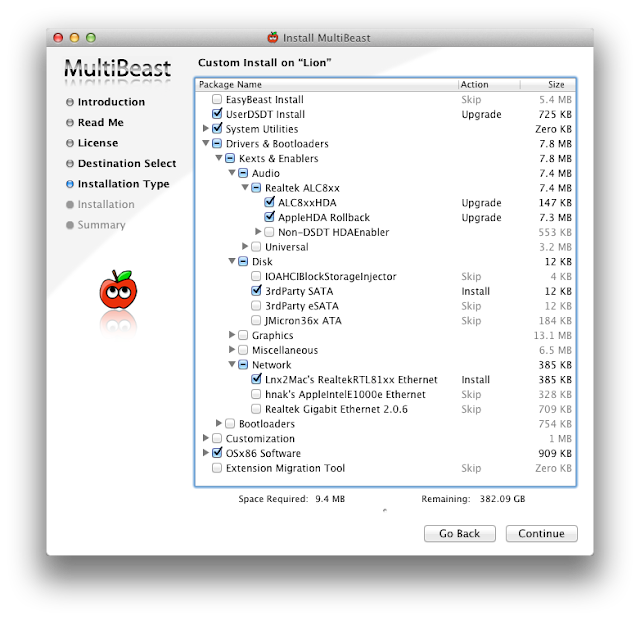
The above photo will provide general post-installation support for any recommended CustoMac build.

You may also use MultiBeast to install further drivers to enable ethernet, sound, graphics, etc... Be sure to read the documentation provided in MultiBeast Features.pdf about each option. Both UserDSDT and EasyBeast install the proper bootloader by default, so you'll not need to check that option.

Congratulations!


You now have a fully updated bootable version of Mac OS X Lion on your CustoMac! And a handy USB rescue drive to boot from in case things go pear-shaped. It's easy to get frustrated, but don't give up! If you get stuck, there are many users with similar hardware in the tonymacx86 Forum to provide support. Special thanks to everyone in the community, and our Mods for testing!

If you've had success using this guide, consider a contribution to help keep the sites going. We're constantly updating and tweaking our tools to help you.

Thursday, 13 September 2012

How To Share Scanner Remotly on Lo0cal Area Network (Lan) With BlindScanner Software

artwork.jpg

The BlindScanner software will share and open access to remote scanner on the local area network that is not directly connected to your computer, but installed on a computer located in the neighboring room, for example. Easiness of use, saving to various formats, compressing images, scanning pages automatically, scanning multiple pages, supporting an automatic feeder - these are not all program features. Now you can scan images using your favorite software, text and image editors, just select BlindScanner Pro in the list of installed scanners, specify the necessary color, resolution and size of the image.
The program will be useful not only in office where it will help you save several hundred dollars you could spend on a new scanner, but also at home for scanning from a notebook in a wireless home local area network. BlindScanner works with any flatbed TWAIN scanner and also supports scanners with automatic feeders.

Client of BlindScanner Pro

For Further Detail Visit The Official Site : BlindScanner

How To Add Random Posts Widget On Blogger, Blogspot

Random posts widget is another great widget and very important in a blog also if you want to show your readers other stuffs you have in your blog. This widget I have here display some of your posts randomly. Same as the related posts widget but different because this only shows your other posts either related or not. Below is an image of this widget.


1. Go to your Dashboard > Design.
2. Then click on Add a Gadget and select HTML/JavaScript.
3. Copy the code below and paste on the HTML/JavaScript gadget.


4. Preview your blog.
5. If you can see the gadget running perfectly then SAVE it.


Configuration:

numofpost=6 - the number of posts to be shown in the widget. You can change the numerical value as you want.


Just follow the steps and you will have it in your blog in no time. Leave a comment you have something to say.

How To Add Meta Tags in Blogger , Blogspot for SEO

Meta tags / content is a very important factor in search engine optimization. This means that this will help search engine crawlers to find your blog. This tags will not be seen in your homepage or your blog because this is placed in the blog HTML and only crawlers and of course you can see it. Some blogger templates have built-in meta tags in their blogger HTML so the only thing to do is to configure the meta tags. But most of the blogger templates don't have meta tags in their blog HTML so it is your initiative to add the meta tags to make your blog more SEO friendly.


Adding Meta Tags / Content On Blogger HTML

Please Backup your Blog Template Before Updating Meta Tags for safety Reasons
  1. Now go to your Dashboard > Design > Edit HTML.
  2. Find the line below in your HTML.
3. Configure the js below:


Link

DESCRIPTION HERE : Change it with your blog description.
KEYWORDS HERE : Change it your KEYWORDS, separate keywords with comma.


4. Now add the configured script just below the code in step 2.
5. SAVE your template.

If you followed the steps above then you successfully added Meta Tags / Content in your blog HTML. Good luck in your SEO adventure. Drop a comment if you have something to say!

How to Improve Your Blog Search Engine Optimization By Changing Your Post Title Before Blog, Blogger Name

how to improve search engine optimization (SEO) of your Blogger blog (Blogspot blog) by optimizing your post title tags for search engines like Google and Yahoo. How to improve search engine results by optimizing post title tags.

By default your Blogger blog (Blogspot blog) does not have search engine optimised title tags. This puts your blog at a disadvantage compared to other blogs that have inbuilt SEO or enhanced SEO modules as these sites are likely to be placed more highly in search engine results.

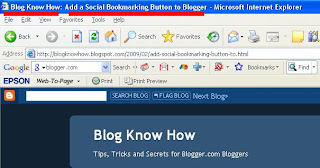
The title tags of your blog are ordered by blog name first followed by the title of the post. This is not ideal for popular search engines like Google and Yahoo which give more importance to the first words of a title. By way of example take a look at how the title tags of this blog were viewed in a browser before any SEO. Note the order of the tags: Blog Name | Post Name.

How Blogger Title Tags are viewed in an IE browser

When this site was first indexed by Google this is the search engine results this site received. Note how the blog name is first in all the results.

Search engine result for blogknowhow.blogspot.com before the tweak

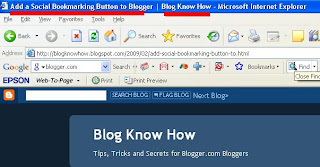
Fortunately there is a simple tweak to your template which can rectify this problem. By simply reversing the position of the blog name and page title significant improvement can be gained in search engine results. See the difference in the example below:

How Your Blogger Title Tags are viewed in your browser with change

Follow the step by step guide below to achieve higher rankings in search engine results.

Tweak of Title Tags for New Blogger (beta) Blogs

1. Login to your blog at Blogger.com and navigate to Design > Edit HTML

2. Backup your template by downloading it to your computer. This will ensure that you can upload your template before these changes in case of problems.

3. Replace the following line of code (about 5-10 lines from the top):

<data:blog.pageTitle/>


with (highlight code, Ctrl + C to copy)


<data:blog.pageName/> |<br /><data:blog.title/>

<data:blog.pageTitle/>

4. Click on Save Template and then View Blog. Navigate to an individual post. You will see that your page title is now first followed by your blog title. A pipe symbol separates the two.


Below is an example of the change in search engine results since the tweak was implemented for this site. Since optimising for search engine friendly page titles there has been a significant improvement in traffic accessing the site. This didn't happen right away but if you too implement this page title tweak and continue to deliver quality content you are on your way toward higher search engine rankings.

Blog Know How Search Engine Results in Google with Title Tags Tweaked

Troubleshooting
Several readers have reported issues with the line:


If you experience problems try inserting this line instead which works on many blogs. Ensure you have double quote marks around item followed by a single quote mark:


For more on this please read the comments section.

UPDATE
Due to the number of readers experiencing problems with their browsers reading this post I have created a PDF file of this article which is free to download

This Blogger tutorial (Blogspot tutorial) has discussed how to adapt the title tags of a Blogger (Blogspot) blog to improve search engine optimization (SEO) by Google,Yahoo and other search engines.

Wednesday, 12 September 2012

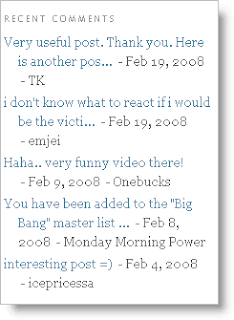
How to add Recent Comments Widget with Avatars and Without AvatarsTo Blogger

If in the past tutorial i've talked about a simple Recent Comments widget, now i'll be sharing to you a stylish Recent comments widget with round avatars, which comes along with comment excerpts.
You have the option to change default Anonymous Avatar Image as well.

How to add recent comments widget with avatars

Step 1. Go to Blogger Dashboard, then go to Design >> Page Elements and Add a Gadget.
In the popup window scroll down + choose HTML/Javascript and paste in the following code:

If Gadget Script not Show than Click Here to View COdes --> CLICK

Settings:
Link

- Replace your-blog with the name of your blog.
- Replace the "5" values in red, with the number of comments you want to appear, from:

  • numComments = 5

and

  • &max-results=5

- To change the anonymous avatar, replace the following address with your own:

  • http://www.gravatar.com/avatar/?d=mm

- To change the size of the avatar, replace 60 value in green with your own

After you've made the changes, click Save... and you're done!

WITHOUT AVATARS


1. Log in to your dashboard--> layout- ->Page Elements

2. Click on 'Add a Gadget.' Select 'HTML/Javascript'.

3. Select the whole code given below and paste it in the widget box you have just opened above.
Note : Replace "http://YOURBLOG.blogspot.com" with Your blogspot URL.

4. Now Click Save and Refresh Your site.

IF YOU DONT FIND THE CODE PLEASE CLICK HERE FOR CODES
make-money-468x60