Social Icons

Wednesday, 4 July 2012

Telenor, Jazz, Ufone, Warid, Zong Balance Check Inquiry No


valued customers, Balance check Inquiry request on *444#, *222# and *111# will be charged @ 10 paisa + tax.

How to check Balance of Telenor Jazz Ufone Zong Warid

i am sharing the method of balance chaking of all networks by entring a USSD command string like below.

Jazz *111#

Ufone *124#

Warid *100#

Zong *222#

Telenor *444#


Mobile Networks company start to charge on balance inquires.But still customers searching the tricks to get free balance inquiries.

All Networks Rumored all codes to get free balance inquiries.

some worked most of them are not‚ and some got blocked. Here we got another one for you‚ try it out.

Ufone *333*1*2*1#

Zong *100# and *310#

Telenor **444###

How to Reset or Crack any Windows Password (Windows XP, Vista or Seven)

Image

This small software might be useful for you to reset your Windows XP or Vista Password in a single attempt.

Besides this applet would be able to help you in the case of Finding your computer's BIOS/CMOS password.
Link
Well download this Reset Windows Password CD.nrg | 3.22MB, and burn it on a Writable CD or put the files in your USB PEN drive by using NERO IMAGE DRIVE or any other software.

Download this Reset or Crack any Windows Password
http://www.mediafire.com/?sharekey=e88cc2f7d5aded4595af63b7d44918aa4753197ff62e4314

Password: password

Now reset Windows 7 Password also!!!
Burn this new ISO on a flash drive or CD using PowerISO (latest version)
With the .ISO, now you can reset password for Windows XP, Vista, and 7

Download: http://www.mediafire.com/?7krlqhfb8764a79

Enjoy!

How to Optimize Your PC for Best Performance in Easy 10 Steps


1.Update ur antivirus

2.Scan 4 viruses weekly

3.Remove unnecesery startup pgrms

4.shutdown system properly

5. Use disk defragmented or disk cleanup utility weekly.

6. Remove unwanted restore data.

7. Remove temp file

8. Keep cpu in dustfree area or surface
clean cpu as far as possible

9. Remove dust from cpu or cpu fans by any vaccum cleaner or blower or by brush.

10. Keep updating your system or hardware firmware.

How To Set Password On Your USB Pen Drive Easy


USB Flash drives are one of the easiest ways to transfer data. But what happens when you lost your USB drive which has some important files which you don’t want to share. Or forget your USB on your office desk and worried about the data that you save on your USB pen drive. Data in a USB Flash Drive is protected by a password. All you need a free USB security app USB Flash Security, which allows you to protect the data inside your USB flash drive with a password.


Use of this app is so simple just download the app on your Windows PC and install the app. After the installation a new dialog box appears on your Windows screen asking you to connect the USB flash drive to the computer.

"USB Flash Security" makes the following two areas in USB Flash Drive:
Small area about 0.5MB to save "Release tool"
Area to save data that you want to protect
The application has both free and paid version and available for both 32-bit and 64-bit versions of Windows XP, Windows Vista, Windows 7 and Windows 8. All in all, USB Flash Security is a simple and effective solution to lock your USB Flash Drive.


Download USB Flash Security

http://techgroovers.blogspot.com/2012/04/how-to-put-

USB Flash drives are one of the easiest ways to transfer data. But what happens when you lost your USB drive which has some important files which you don’t want to share. Or forget your USB on your office desk and worried about the data that you save on your USB pen drive. Data in a USB Flash Drive is protected by a password. All you need a free USB security app USB Flash Security, which allows you to protect the data inside your USB flash drive with a password.


Use of this app is so simple just download the app on your Windows PC and install the app. After the installation a new dialog box appears on your Windows screen asking you to connect the USB flash drive to the computer.

"USB Flash Security" makes the following two areas in USB Flash Drive:
Small area about 0.5MB to save "Release tool"
Area to save data that you want to protect
The application has both free and paid version and available for both 32-bit and 64-bit versions of Windows XP, Windows Vista, Windows 7 and Windows 8. All in all, USB Flash Security is a simple and effective solution to lock your USB Flash Drive.


Download USB Flash Security

How to Set-up Ad hoc Wifi network in Windows Vista / XP Without Router

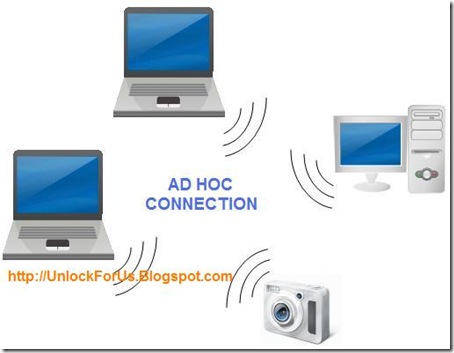
adhocnetwork

Based on my observation, an adhoc network is a wireless network connection without a central node. The network is dispersed which requires no base station (Router).

Using the Network Setup, devices such as PSP, Laptops, and other portable gaming consoles can search, share and link each other within range without using a router or a hub.

Advantage

  1. Easy to setup: No additional Software is needed and It's FREE
  2. Nowadays, By default Wi-fi or Wireless Card is included when you bought a computer especially in laptops. Even if it's not included USB type Wifi is now cheap.
  3. Portability and Mobility
  4. No more wires and additional devices such as hub and routers

Main Disadvantage

If you'll share or connect other computers and devices to the Internet. The computer that is connected to the Internet (Gateway) must always be turned on. Unlike using a router, you can turn off any computers in the network.

Read more: Internet Connection Sharing (ICS) in Ad Hoc Connection

Distance: Computers and devices in ad hoc connection must be within 30 feet of each other (although you can extend this by using a passive repeater by simply creating a parabolic antenna using a USB type Wi-fi and other types of antenna)

How to Create an Ad hoc Wireless Network (Automatic IP Address Configuration)

Windows Vista

1. Launching Setup a Network or connection Window

Choose "Set up a wireless ad hoc (computer-to-computer) network Set up a temporary network for sharing files or an Internet connection"
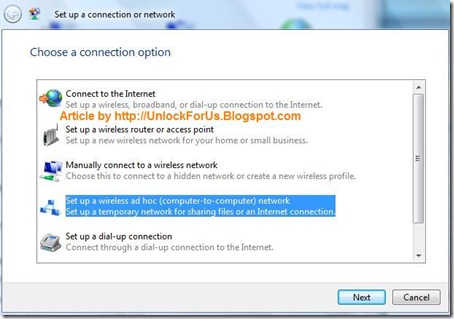
setup

There are several ways to access this Window, here they are:

a. Right-Click the Wireless Network Icon in the Taskbar's Notification Area > Connect to a Network > At the Bottom, Click the Setup a Connection or Network

b. Right-Click the Wireless Network Icon from the Notification Are > Network and Sharing Center > In the Left Pane, choose Setup a Connection or Network link

c. Start Menu > Connect To Button > At the Bottom, Click the Setup a Connection or Network link

d. Using the New Control Panel View: Start Menu > Control Panel > View network status and tasks > In the Left Pane, choose Setup a Connection or Network link

controlpanelhome2

Using the Classic Control Panel View: Start Menu > Control Panel > Network and Sharing Center > In the Left Pane, choose Setup a Connection or Network link

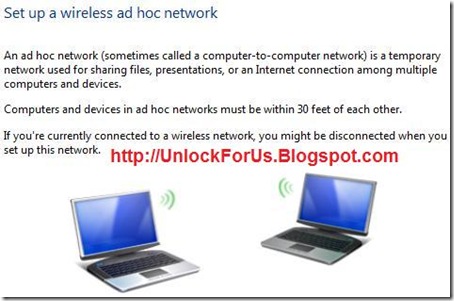
2. Creating Ad hoc Network Window
setup22

"Set up a wireless ad hoc network

An ad hoc network (sometimes called a computer-to-computer network) is a temporary network used for sharing files, presentations, or an Internet connection among multiple computers and devices.

Computers and devices in ad hoc networks must be within 30 feet of each other.

If you're currently Connected to a wireless network, you might be disconnected when you set up this network."

Click Next Button to Start Creating Ad hoc Network.

3. Write the Network Name, Password (Security Key) and other Security options (No authentication (Open)/WEP/WPA2-Personal)
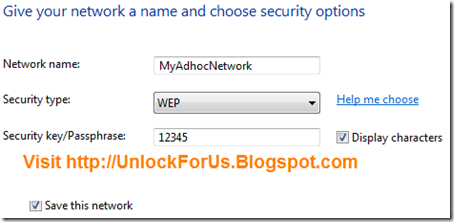
setup33

4. Click the Next Button to Create and Connect to the Network
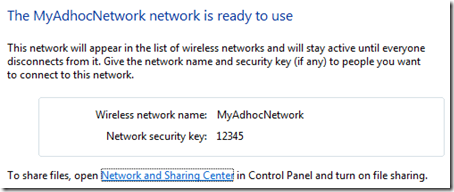
setup44

To be able to activate the Ad hoc Network that you have just created, more than 1 computers or devices must be connected to the network.

Setting up the IP-address in Vista/XP
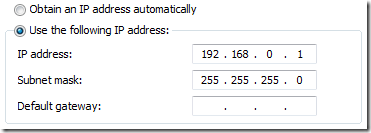
1

1. From my previous tip: Open the Network Connections

type and launch the command: ncpa.cpl

or Control ncpa.cpl

2. Right-Click the Wireless Network Connection > Properties > Internet Protocol Version 4 (TCP/IPv4) > Properties Button > Select "Use the following IP address:"

Examples: Class C - Most Common Home Configuration

Computer A Computer B Device C

192.168.0.1

192.168.0.2

192.168.0.3

255.255.255.0 255.255.255.0 255.255.255.0

Range: 192.168.0.0 - 192.168.255.255

For more information: http://en.wikipedia.org/wiki/IP_address

To Connect: Right-Click the Wireless Icon > Connect to a Network > Find the name of the ad hoc Network > Click the Connect Button > Input the Passphrase or Security Key and finally Click the Connect Button again.

Windows XP

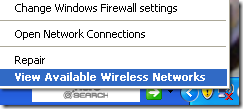
viewwirelessnetworks


Right-Click the Wireless Network Icon > Choose View Network Wireless Networks

In the Left Pane > Click "Change advanced settings" link
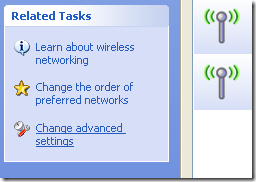

changeadvancedsettings

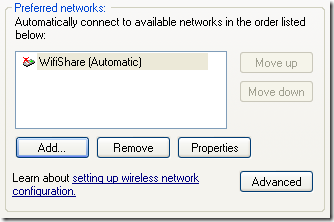
Make sure that you are using Windows to configure your wireless network settings and click the Add Button
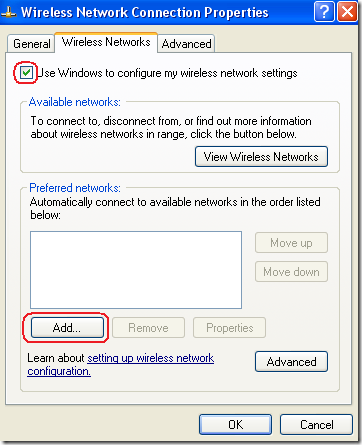
adding

Enter the Network Name (SSID), Set the Network Authentication, Data Encryption, Network key and Choose the option "This is a computer-to-computer (ad hoc) network; wireless access points are not used.
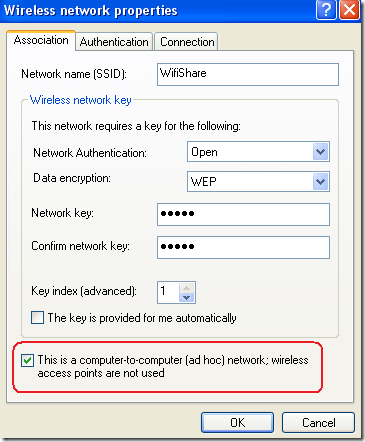
namenetworkkey

Finished.
finished

Remote Administrator (RADMIN) V.2.2 For Remote Access Of any Computer On LAN and WAN


Description:-Radmin is one of the safest, fastest and most popular remote access software solutions designed for Windows.
A remote computer screen can be viewed on a local monitor in either a window or a full-screen display. All mouse movements and keystrokes are transferred directly to the remote computer.
Files can be transferred to and from the remote computer, and communication with the remote computer's user is possible by either Text Chat or Voice Chat.
Features
Windows 7 сompatible
  • Full control of the remote computer
  • View the remote screen
  • Transfer files
  • DirectScreenTransfer™ technology
  • provides the highest operating speed
  • All transferred data is protected
  • with 256-bit AES encryption
  • Shutdown or reboot
  • Multi-user Text and Voice Chat
  • Send message
  • Intel® AMT support
  • Multiple monitors support
  • Easy and user-friendly interface
  • Free Technical Support


How to Install and Configure Apache Server On Your Windows XP

After downloaded Apache HTTP Server 2.2.14, I continued to install it on my Windows system:

1. Double-click apache_2.2.14-win32-x86-no_ssl.msi. The installation wizard starts.

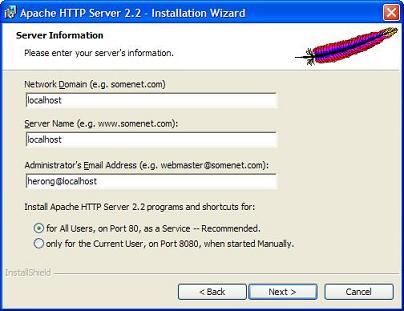
2. Follow the instruction given by the wizard until you see the "Server Information" setting screen. Since I will be using the Web server on my local machine only, I entered the following settings:

Network Domain: localhost Server Name: localhost Administrator's Email Address: herong@localhost 


Apache 2.2 Installation Settings

3. When the "Destination Folder" screen shows up, click the "Change" button to set "C:\local\apache\" as the destination folder.

4. When the installation is done. The Apache Web server should be running as a background process.

To verify the installation, open a Web browser with http://localhost. You should see the Apache server default home page saying: "It works!".

Tuesday, 3 July 2012

How to Easy Disabel Your Network User USB, CDROM, CONTROL PANEL By Intelli Admin Network Administrator 3.0


Network Administrator allows you to make tweaks, changes, and updates across your network. It has an amazing plugin system that is packed full of actions. Want to switch 1000 hosts to DHCP? Have new DNS servers? No problem, with this plugin you can change them in a few clicks.

Daylight Saving Time Update
Network Administrator 3 Daylight Saving Time Update
Easily update those older NT 4.1, Windows 2000, and XP machines to the latest DST settings without being forced to purchase a $5000 patch from Microsoft.

Disable CDROM and DVD Drives
Network Administrator 3 Disable CDROM
Keep users from installing unwanted software. Disable and enable their CDROM / DVD drives with ease.

Download Link:
- IntelliAdmin Network Administrator v2010.3.0.111 + Keygen

How To Backup Your Email Data On Outlook 2007 | Backup MS Outlook 2007

How to backup your email data on Outlook 2007

Backup:

1. The data is saved in a Personal Folder File (.pst) only if you are not using Microsoft Exchange account or Windows Live Mail account. For Microsoft Exchange Account or Windows Live Mail account your backup data is saved locally on your computer instead of the e-mail server.

There are two .pst files, one is the personal folder file which includes all of your Outlook folders, such as the Inbox, Calendar, tasks and Contacts and the other is the Archive Folder which includes archive messages of your Outlook.


2. You can easily locate the data files in outlook 2007 using the following steps.There are two ways to access the location of your data files.
Go to Main Menu of Outlook 2007,
1. click File > Data File Management...
2. click Tools > Account Settings...


3. If "Data Files" tab is not selected, click on the "Data Files" tab. You may have a single data file or multiple data files. These "Data Files" are where you store your email messages, calendar, tasks and other items.


4. Highlight the data file that you are interested in backing up and Click on the Open Folder icon. Windows Explorer will be opened automatically and will take you to the location where this data file is stored. Now select the outlook.pst and archive.pst file you want to backup.

5. Within the folder you should find an outlook.pst file . Burn this file to a CDROM disk , Hard disk or other backup source. If you archive your email, be sure to backup the archive.pst file as well.
Note: Prior to backing up these files, Outlook will need to be closed.


The table below lists key Outlook files that you may want to back up in addition to your Personal Folder(s). You will need to completely exit Outlook prior to copying these files. Depending upon your configuration some or all of these files may be present in your Outlook directory.


Type of File Name or Extension
Personal Folders .pst files
Outlook Bar shortcuts .fav files
Rules Wizard rules .rwz files
RSS subscription names .sharing.xml.obi files
Known feed list for RSS .xml.kfl files
Nicknames .nick files
Customized toolbar settings outcmd.dat
Customized system folder views Views.dat
Macros and VBA programs VbaProject.otm
Signatures .rtf, .htm, and .txt files
Stationary .htm files
Templates .oft files
Dictionary .dic files


Restore :

If you have followed the steps above to backup your Outlook data, restoring is simple. All you do is copy the backup PST file(s) into the folder that you located when you initially backed up your work.

USB Pen Drive Not Detecting In Vista - Fix it Easy

You are using Windows Vista and pen drive is not detecting in Vista, the solution to fix the problem is below.

This problems arises when the service called “IDriverT”, which is responsible for detecting your newly attached devices and Install drivers for them somehow stops to work.
Lets see how to fix it.
To enable this service, follow these simple steps:
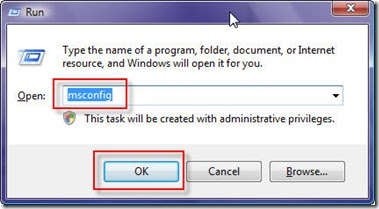
1. Press “Window Key + R”, this will open run prompt, type “msconfig” in it and press enter.


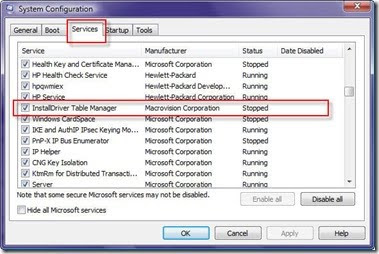
2. Above step will open System Configuration Window as seen below, on this windows press on Services tab.


3. In this windows Check the Service called “InstallDriver Table Manager” , click Apply and Ok. It may ask you to re-start your computer, restart it if it asks.

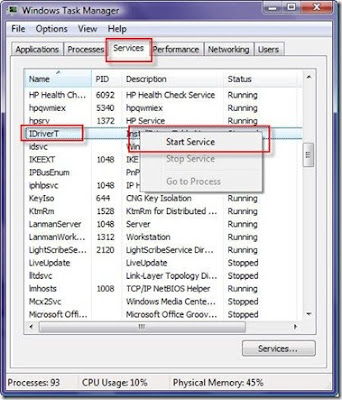
4. After restart, plug in the USB drive and give it a minute or so, it will recognize the pen-drive and will install it. If it does to install it even now, then follow the step 5 below to re-start the “IDriverT” service from task manager.

5. Press Shift+CTRL+ESC key together, it will open Task-Manager for you, on task manager, click on services Tab and locate the service named “IDriverT”, Right Click on it and Click Start Service.


The above method will fix the problem. If any doubt please use the "ASK any Question or Doubt" link at the top of the page for a quick reply to your email.

Sunday, 1 July 2012

how to Install and Run Windows XP in VMware


Windows XP has been the most famous and most useful operating system to its users till date. Well even if we are have to migrate to Windows 7, we will never forget the ability of Windows XP. There are a lot of programs which were supported by Windows XP but not in the later versions like Windows Vista and Windows 7. Now when we migrate to Windows 7, we will not be able to run such programs.

In order to solve the problem of incompatibility of software and drivers in Windows 7, we have been given the option of installing Virtual Windows XP using Microsoft Virtual PC. But the lone problem in this option is that the processor should support Virtual Machine.

Here we have given a technique with which you will be able to run Windows XP in Windows 7 without any Virtual XP software or Virtualization Supporting Processor. Moreover you can use your own CD or ISO backup of Windows XP to create the Virtual Machine and no need of downloading the XP Virtual PC from Microsoft.
Requirements:
Windows 7 installed Machine

Minimum 1 GB RAM.

Minimum 4 GB Free Hard Disk Space

Windows XP backup either CD or ISO file

OR

If you have downloaded Microsoft Virtual XP Mode, then refer the instruction at Step 6.
Step 1: Download and Install VMware Player 3.0.1. The download Links are given below.

Size: 90.0 MB
Step 2: Now we have to create a new Virtual Machine. Open VMware and clickCreate a New Virtual Machine as shown below.

Step 3: Select the location from which you are going to create the new Virtual Machine. If you have a CD then select the drive. If you have a back up file in an iso, then you can select the file.


Step 4: Enter the Windows XP key and the user name and password.


Step 5: Then you can set the location to be installed, maximum Disk space size and the RAM size. Follow the instructions normally. Finish the setup. It will continue to install Windows XP in your Virtual Machine.


Optional Note: While installing the Virtual Machine it may ask you to downloadVMware Tools for Windows 200 or later. It is recommended that you download it or you can download it later also.


After that, the installation process will continue by itself and Windows XP will start.


After successful installation Windows XP will start and you can see the System properties as shown below.

512 MB of RAM is set when installation(you can change the size in VM settings).

Now, you have successfully installed Windows XP virtual PC using VMware player. In order to quit Windows XP you can simply shutdown and quit VMware player.

To start the Windows again in virtual mode, open VMware Player and Select Windows XP in the left pane and Click Play virtual machine.


Let us discuss some of the issues which should be known by the users.

How to Transfer Data to and from Windows XP virtual Mode?

As you are running two different machines drag and drop will not work if you have not installed VMware tools. Even if you can copy directly, it takes more time. You can either use a flash drive or Disc drive to transfer data between Windows 7 and XP virtual mode. But this is not the optimal way. You need to map network drive in Windows 7 which has been shared from Virtual XP.

To enable file and folder sharing in Windows XP virtual Mode, you need to edit the settings. Click on Virtual Machine Settings as shown above to edit the settings.

Select Options and select Shared Folders. Set Always enabled and clickOK.


Now you need to share a folder with write permission as shown:

In Windows XP, right click on the folder or drive you want to share and selectShare and Security. Do not forget to check Allow network users to change my files.


Now after sharing the folder in Virtual XP, you need to map the folder in Windows 7 as shown below:

Right Click on My Computer and Select Map network drive. UnderNetwork search for the folder you have shared in Virtual XP Machine and clickOK.


You can copy or paste anything from or to the network location drive in Windows 7. This is how you can transfer files between Windows 7 and Windows XP virtual mode.

Removable Devices:

Now if you want to use a removable device like a flash drive, you can connect the device using the following setting:


You need to disconnect the device from the host in order to connect to the Virtual machine.

Step 6. Running Microsoft’s Windows XP Virtual PC:

All the above installation is not done using the Microsoft’s Virtual Windows XP PC. Above we used normal Windows XP installation CD. If you have downloaded Virtual XP PC from Download Windows XP Mode then, install it on your PC and then you can open the Virtual Machine from the VMware Player as follows.


Browse for the .vmx file in the folder you have installed the Virtual XP PC and Click Open. You can run it.

Finally, as you have successfully installed Windows XP Virtual PC in Windows 7 using VMware Player 3.0.1 you can enjoy the unbeatable features of Windows XP in Windows 7 also.


Note: No new Partition is created in your hard disk for the Virtual PC. Just a virtual disk file is created in your drive which will increase in size according to what you copy and install in your Virtual PC.

make-money-468x60