Social Icons

Showing posts with label Blogger. Show all posts

Thursday, 20 September 2012

How to Create Blog On Blogspot Free Complete Tuter With Pics


Hello Viewers, after so many days, I'm again with so popular & essential subject, "HOW TO MAKE A SITE IN BLOGSPOT.COM." But why we blog? Now it's the time of Globalization means the whole world have turned into a small village because of ICT & blog is the most powerful digital media to share your thoughts, opinion, comment's about any subject around the world. It's also the optional way to make some extra money from home. So why r we late?


After reading this post carefully you will be able 100% to make your one & own blogsite, under the tech giant Googles Unlimited hosting service & free blogspot domain. I'm saying again, "IT'S TOTALLY FREE!!" So no more delay, grab a chair & hook up with me. Now let's start........


First go to BLOGSPOT. Then SIGN UP for a free account and it's simple, needs no extra knowledge to create. Just like an email account creation. After completing your account SIGN IN. Then you'll see a page like this.


Means you got it. Then click on NEW POST. After that you'll see a page like this.


FOLLOW steps as shown in the pics. Give a name for your post in the title box. Then write/create the main article or anything by your CHOISE. You are not bound to select any topic. Allow readers comment by the allow/disallow radio button. After completing click on FINISH POST at the end of the page. You can edit your post by clicking on the tab named EDIT POSTS. You can edit & add pictures, videos and many more things as shown. Upload/directly select videos from worlds largest video sharing site YOUTUBE.COM


Blogspot.com has one more exclusive built in feature like create pages. As for example HOME, ABOUT ME, CONTACT US etc. All you have to do, click on EDIT PAGES, then create new page. Give a title, create information then publish. Then you'll see a Horizontal bar above your blog site like this.


You can create up to 10 different pages like it. It gives a more attractive look to your site. 


You are free to choose your own settings & personalization by the SETTINGS tab like this. There are so many options under this tab & very easy to understand & use. Just try it. If problem arises just inform me.


Blogspot.com is offering some attractive templates & advanced design to design your site freely. Just try, click on DESIGN as shown on the page.


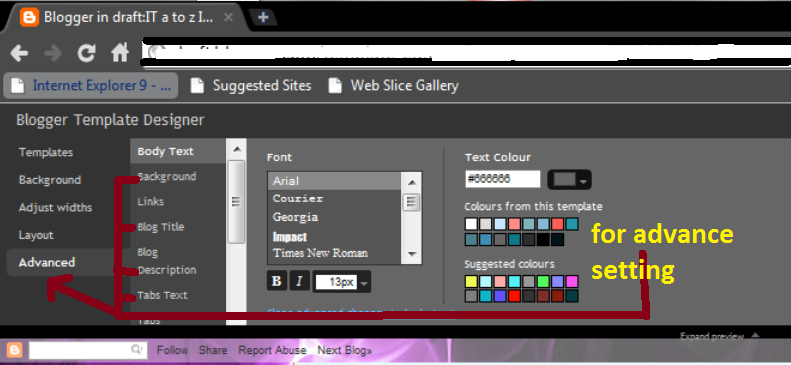
Set up page elements, add exclusive & wonderful free gadgets from Googles gadgets store. Design your site, make attractive it to your viewers. Here you'll find a sub tab named template designer. From here you can select a template that fit with your subject and can apply advance settings. There are so many templates, chose your own.


Give a background.


Adjust width for your main blog and side banners.


Choose a layout.


Then click on advance menu, set advance options to your site. Click on APPLY TO BLOG. 
Then finish and BACK TO BLOGGER.


Now just enjoy. Finally your site is ready to show. Checkout by clicking on VIEW BLOG.

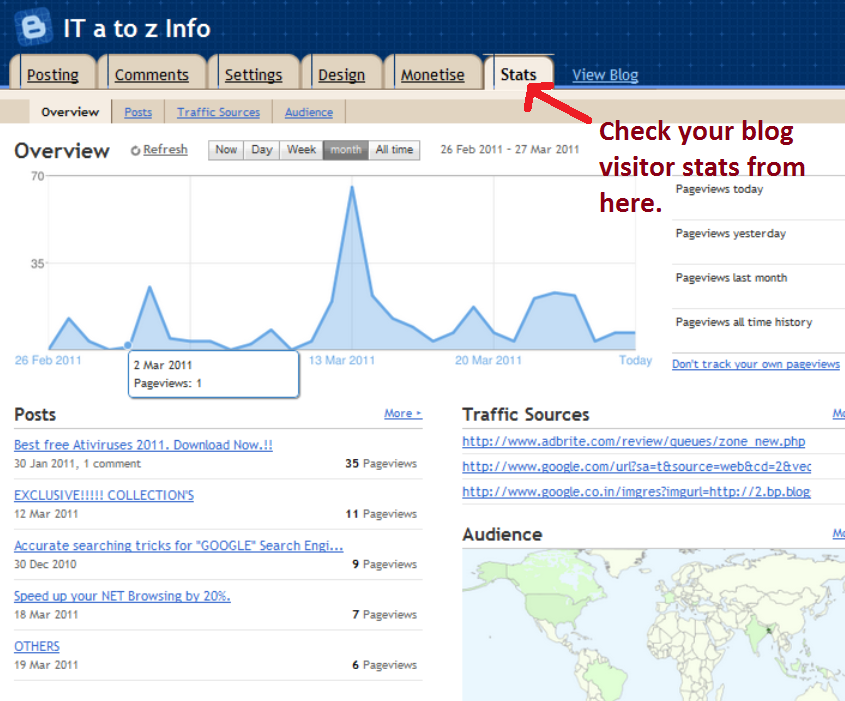
If you want to check your site visitor stats, just click on STATS, then view by month, week or by All time.


Your site is completed finally. If you need any help, just contact me or click on HELP.


Thursday, 13 September 2012

How To Add Random Posts Widget On Blogger, Blogspot

Random posts widget is another great widget and very important in a blog also if you want to show your readers other stuffs you have in your blog. This widget I have here display some of your posts randomly. Same as the related posts widget but different because this only shows your other posts either related or not. Below is an image of this widget.


1. Go to your Dashboard > Design.
2. Then click on Add a Gadget and select HTML/JavaScript.
3. Copy the code below and paste on the HTML/JavaScript gadget.


4. Preview your blog.
5. If you can see the gadget running perfectly then SAVE it.


Configuration:

numofpost=6 - the number of posts to be shown in the widget. You can change the numerical value as you want.


Just follow the steps and you will have it in your blog in no time. Leave a comment you have something to say.

How To Add Meta Tags in Blogger , Blogspot for SEO

Meta tags / content is a very important factor in search engine optimization. This means that this will help search engine crawlers to find your blog. This tags will not be seen in your homepage or your blog because this is placed in the blog HTML and only crawlers and of course you can see it. Some blogger templates have built-in meta tags in their blogger HTML so the only thing to do is to configure the meta tags. But most of the blogger templates don't have meta tags in their blog HTML so it is your initiative to add the meta tags to make your blog more SEO friendly.


Adding Meta Tags / Content On Blogger HTML

Please Backup your Blog Template Before Updating Meta Tags for safety Reasons
  1. Now go to your Dashboard > Design > Edit HTML.
  2. Find the line below in your HTML.
3. Configure the js below:


Link

DESCRIPTION HERE : Change it with your blog description.
KEYWORDS HERE : Change it your KEYWORDS, separate keywords with comma.


4. Now add the configured script just below the code in step 2.
5. SAVE your template.

If you followed the steps above then you successfully added Meta Tags / Content in your blog HTML. Good luck in your SEO adventure. Drop a comment if you have something to say!

How to Improve Your Blog Search Engine Optimization By Changing Your Post Title Before Blog, Blogger Name

how to improve search engine optimization (SEO) of your Blogger blog (Blogspot blog) by optimizing your post title tags for search engines like Google and Yahoo. How to improve search engine results by optimizing post title tags.

By default your Blogger blog (Blogspot blog) does not have search engine optimised title tags. This puts your blog at a disadvantage compared to other blogs that have inbuilt SEO or enhanced SEO modules as these sites are likely to be placed more highly in search engine results.

The title tags of your blog are ordered by blog name first followed by the title of the post. This is not ideal for popular search engines like Google and Yahoo which give more importance to the first words of a title. By way of example take a look at how the title tags of this blog were viewed in a browser before any SEO. Note the order of the tags: Blog Name | Post Name.

How Blogger Title Tags are viewed in an IE browser

When this site was first indexed by Google this is the search engine results this site received. Note how the blog name is first in all the results.

Search engine result for blogknowhow.blogspot.com before the tweak

Fortunately there is a simple tweak to your template which can rectify this problem. By simply reversing the position of the blog name and page title significant improvement can be gained in search engine results. See the difference in the example below:

How Your Blogger Title Tags are viewed in your browser with change

Follow the step by step guide below to achieve higher rankings in search engine results.

Tweak of Title Tags for New Blogger (beta) Blogs

1. Login to your blog at Blogger.com and navigate to Design > Edit HTML

2. Backup your template by downloading it to your computer. This will ensure that you can upload your template before these changes in case of problems.

3. Replace the following line of code (about 5-10 lines from the top):

<data:blog.pageTitle/>


with (highlight code, Ctrl + C to copy)


<data:blog.pageName/> |<br /><data:blog.title/>

<data:blog.pageTitle/>

4. Click on Save Template and then View Blog. Navigate to an individual post. You will see that your page title is now first followed by your blog title. A pipe symbol separates the two.


Below is an example of the change in search engine results since the tweak was implemented for this site. Since optimising for search engine friendly page titles there has been a significant improvement in traffic accessing the site. This didn't happen right away but if you too implement this page title tweak and continue to deliver quality content you are on your way toward higher search engine rankings.

Blog Know How Search Engine Results in Google with Title Tags Tweaked

Troubleshooting
Several readers have reported issues with the line:


If you experience problems try inserting this line instead which works on many blogs. Ensure you have double quote marks around item followed by a single quote mark:


For more on this please read the comments section.

UPDATE
Due to the number of readers experiencing problems with their browsers reading this post I have created a PDF file of this article which is free to download

This Blogger tutorial (Blogspot tutorial) has discussed how to adapt the title tags of a Blogger (Blogspot) blog to improve search engine optimization (SEO) by Google,Yahoo and other search engines.

Wednesday, 12 September 2012

How to add Recent Comments Widget with Avatars and Without AvatarsTo Blogger

If in the past tutorial i've talked about a simple Recent Comments widget, now i'll be sharing to you a stylish Recent comments widget with round avatars, which comes along with comment excerpts.
You have the option to change default Anonymous Avatar Image as well.

How to add recent comments widget with avatars

Step 1. Go to Blogger Dashboard, then go to Design >> Page Elements and Add a Gadget.
In the popup window scroll down + choose HTML/Javascript and paste in the following code:

If Gadget Script not Show than Click Here to View COdes --> CLICK

Settings:
Link

- Replace your-blog with the name of your blog.
- Replace the "5" values in red, with the number of comments you want to appear, from:

  • numComments = 5

and

  • &max-results=5

- To change the anonymous avatar, replace the following address with your own:

  • http://www.gravatar.com/avatar/?d=mm

- To change the size of the avatar, replace 60 value in green with your own

After you've made the changes, click Save... and you're done!

WITHOUT AVATARS


1. Log in to your dashboard--> layout- ->Page Elements

2. Click on 'Add a Gadget.' Select 'HTML/Javascript'.

3. Select the whole code given below and paste it in the widget box you have just opened above.
Note : Replace "http://YOURBLOG.blogspot.com" with Your blogspot URL.

4. Now Click Save and Refresh Your site.

IF YOU DONT FIND THE CODE PLEASE CLICK HERE FOR CODES

Tuesday, 11 September 2012

How to Add Animated Flash Cloud Label In Blogspot, Blogger By blogumus by roy tanck

Another widgets tools for blogger I will share. The "Blogumus" is an Flash based tag cloud widget which uses scripts converted from Roy Tanck's WP Cumulus plugin for Wordpress. The result is the widget you can see in action at the top of this post. Hover your mouse over the Flash object to see the animation begin. In this post, I'll explain how you can add Blogumus to your own Blogger layout with ease!

How to Add flash Animated label cloud Blogumus for Blogger

Step 1:
First Of all Goto Your blogger Layout>Page Elements page and add a Labels Widget there..You can Do that using the Add a Page Element Option on that

Choose to sort the labels Alphabetically when prompted.
Step 2:
After Adding the Label Widget Goto Layout>Edit Html (Do not expand the widget templates for the sake of easy explanation)

You will find some code similar to


  • ()


    Immediately after this line, paste the following section of code:


    Finally, preview your template. If installed correctly, you should see the tag cloud appear in your sidebar.
    If you want to change the size and colour of the label cloud , just play around with the highlighted numbers in the code and you will do fine.

    Thursday, 6 September 2012

    How to Remove / Delete Labels From Blog Posts

    If you want to hide labels from blogger post footer (or below post title), it is a very easy thing to do.
    Sometimes labels can be unnecessary if you already have them in the blogger sidebar.
    How we gonna do it?

    Hide labels from Blogger

    Step 1. Click 'Layout' tab and go to the 'Edit HTML' Subtab.
    First of all, backup your current template to be assured that you won't lose or delete something erroneously (to do that > click download full template)
    Step 2. Check 'Expand Widget Templates' option to expand the CSS code.
    Step 3. Find the following code in your template.


    ,

    Step 4. Delete this portion from your template.
    Step 5. Save Template. And you're done

    How to Make Your Blogger / Blog Load Faster Than 123

    The speed at which your blog loads is very critical to attracting and retaining more readers to your blog. If your blog takes a long time to load, many readers may leave your blog before they have the chance to read it.


    The major factors that affect your blog load speed include:

    • The number and nature of Images and other multi-media
    • Third Party JavaScript and Links
    • Number of Posts displayed on the Main page

    Let's take a look at the above factors and few tips and tricks that will help you optimize your blog load time.

    Images and other multimedia are important to beautifying and attracting users to your blog. However, the more images, videos and other multi-media you have on your blog the longer it takes to load. It becomes necessary to optimize the load speed of your images and other media.
    Decrease the size of your images or use thumbnails that link to the full-size image.
    Consider uploading images to Picasa Web Albums via the Blogger post editor if you use third party images.Don't link to external image URLs!

    For optimal blog load speed, we recommend using Google/Blogger widgets, JavaScript and links.
    However, I understand that sometimes you will need to use third party JavaScript and links. If you those, put them at the bottom of the sidebar. Your blog will load much faster that way.

    Finally, your blog's load time can be affected by the number of posts you display on your main page. 10 or even fewer posts per page is recommended. You can easily edit the number of posts displayed of the main page from the Settings > Formatting tab. You can then select the number of posts you want to display on the main page as shown in the image below.

    How to Easy Hide or Remove Blogger / Blogspot Top Navigation Bar

    If you are using any default template of Blogger, I'm pretty sure you must have seen a navigation bar at the top of your blog. The Blogger NavBar contains Search Blog textbox, Follow link, Next Blog link to visit another blog randomly, links to create a blog or sign in to Blogger etc.
    Below is the preview of Blogger navigation bars.


    What do you think about it? Well, I think it makes your blog look too basic and unprofessional? If we share the same thoughts and you want to hide or get rid of it. Follow these steps.

    To Remove or hide the Blogger Navbar, you just have to insert one line of code into your blog's HTML. It's a very easy CSS hack. The trick will not interfere or mess up with your custom layouts and it's pretty safe and easy to implement.

    1. Go to Dashboard > Template > Edit HTML
    2. Check the box of Expand Widget Template.
    3. Ensure you backup your template (Download Your Template)
    4. Find the following code by pressing Ctrl + f

    ]]>

    Before the line, add in the following line of code:

    #navbar { display: none; }

    5. Save your template.

    View it. Viola and it's gone!

    How to Add Animated Tag Cloud in your Blog / Blogger / Blogspot

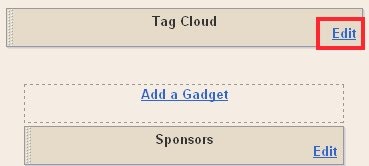
    Once you have added the animated tag cloud, you will see an additional widget (labels widget) in the Layout -> Page Elements page. So click on the "Edit" link of this widget.


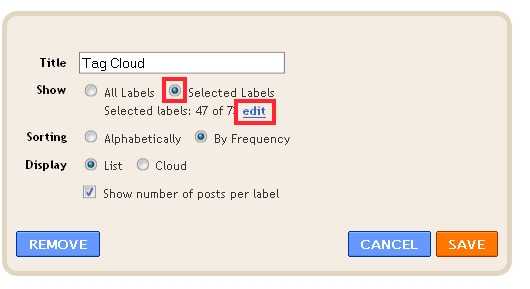
    Then in front of "Show" option mark the radio button "Selected Labels", now click on the small "edit" link and un-mark the labels which you want to remove from the tag cloud, and finally save it.


    If you want to

    Remove Label - Add New Label - Edit Label in Blogger / Blogspot

    how you can edit, add or delete labels in Blogger.
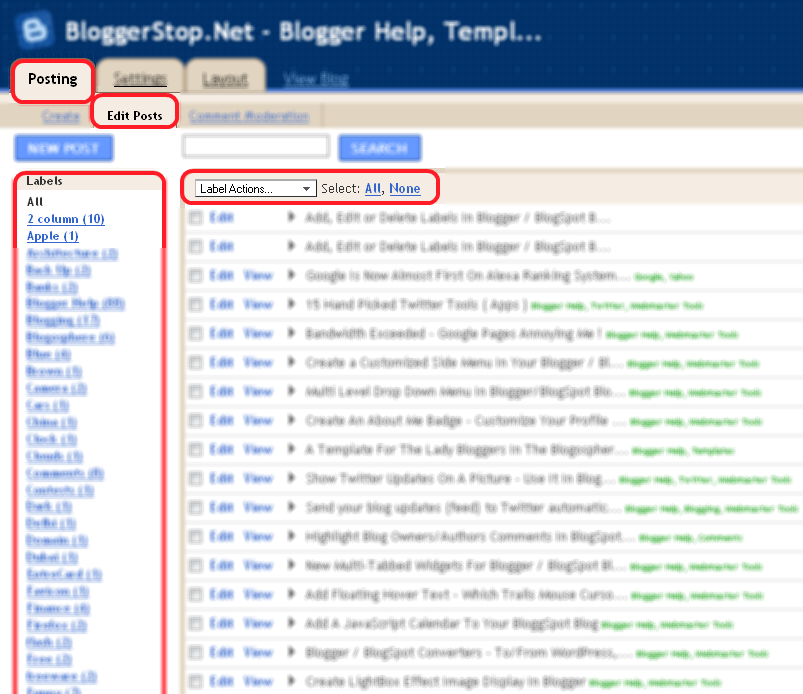
    Log in to Blogger, in the Posting section, click on Edit Posts.

    See the highlighted regions in the image above.
    As soon as you click on Edit posts, you will see all posts written by you (select posts per page as 300 in the right corner of the page).

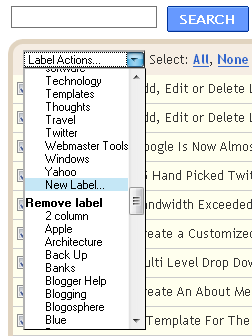
    1. Now to delete any label, click on "Select All". Then in the drop down menu "Labels action", under "Remove label" option you will see the list of all labels, click on the one, you want to remove for ever.

    2. To add a label, select all the posts, you want to add the label. Then in the drop down menu "Labels action", under "Apply label" option click on New label.... Finally enter the name of the new label.

    3. And in case you want to edit a label, unfortunately there's no direct option given by Blogger.
    So do this, firstly in the list of labels column, present at the left side of the page, click on the label you want to edit. Now only those posts are displayed which have this label. Now add a temporary label to these posts. Then delete the label, you want to edit. Now click on the temporary label in the labels list. Now add the new label. Then finally delete the temporary label.

    How to Easy Delete or Rename Blogger Labels

    You've got blogger labels you don't need anymore.You want to delete or rename them?
    Logon to www.blogger.com. On the dashboard, click Edit Posts.


    On the Edit Posts screen, click Select: All (very important). Then drop down the Label Actions menu, scroll down and you'll find a Remove Label heading with a list of all your labels appearing under it.To delete one, click on it! You'll have to remove each label one after the other.I don't think there's a one-click solution to delete all labels at a time.

    I don't also think there's a one-click solution to rename/edit a label name.Simply delete/remove the label and create another with a new name.

    To create a new label, just drop down the Label Actions menu, scroll down and you'll find the New Label
    heading, click on it and a dialog box prompts you to enter your new label name.Enter a name and click Ok. That's it.It's that easy!

    Monday, 27 August 2012

    How to Link your Blog to Social Network Easy

    Blogs vs Social Networks

    Dance Party LuMaxArt
    The words "Social-network" or "social media site" usually to refer to Facebook, Twitter, LinkedIn, Bebo, MySpace, Buzz, etc. But they can include any site that you think of as part of your own network of people. Some people even include Flickr and YouTube in the list, though personally I still see them as about file sharing rather than "friendship", even though you can define groups of people that you share the files with.

    Your blog is also part of your on-line social network. But it's different from the other social-media sites:

    1) It makes sense for one person to have more than one blog - it doesn't make sense to have multiple personal Facebook accounts (there's only one you) , and

    2) A blog is mainly about showing people your writing (or photography etc) in longer amounts (posts), with a small amount of profile information. The other social-media-sites are mainly about having a larger profile, and putting small bits of writing (status updates) with that.

    3) In your blog, history is kept - history matters. In the social-media-sites, NOW is what matters most. We don't really know how long the various social websites will keep history on-line for, but can you imagine caring about what someone tweet-ed ten years ago, unless you're a historical researcher?


    Ways of linking your Blog and the Social Networks


    There are many, many different options for linking your blog and regular websites.

    Social media offer a more limited range of options, because you generally can only change the content, not the structure, of your site there. But it can be difficult to understand the different types of links, because people are quite loose in the way they're described.

    At the moment, I'm seeing four main approaches to linking your blog with the "social networks":

    "Follow-me"

    Asking your blog-readers to link to their own social-media-site account to your (or your blog's) account on the social-site


    "Look at this"

    Giving your readers a tool that they can use to update their own social-media site (usually their status) with a reference to the page on your blog that they've just read. This may involve sharing, or just noting their approval ("liking") your site.


    "Look-what-I-wrote"

    Automatically updating your social-network-site with content that you posted on your blog.

    This has a variation, "look what she wrote" - setting up your social-network site to automatically show what some other interesting person said.


    "Look-what-I-said-over-there"

    Automatically updating your blog with content that you posted on your social networking site.


    Making the links

    Having identified these ways of linking your blog and Facebook, Twitter, etc, the next step is to actually make the links. The social networks do these things in different ways, and not every type of link is available in each network, yet. See Tools for linking your Blog and the Social Media for more specific information.


    Working out what to post where:

    Sometimes, you might want to make the links so that people can follow you where they want to - but still use different tools primarily for different audiences, based on who actually uses each network. This template can help you work out what you want to use each network for.

    How to Put a Facebook Like, Send or Share button on your Blog

    There is an official Facebook button that your readers can use to share your blog, your current post, or any website, on their own Facebook account. This article describes how to get the code from Facebook and install it into Blogger - but most of the information applies to other blogging tools (Wordpress, TypePad, etc) and many other web-site tools also.

    Background

    Previously I've described the different ways that you can link your blog and the social-networking sites.

    Facebook badges can be used to send your blog's readers to your personal Facebook profile, or to your page. These are an example of the "follow me" approach.

    But often blog authors want to give their readers a tool to share the blog that they are reading on their own (ie the readers own) Facebook account - that is to use the "Look what s/he said" approach.

    Your readers could just copy-and-paste a hyperlink to your page into their own Facebook account, but it's clunky, and means that they have to start up Facebook themselves.

    Various people have written 3rd-party widgets to put a Facebook icon on your blog, set up so that when a reader clicks it the current page it is automatically shared on the reader's Facebook account. Some even count how many times the button has been clicked.

    But I really don't like, or trust, 3rd party gadgets:
    • There's no guarantee that they don't have nasty side effects on your blog.
    • Some of them ask you to type your Facebook id and password onto a page owned by a 3rd party. They promise that the won't do nasty things with the data - and some of them mean it. But you just don't know who to trust.
    • If Facebook change how they do things, there's no guarantee that 3rd party tools will also be changed: you could easily be left with a button that doesn't work any more.
    I'm not saying that all the 3rd party gadgets are bad: I've used some on my sites with no ill-effects. But I've never been happy about it. And the day that I used the AddThis button on a newspaper website to share an article to my personal travel-blog, I had a mini panic-attack 1/2 an hour later when I realised that I'd just given my email and AdSense password to a third-party.


    One approach - Blogger's social-sharing buttons:

    Google have now introduced social-media buttons which can be shown at the bottom of each post. They only work on blogs with Designer Templates (ref Types of Blogger Templates)

    They're an improvement on the 3rd party gadgets, but I still don't like the way they look, and the lack of options to customize them, so I usually have them turned off.


    A better approach - Facebook's official gadgets:

    The Share Button:

    The first "look what s/he said" option that Facebook offered was the Share button, officially called the the Post To Profile gadget.

    This let you customise a few features, and also had a preview function

    You can still see this gadget on many web-pages. But you cannot get the code for this from Facebook any more: they now recommend using the social plugins (more about them below) instead.

    The Share button still works though, and can be added to your site using this code:
     
    href='http://www.facebook.com/sharer.php' 
    name='fb_share' 
    type='box_count'>
    Share
     
     
    (I've spaced the code out a bit so it can be understoond more easily - the extra line-breaks can be removed when you use it.)

    You can configure the code by changing the value of type: other options are
    • button_count (shows a counter beside a smaller button)
    • button (shows a smaller button, still with the word "share"
    • icon (shows the small "f" only)

    See Sharing from your blog to the Social Networking Sites for more information about where to put the code, including general and post-specific options.

    Notice that because the code above includes expr:share_url='data:post.url' you need to put it in a post-specific place in your blog. Another option would be to replace data:post.url with the URL for your blog, and put the code into a gadget etc.

    Be aware that sometime in the future, the Share button may stop working, because Facebook stop supporting it. I don't expect that to happen soon though, because it's now installed on so many web-sites worldwide.

    The Like and Send buttons:
    Facebook's official gadgets for saying "look what s/he said" are now the Like and Send buttons.

    Officially, you can get the code for them on the Developers > Social Plugins > Core concepts page: don't be put off because the page is labelled "develoeprs" - it really is quite simple to install the buttons into your blog.


    However the last few times I tried to get the code from Facebook, it's refused to give it to me, saying:
    "The href entered is not recognized as a valid URL.".
    So this is the code I got from them before, modified to be used in a post-specific place - see below - and to not use the width that was suggested:
    href="DUMMY-TEXT" send="false" width="450" show_faces="true" font="">
    to
    expr:share_url='data:post.url' send="false" width="450" show_faces="true" font="">

    The way to add the code to your blog is described fully in Putting Share this on XXX buttons into your blog (it's done the same way, no matter what social network's share button you are adding).


    What your readers see

    When a reader clicks your Facebook button, they'll be asked to log in to Facebook (unless they're already logged in).


    Once they're logged in, then:

    If they used the Like button:
    The "like" is recorded on their wall, and they are shown a small message in your site, giving then the opportunity to un-do the like, or to add a comment which is also shown on their wall along with the like.


    If they used the Send button:
    They are shown a small pop-up window where they can type in names (from their existing Facebook friends) or email addresses. A message about the item is send to the selected people using either Facebook Messages or regular email for people who aren't on Facebook.

    If they used the Share button:

    They see a window where they can enter a message, and see the link and description that they're going to be sharing.
    The link is either the page that they were viewing when they clicked the button, or another URL (if you chose the Custom URL option when you were setting up the gadget). The description is an advertisement for Blogger. However both of these these can be changed if your reader clicks on them.


    Lastly there's a captcha window, where they have to enter some security test.

    Monday, 25 June 2012

    How To Switch Back To Old Blogger Interface (Easy)

    How to get back old blogger interface

    get-back-old-blogger-interface

    Do you have trouble working with new blogger interface? Oh yes you do :) that's why you came here.If you are a new to blogger, you are not much used to new blogger interface, don't worry a bit, I'm here to save you. Here the way to how to switch back to old blogger interface.


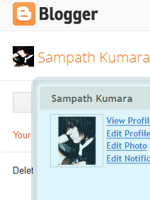
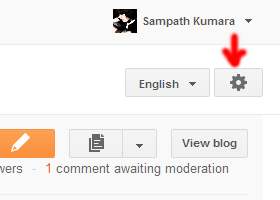
    • Click on "Settings" Button under your name

    get-back-old-blogger-interface

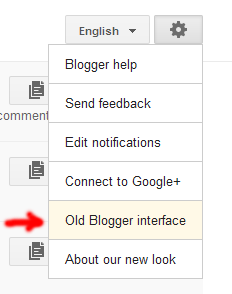
    • Then you will see the menu collapse
    • Click on "Old Blogger Interface"

    get-back-old-blogger-interface 

    • Here we are again to Old Blogger Interface

    get-back-old-blogger-interface
    make-money-468x60