if checking it doesn’t fix your problem there is another step you must do. Follow this procedure:
Control Panel > Display > Desktop > Customize Desktop > Web > Uncheck everything here > OK > Apply
Tuesday, 20 November 2012
How to Make icons background transparent in Windows XP
Monday, 15 October 2012
How to Secure Private Cloud Security Services Data Usefull Tips, Tricks and Guidelines

Friday, 12 October 2012
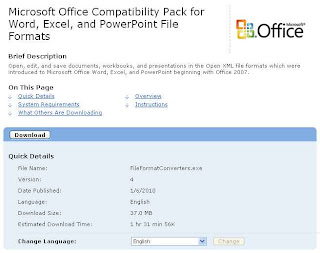
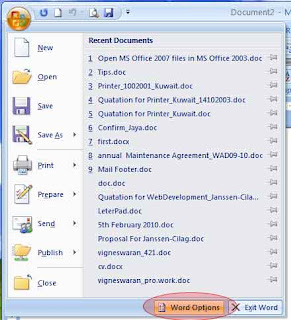
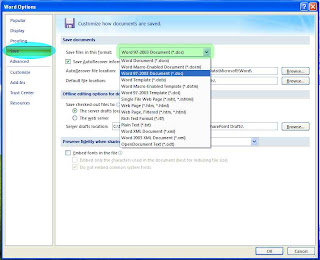
Open Office 2007 Xlsx Files in MS Office 2003 / XP / 2000
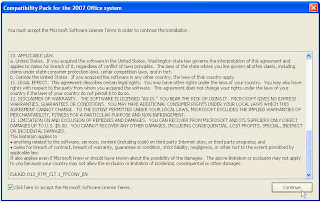
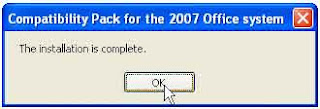
Open Office 2007 files in MS Office 2003/ XP/2000

- Microsoft Office Excel 2007
- Microsoft Office PowerPoint 2007
- Microsoft Office Word 2007


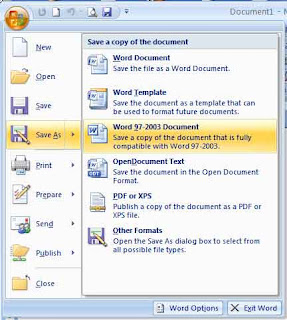
Or else you can change the saving option permanently in new Office option.


Now you can enjoy.
Thursday, 4 October 2012
How to Fix Dell Latitude D610 Restart, Hang Problem
First remove the top cover plate by prying up on the right side and rocking it back and forth to disconnect it.
Next remove the 2 screws that hold down the keyboard. To remove the keyboard unhook the catch that is on each side of it then unplug it from the motherboard. The second screw is above the F4 key.
Next locate the screws that hold down the processor heat sink and loosen them. They stay attached to the heat sink.
When you remove the heat sink you should be able to see if it is clogged with dust like this one. Remove the dust and then put everything back together.
Be sure to check to see if the cooling fan runs on start up. It usually shuts off until it gets hot then it turns back on again automatically.
Friday, 28 September 2012
KMS Activator for Office 2010: Genuine Activation Key
Now you don’t have to crack your Microsoft Office 2010 and also you don’t have to search Genuine Keys for your Microsoft Office 2010 because no serial keys and cracks will helps you to make your office 2010 copy genuine accept the license serial keys and working activation crack. After a lot of research on internet I have finally found Two Ways to Activate Microsoft Office 2010.
How to Activate Microsoft Office 2010 by using KMS Activator:
- First Disable your all kind of Anti-Virus/Security Software. (Recommended)
- Run KMS Activator Software.
- Click on Install/Uninstall KMService Tab.
- Then Click on Activation Office 2010 VL.
- Follow the instruction inside the window.
- Your Microsoft Office 2010 is genuine now.
- Check the status of your Ms. Office 2010 by click on Activation Check Office 2010.
- Hurray! Enjoy Genuine Ms. Office 2010.
If above KMS Activation Method doesn't work for you, than you can also try to use Manually Activation Method of Microsoft Office 2010.
File Download Instruction:
After opening above download link Click on Slow Download Button for Free User Downloading and Don't Use Any Download Manager when downloading above File (You may face Download Interruption).
Saturday, 22 September 2012
How to Update to ICS 4.0.4 from 2.3.4/2.3.6 (Without Rooting) Samsung Nexus S i9020a
- Download this file
- Rename the downloaded file to update.zip
- Put it update.zip you have downloaded on your sd card.
- Turn off your device
- Go to Bootloader (press&hold volume up button then press&hold power button)
- When in Fastboot mode navigate to Recovery using volume up/down buttons
- Press the power key to select Recovery
- If you see a warning logo, press the power button and then press volume up button then release both to go to the Main Recovery menu
- From the menu, select Apply update from /sdcard, and choose update.zip from the list.
- When update is finished go back and select reboot system now.
- Download this file
- Use the above steps again to update.
Thursday, 20 September 2012
How To FIx Computer Common Errors & Troubleshooting It...!!!
Tips is Given Here:
Sunday, 16 September 2012
How to Easy Boost your Laptop or Desktop Computer Wi-Fi Signals Easy
Friday, 14 September 2012
How to Create and Configure VPN Site to Site On ISA Server 2006
Configure IP Address at lab machines as figure 1
Join server ISA-msviet to DCmsviet (msviet.com)
Join server ISA-vispro to Dcvispro (vispro.com)
Step 2:
At ISA-msviet create new user: vispro / password
At ISA-vispro create new user: msviet / password
At the moment, confer these user have allow access in Dial-in Tab
Step 3:
Install Isa 2006 standar to ISA-msviet and ISA-vispro
Configure ISA rule, the following figure:
The IP range: 100.100.100.1 – 100.100.100.254 (customize) is virtual range IP which assigned automatic for clientvpn access to Internal (192.168.10.0/24)
To continue, select Remote sites Tab: create new connection
Note: site name = username which create at last step, here( ISA-mviet) sitename= vispro
Select Point-to-Point at next table.
In table Remote Site Gateways, enter the IP Address of Remote site VPN server that allow Internal connect out site, here we type 192.168.1.201 – interface WAN in ISA-vispro.
Click next, we to Remote Authentication tab, at that type user remote is created out site (vispro) – msviet / password
The part Network Address, specify IP range Internal on out site, at here we type 192.168.11.1 - 192.168.11.254
To continue, click next and select protocol (all outbound traffic), the end click finish.
Step 4:
Right mouse on Virtual Private Network and select properties, at tab access network we tick EXT, vispro as following figure:
Step 5: at both ISA server,
Start Routing and Remote access, ensure Network interface is connected
Note, in ISA2006, we must edit system policy on Firewall Policy ( both isa server)
How to Install Mac OS X Lion Using an All In One Bootable USB Drive : UniBeast :

UniBeast + MultiBeast is the easiest method to do a clean install of Mac OS X Lion or update any Snow Leopard system. The following guide requires no coding, terminal work, or Mac experience of any kind.


Install Mac OS X Lion Application OR |

Mac OS X Lion USB Thumb Drive |


You may have to type extra command line flags to reach the installer.
- Asus Motherboard + NVIDIA Graphics - type PCIRootUID=0
- Unsupported graphics - type GraphicsEnabler=No
- Boot in Single-user mode - type -s
- Boot in Verbose mode - type -v
- Boot in Safe mode - type -x


16. Upon completion, restart system

MultiBeast is an all-in-one post-installation tool designed to enable boot from hard drive, and install support for Audio, Network, and Graphics. In addition it includes System Utilities to repair permissions and a collection of drivers, bootloaders, config files and handy software.
1. Complete Mac OS X Lion setup.
2. When you arrive at desktop, open Safari
3. Browse to tonymacx86.com and log in. If you don't have a user account, create one!
4. Go to tonymacx86.com/downloads to download the latest MultiBeast
5. Go to the DSDT Database to download your motherboard's DSDT
6. Open Downloads folder and move the .aml file to the Desktop
7. Open and run Multibeast's UserDSDT
8. Restart system
If your drive doesn't boot on its own, and you get an error referencing boot0, fix it using the methods listed here.
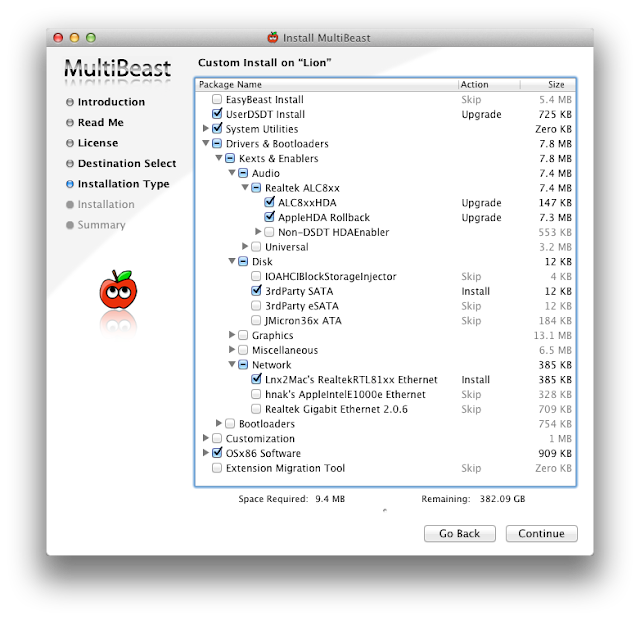
You may also use MultiBeast to install further drivers to enable ethernet, sound, graphics, etc... Be sure to read the documentation provided in MultiBeast Features.pdf about each option. Both UserDSDT and EasyBeast install the proper bootloader by default, so you'll not need to check that option.

You now have a fully updated bootable version of Mac OS X Lion on your CustoMac! And a handy USB rescue drive to boot from in case things go pear-shaped. It's easy to get frustrated, but don't give up! If you get stuck, there are many users with similar hardware in the tonymacx86 Forum to provide support. Special thanks to everyone in the community, and our Mods for testing!
If you've had success using this guide, consider a contribution to help keep the sites going. We're constantly updating and tweaking our tools to help you.
Thursday, 13 September 2012
How To Add Random Posts Widget On Blogger, Blogspot
1. Go to your Dashboard > Design.
2. Then click on Add a Gadget and select HTML/JavaScript.
3. Copy the code below and paste on the HTML/JavaScript gadget.
4. Preview your blog.
5. If you can see the gadget running perfectly then SAVE it.
Configuration:
numofpost=6 - the number of posts to be shown in the widget. You can change the numerical value as you want.
Just follow the steps and you will have it in your blog in no time. Leave a comment you have something to say.
Wednesday, 12 September 2012
Apple TV Run Full Screen iOS Applications - Unofficially

Friday, 7 September 2012
How to Make Your Laptop Battery Longer Long Life in Just SImple Step
How do you keep your laptop battery going for as long as possible? If you've had replaced your laptop battery, then you know that it is not cheap.
Here are some basics you should learn about laptop batteries. Most of them are manufactured from lithium ion. The average life of a Li-Ion battery is 300 to 500 discharge-recharge cycles, or 2 to 3 years, whichever comes first. Power level, environmental conditions and charging habits will affect the longevity of the battery. As the battery gets closer to its end of life, the amount of time it will hold a charge will become less and less. Whatever precautions you will take, battery life will eventually wear with time.
You should know that you can do something to lessen the impact of the battery degradation and make the life span of your laptop battery a little bit longer. Although your battery will eventually die, proper care can put off the inevitable. Here's how to keep your laptop battery working for as long as possible.
• Keep your batteries away from too hot or too cold environments
Undue heat kills off a battery slowly but surely. Avoid leaving the laptop under direct sunlight or inside a closed car. Maintain your battery out of utmost heat. Similarly, extreme cold conditions (like a refrigerator) can also kill a battery. Hence, never leave your laptops in places where temperatures are extreme. Of course, the whole health of your laptop can benefit from this, not just your batteries. If you don't plan to use the laptop on batteries for quite some time, ensure that the charge is about 40% then remove the battery and store it in a cool place (room temperature).
• Practice proper charging-discharging habits
Most people are familiar with Nickel Cadmium (Ni-Cad) batteries, and know that it is best to discharge them all the way down before charging them up again because they have charge memory. This is not true for Lithium Ion batteries. Li-Ion batteries do not have that type of memory, so it is not important to let them discharge all the way down before recharging. In fact, most of the time, it is best NOT to let it discharge all the way. Partial discharge reduces stress and prolongs battery life. If possible, avoid frequent full discharges and charge more often between uses.
• Exercise the battery
Do not leave a charged battery dormant for long periods of time. Too usually, folks would use their laptops while plugged in a power source. While this is fairly safe, batteries that don't get used shall be simply as sickly as batteries which are used incorrectly. Like our bodies, batteries need to be exercised to remain robust and healthy. Moreover, keeping a fully charged battery at elevated temperatures (which is the case when running a laptop on the power grid for extended period) affects the performance of the battery.
• Use the right charger
The volume of energy that is introduced and expended over each charging cycle will make a difference in the life of a Li-Ion cell. It is best to use the original equipment to charge the battery. Higher output charging units (what we typically call fast chargers) will reduce the life of the battery.
• Use Power Management Applications
Most laptops come with power management applications with battery maintenance functions. When running on extended AC mode, you can select "long life" option for your battery and it will charge to about 80% capacity only. Before travelling, apply the "full charge" option to bring your battery to 100% capacity.
A typical lithium ion battery has an overall average life of 2-3 years. With some care and caution, its mortality can be delayed. These simple ways on laptop battery care could help you in increasing or lengthening the lifespan of your laptop battery.
Thursday, 6 September 2012
How to Easy Unfriend or Remove a Friend in Facebook
To unfriend someone:
- Go to that person's profile (timeline and even old profile)
- Hover over the Friends box at the top of their profile (timeline and old profile )
- Click Unfriend
- A dialog box pops up. Click "Remove from Friends"
Wednesday, 5 September 2012
Free computer tip for resolving inability to add or remove programs
Resolving Inability to Add or Remove Programs
If a particular user cannot add or remove programs, there might be a simple registry edit need.
click at start button then select RUN and type Regedit
Go to HKCU\Software\Microsoft\Windows\CurrentVersion\Pol icies\Uninstall
Change the DWORD NoAddRemovePrograms to 0 disable it.
How to Increasing Graphics Performance Easy
By default, Windows XP turns on a lot of shadows, fades, slides etc to menu items.
Most simply slow down their display.
To turn these off selectively:
Follow these steps to Increasing Graphics Performance
- Right click on the My Computer icon
- Select Properties
- Click on the Advanced tab
- Under Performance, click on the Settings button
- To turn them all off, select Adjust for best performance
- For best performance leave them all off except for "show shadows under mouse pointer and Show window contents while dragging"
how to Increasing Graphics Performance
Free computer tip for Increasing Graphics Performance
By default, Windows XP turns on a lot of shadows, fades, slides etc to menu items.
Most simply slow down their display.
To turn these off selectively:
Follow these steps to Increasing Graphics Performance - Right click on the My Computer icon
- Select Properties
- Click on the Advanced tab
- Under Performance, click on the Settings button
- To turn them all off, select Adjust for best performance
- For best performance leave them all off except for "show shadows under mouse pointer and Show window contents while dragging"
Increase Your System Speed in 7 Step
First of all make it sure that your system is not infected with virus, spyware, adware or any other malicious software. If yes then first of all remove it because they are main factor that decrease your system speed. Here are few thing on which you system speed depends.
- disk defragment
- temp files
- registry files
- virus/spyware
- adware
- milieus softwares
- cache memory
Follow this Steps to increase your CPU speed:
Scan your system on regular basis:
If you are using a system which is connected to Internet or new USB are usually connected to your system then it is recommended that you scan your system on daily bases and conclude that which virus is mostly attacking on your files. try different antivirus if you are facing problem.
Delete all temporary file
When you use Internet your browser will cache the page and save the image,video,text every thing present on the web pages.Some times they also contain virus and these are unwanted for operating system,will decrease your processor speed.Some time some malware will also present in this.Ad-ware will spy your behaviour using your cookies ,So clean this unwanted Temp files.
Cleanup your disk
Do Disk Cleanup daily .This is a tool provide by windows ,which is inbuilt in your windows .Disk CleanUp will delete all the Active X like files or application installed while browsing on Internet.To clean this go to system tools and click Disk Cleanup select the drive and click OK Delete all the unwanted files and application
Defragment your disk
when files are stored on the disk they are not well organized, disk Defragmenter will rearrange them in a good way that will increase your system speed Weekly do Disk Defragmenter ,this will arrange your files in disk .It will also provide by Windows and administrator can only use this .This will take more than 15-45min.