Social Icons

Showing posts with label Tips and Tricks. Show all posts

Monday, 15 October 2012

How to Secure Private Cloud Security Services Data Usefull Tips, Tricks and Guidelines

Many organizations use private clouds to ensure safety and easy handling of data. However, when the number of people who control the data increases, the risk of hackers tampering the safety measures increases too. It is critical to form and implement foolproof strategies to protect the data that’s on the cloud. Though there is strict monitoring of online activities and logins, hackers break in often. There’s no storage system that hasn't been tampered by hackers. To make cloud computing safe, companies use private clouds but these private clouds are no exceptions when it comes to security. All these incidents make companies, especially those who are in the cloud, diffident about their data storage system. There are some tips to strengthen your cloud security.


Cloud Computing Tips
1.    Single Tenant Clouds:
Using a single tenant cloud is very important to manage your data efficiently. Ask your service provider about the data storage location before signing up for their service. If the physical location of data is distributed among different servers, there are high possibilities of tampering and you may not be able to track the online activities effectively. Under single tenancy architecture, a single instance of software is used to serve each client. You can customize the software as per your needs and the data center model you want to have can be designed without any need for changing according to vendor restrictions.
2.    Classify Data:
All types of data don’t need the same security level. Confidential and sensitive data needs a higher level of security than public data. To make your private cloud secure, classify data based on the levels of security needed. This will help you focus on the safety of most critical data and implement lower levels of security strategy for other types of data. For example, the budget for the different departments needn’t be known to the entire organization, and so the security level of such files should be higher than the security level of other types of files.
3.    Configure Firewalls:
Configuring firewalls is as important as owning a private cloud. There are multiple ways to configure firewalls. And the responsibility doesn't stop with installing and configuring firewalls. You need to try and test your firewall to detect any loopholes through which your data may be mined out. Try penetrating your own firewall using different methods both internally and externally. It will give you different ideas on how you need to monitor the activities and secure your system.
4.    Encryption:
The next best thing you can do is to encrypt the data. This statement seems like a no-brainier because almost all clouds have encryption. However, not all the data in the cloud are encrypted. Most clouds encrypt only data that is in transit. Other data that is stored and is idle is not encrypted. Ensure that even the idle data is encrypted so that you will not end up losing your data and identity.
5.    Monitor and Store Logs:
You should also monitor all online activities like logins, file transfers, file sharing, link sharing, password changes, etc. As monitoring becomes difficult when the number of authentications to be done in a day crosses a limit, organizations tend to give up keeping a tight rein on authenticating. This is the most common cause of data loss and hacking.
Implementing effective strategies and relying on good service providers are the basic steps to safeguard your cloud. Some of the steps discussed here seem to be complex and unnecessary but you can reap long term benefits by following these.
Author Bio: - The above content and topic was provided by Samantha Kirk from mytechhelp.com, a site that offers savings and current information on Toshiba Support.

Saturday, 13 October 2012

How to Set the Snapshot Resolution, Pixel in Adobe Acrobat Reader For Image

found in Adobe, is under Edit | Preferences | General, there is an option to set the snapshot tool resolution to a fixed number. I use 300pixels/inch’
The Adobe Acrobat Reader Preferences
300 PPI is a good resolution for printed images. 96PPI would be fine for on-line documents.
The Adobe Acrobat Reader Fixed pixel resolution
You can now use the Marque snap shot tool to capture images from a PDF file at a vastly improved quality.
The Adobe Acrobat Marquee select snapshot tool


How to Set the Snapshot Resolution, Pixel in Adobe Acrobat Reader For Image

Friday, 12 October 2012

Open Office 2007 Xlsx Files in MS Office 2003 / XP / 2000

Open Office 2007 files in MS Office 2003/ XP/2000

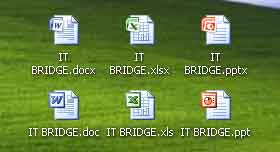
Most of the users get the problem that he is not able to open Microsoft office 2007 files with extensions “.docx” – Word Document, “.xlsx” – MS excel file and “.pptx” – Powerpoint presentations in office 2003 or lower versions.


This is a common problem with many users who use MS office versions which are older than MS office 2007. The documents saved by the new office software are not backward compatible directly. But there is a very useful and easy add-on available from Microsoft itself.

Also we will tell you a workaround to save your documents in such a way that will open it on any computer with older version of Microsoft office.

Way 01:
Install the compatibility pack on a computer that is running Microsoft Office 2003 programs, Microsoft Office XP programs, or Microsoft Office 2000 programs

Way 02:
Save Files In Compatible Format

Way 01 : Download Compatibility Pack

Microsoft has added the new Office Open XML Formats to the following 2007 Microsoft Office programs:
  • Microsoft Office Excel 2007
  • Microsoft Office PowerPoint 2007
  • Microsoft Office Word 2007
A compatibility pack is available to make sure that you can open and save Office Open XML Formats (Office 2007) in earlier versions of Microsoft Office (Office 2003, 2000 or XP).

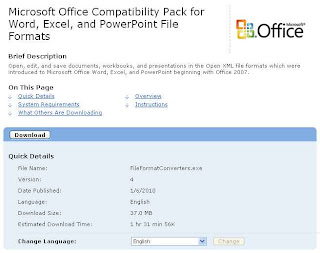
Follow the given steps to download free Microsoft compatibility pack and install it.

To use this feature, you will need to be logged into your computer with administrative rights.


When you have downloaded the file, double click on FileFormatConveter.exe file to start installation.

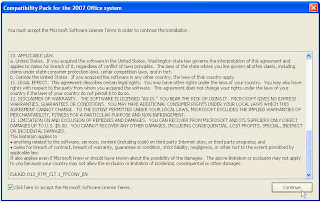
Now here it’s simply a case of pretending you’ve read the license terms and clicking continue


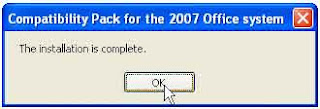
Now Click OK to Complete Installation.

Once the process is done, you can open new Office files in older version.


Way 02: Save Files In Compatible Format

You can install this compatibility pack in your computer, but if you need to send your document to a client or a friend or anyone else who does not have this compatibility pack, then you will still be in trouble. To avoid such trouble we give you a very useful tip, because we always believe “Prevention is better than cure”.

We will tell you how you can save the documents in older formats which will open the documents with the new as well as old versions of MS office, without any problem.

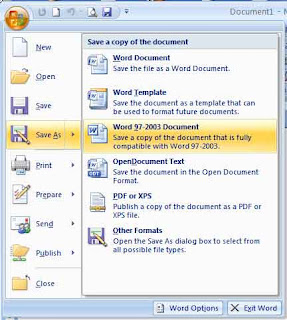
To save it in compatible format, simply click on the circular office logo at the top left corner of MS word / or Excel or PowerPoint > click on Save As arrow > and select the MS office 97-2003 compatible version as shown in images below.


Or else you can change the saving option permanently in new Office option.

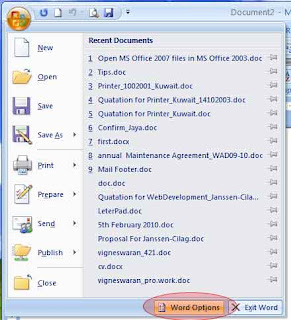
Click Office Button >> Word Options


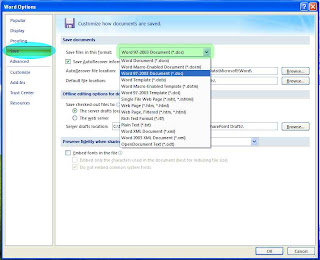
Select older extension as a default saving option.


Now you can enjoy.

Friday, 5 October 2012

How to Check Instant Spell of any Application in Imac


You can instantly check the spelling or grammar of anything you write in Safari, Mail, TextEdit, or any Application which has a space to write text.

You can simply type the text out as you like, and then highlight the word or set of words and right-click, or type Control + left-click to bring up a window with a selection that says "Spelling and Grammar", then clicking the sub-selection "Show Spelling and Grammar" will bring up a window (without loading any external Applications) with possible corrections, if any need be, for your text.

You can also check the spelling and grammar of an entire document without having to select text by typing "Command + Shift + ;".

Customize the Mission Control Wallpaper in Apple iMac Lion

You have probably noticed when you activate Mission Control, in Mac OS X Lion, that there is a second background image behind the wallpaper you may have already chosen for the desktop. The Linen tiled picture is selected by default for the operating system, but you can change this to a custom image if you desire to give it your own unique look and feel.


Setting Up Your Image

Lion's processing will not recognize a file that does not have the proper extension for the file of the picture you will be using. So, in order for this to work, you will need to either make a new picture in an application of your choosing, or you can simply copy and paste your ready image to an app and export the file with the PNG format. To simplify this process, just follow these steps:

Open the file you want to use as the new Wallpaper (we are using Preview for these directions):

• Go to File, and select Export

• Next, choose the format PNG, and save as "defaultdesktop.png"

If you want to optimize the look of the wallpaper before exporting, you should see if
the resolution of your display matches that of the file you will be using. If the file is too long or too wide you could run into problems with how it displays. The default Linen image is 256 x 256 pixels small square that is used as a tiled pattern. You can check the resolution of your monitor by simply launching System Preferences and going to Displays.


Replace the Mission Control Background Picture


Buried within the system files, this little file is hidden waiting for you to change it. You cannot find this particular file by using Spotlight or the Finder search. Instead, follow these steps to get to it:

• Choose Go from the Finder menu (or hit Command + Shift + G) and type in this location:
/System/Library/CoreServices/Dock.app/Contents/Resources/

• Look through the folders and files until you see "defaultdesktop.png" (you can make a copy of this if you want to revert back to this easily at a later time).

• Select your file you named "defaultdesktop.png" and move it to this Resources folder. You can do this the easiest way by dragging the file over the open Finder window. A window will pop up asking which option you would like to use. Choose Replace. You may have to enter your User Password to Authenticate this process.


• Next, launch Terminal from Spotlight and type the following command:
killall Dock


Now, whenever you use Mission Control by using the assigned F3 key or the three finger upward swipe or by simply using the icon on the dock, you will see your chosen beautiful custom picture appear before your eyes.

If you want to use an existing OS X Lion desktop image as a new Mission Control background, just as we have here in our example, you can find these desktop files by selecting "Go" from the Finder menu, and click "Go to Folder", then type "/Library/Desktop Pictures/". Once here, you can choose a file to copy. Select it, and go to the Finder menu and under Edit, hit Copy. Next, paste to the Desktop or wherever you want to paste. Then open the file in Preview, from there, follow the same process to export the file in the PNG format. After this has been accomplished, go once again to the Resources folder and drag the file over as shown in the preview steps above. Enter your password to Authenticate if needed. And Presto!

If you would like to go back to the default setting, you can just replace the file in the Resources folder with the original backed up Linen image file.

How to Sync/Transfer Apps between iPad/iPhone Device Through iCloud


You might have lots of purchased apps on your iPhone and want to transfer them to your iPad. With the iCloud, it is easy to aync and transfer apps between iOS devices over WiFi or 3G network.

* Make sure all device are set up to use the same Apple ID and installed iOS 5.0 or later.
* On your iPhone, tap iTunes Store app and select the apps to set to share your iTunes library.
* On your another iPad tablet, open App Store app, tap Updates > Purchased, and select All apps to download onto the device. You can also tap iCloud icon to manually transfer.

Tuesday, 25 September 2012

Warid Telecom : SMS Daily and Weekly SMS Subscribe Details | Warid Wap, GPRS, MMS Settings Details


To subscribe the bundle 
Daily SMS Bundle, write “DS” and SMS to 3333.
Weekly SMS Bundle, write “WS” and SMS to 3333.
To de-activate the bundle 
Daily SMS Bundle, write “SMS off” and SMS to 3333.
Weekly SMS Bundle, write “SMS off” and SMS to 3333

Warid Wap, GPRS, MMS Settings


Online CAP Results 2012


The system of Centralized Admission Policy (CAP) was introduced in the year 2000 by the Education Department, Government of Sindh for the admissions in class XI in the colleges and higher secondary schools of Karachi. The objective of the policy is to make more efficient the procedure of admissions and root out every sort of indiscretion as well as to offer equal prospect to the students for taking admission in the colleges of their selection on the root of marks merit. The Cap system is the very reliable and easy to take admission in the colleges and running successfully since it started. Find CAP Result 2011-2012 (Regular and private) of Pre Medical, Pre Engineering, Commerce, Humanities, economics and computer science of Male & Female Candidates


CHECK YOUR RESULT ON CAP OFFICIAL SITE 

Providing This Information is Only to Help User to Get there Results.  

Saturday, 22 September 2012

HTC One TE tablet specs revealed: quad-core processor, 10.1 inch screen, Android OS 5.0

The famous designer Hasn Kaymak has designed several concept smartphones before, which could even compete with the existing flagships of Samsung in functions and design. The list of concepts made by him continues, and this time comes a HTC One tablet. This new concept HTC One tablet adopts the HTC One TE model, being reported to have 10.1 inch SLCD 2 screen display, which supports 720P video playback. Users could freely watch HD videos on HTC One tablet or play DVD movies on HTC One tablet device. It will run on the new Android OS 5.0 (as reported to be codenamed as Jelly Bean), with quad-core processor and the latest HTC Sense UI interface.
There’s also an 8 megapixel camera on board of this HTC concept tablet, with which you can freely record videos and snap pictures as you like. Still, this HTC One TE tablet supports WiFi b/g/n at 60 GHz, Gorilla Glass 2 protection, a micro HDMI port and HTC Sense 4.5. Beats streaming, a bundled in ear headset and iBeats are all included, which makes it excellent for you to enjoy audio or music video on this tablet. However, the latest news reveals that HTC officially announced this week that it will stop bundling Beats headphones with HTC devices, so this model will most likely remain a fantasy, at least on the headset side.
HTC One TE tablet specs
Since the HTC disappointed the public at the MWC 2012 with only One series smartphones announced, it would be the right time for HTC to launch a new tablet, not only the One series of handsets. The rumored HTC Quattro quad core tablet has been talked about for a while now, but no results have appeared. Will this model turn into reality? It looks pretty nice and its back shows that it’s keeping the already famous One series design legacy.

Thursday, 20 September 2012

How to Track Your Laptop If Stolen...

Anti-virus software developer company "Quick Heal" has launched their new service, which helps Individuals with the help of law enforcement agencies in tracking and recovering stolen laptop. To avail the service, a laptop owner has to first register with ‘Quick Heal’ website through a Mac-id, and it keeps continuous track of the laptop.

If the laptop is stolen, the tracker service traces it on the basis of Mac-id and IP addresses. This information can then be used by the police to track the laptop down and retrieve it. The service  totally free and can be availed by anybody.
The method is aimed at helping police by providing them an interface with the website. “This technology from Quick Heal will provide a powerful tool to the society at large and to the police.
Launched as part of corporate social responsibility, the service is free of charge and can be availed by anybody, whether a ‘Quick Heal‘ user or not, he said. The service, already launched in Indore and Jaipur, would soon be started in other cities. Besides, the company also aims to create a database of stolen laptops for the help of users and potential buyers.
This Information is Only for Information Purpose. and Found on internet. The Parents Site is Giving Blow.
Parents Site

How To Convert Hard Disk Partition From FAT to NTFS..!!!

Just follow this simple steps. It's easy.

1. Click Start, click Programs, and then click Command Prompt. In Windows XP, click Start, click Run, type cmd and then click OK.
2. At the command prompt, type CONVERT [driveletter]: /FS:NTFS. Convert.exe will attempt to convert the partition to NTFS.

NOTE:
Although the chance of corruption or data loss during the conversion from FAT to NTFS is minimal, it is best to perform a full backup of the data on the drive that it is to be converted prior to executing the convert command

Speed Up Your Browser Browsing..


  Just follow these steps:

Click Start then Run and type "gpedit.msc" without quotes.This opens the group policy
editor. Go to=>Local Computer Policy=>Computer Configuration=>Administrative Templates=>Network=>QOS Packet Scheduler and=>to Limit Resealable Bandwidth.

Double click on Limit Resealable bandwidth. It will say it is not configured."By default, the Packet Scheduler limits the system to 20 percent of the bandwidth of a connection, but you can use this setting to override the default."
So the trick is to ENABLE resealable bandwidth, then set it to ZERO. This will allow the
system to reserve nothing, rather than the default 20%.It works on Win 2000 as well.
"This information is only for knowledge Purpose"

How to Secure Your Wireless Network or Wifi With Password


1. Change Default Administrator Usernames and Passwords

Most routers or access points come enabled with a default set of username/password combinations. These combinations are well documented and available online for hackers to use. If a hacker can access your device’s administrative pages they can modify the configuration and control all aspects of your device. These username/password combinations can be changed from the administrative panel.

2. Turn on WPA / WEP Encryption

All Wireless devices support some form of encryption. Encryption technology scrambles messages sent over the air and ensures that they cannot be intercepted by hackers. Several encryption technologies exist for wireless communication today. WPA is the strongest commonly available encryption technology for home devices, however, WEP can also be used.

Wifi network

3. Change the Default SSID

Access points and routers all use a network name called the SSID. Manufacturers normally ship their products with the same SSID set for all routers. For example, the SSID for Netgear devices is normally “NETGEAR”. The Default SSID can be changed from the administrative panel and should be set to something unique.

4. Enable MAC Address Filtering

Each wireless device possesses a unique identifier called the physical address or MAC address. Access points and routers keep track of the MAC addresses for all devices that connect to them. Wireless routers offer the option to key in the MAC addresses of your home equipment so as to restrict the network to only allow connections from those devices. It ensures that rogue users cannot connect to the wireless router without using advanced MAC spoofing techniques.

5. Assign Static IP Addresses to Devices

Most home wireless devices use dynamic IP addresses, which are randomly assigned by DHCP servers. Unfortunately, dynamic IP allocation also works to the advantage of network attackers, who can easily obtain valid IP addresses from your network’s DHCP pool. Turn off DHCP on the router or access point, set a fixed IP address range instead and then configure each connected device to match. Using a private IP address range (like 10.0.0.x) prevents computers from being directly reached from the Internet.

6. Disable SSID Broadcast

The wireless access point or router typically broadcasts the network name (SSID) over the air at regular intervals. This feature was designed for businesses and mobile hotspots where wireless clients may roam in and out of range. For the home user, this roaming feature is unnecessary as it increases the likelihood of an unauthorised gaining access to your home network. Fortunately, most wireless access points allow the SSID broadcast feature to be disabled by the network administrator. Your SSID name can be manually inputted into your devices.

7. Enable Firewalls On Each Computer and Router

Modern network routers contain built-in firewall capability, which can be easily disabled.
Ensure that your router’s firewall is turned on. For added security, consider installing and running personal firewall software on each computer connected to the router.

8. Turn Off Network During Extended Periods of Non-Use

Shutting down your network when not in use will most certainly prevent outside hackers from breaking in. While impractical to frequently switch off and on the devices, at least consider doing so during travel or extended periods of downtime.


But we have inform one thing also, that the scientists & researchers revealed that the WIFI Zone is harmful for the trees  according to the study of Netherlands. So be careful when U use it outside & don't make the environment harmful to others. 


If You follow these steps properly we hope U'r network will be more safer than any other time before.

How to Take Backup From Computer and Network Free Backup Software

FBackup4.8 has a simple interface and guides you through the process of defining a backup job using a friendly wizard that asks you:
  • Where do you want to store the backup (the destination).
  • What do you want to backup (the sources).
  • How do you want to run the backup (using full backup that zips the files, or mirror backup that doesn't zip them).
  • When do you want to run the backup (you can schedule it to run automatically or run it manually).
FBackup
Once a backup job is defined, you can run it manually by pressing the Backup button (or F6), or if you add a scheduler it will run automatically. FBackup can easily back up sources from local drives (including USB connected drives) to destinations such as USB/Firewire connected devices or mapped network locations. It creates either standard zip files (when using "full backup"), or exact copies of the original sources without any compression (using "mirror backup").

Wednesday, 19 September 2012

How to Make Web Site

Step 1: Choosing A Domain Name

The first step is to choose the domain name for your website, which is nothing more than its address (e.g., google.com, cocacola.com, soccerblog.net and so on).

Identifying A Good Domain Name

If you are not sure what you should look for in a domain name, here are 4 guidelines that will help you pick a good one:
1. Good domains are short. The shorter your domain, the better. Consider that one word domains like Mobiles.com or Pizza.com are worth millions of dollars. You wont find any one-word domains available, however, so aim to get a domain with two words, like MobilesHub.com or SleekPizza.net. Choosing a domain with three or more words is fine as long as the domain makes sense.
2. Good domains are easy to spell. Your domain needs to be easy to spell, or else your visitors will end up on some other website. This means that you should avoid tricky and foreign words if possible. For example, the domain CappuccinoBar.com might be problematic for English speaking visitors. Cappuccino is an Italian word, and not everyone is aware where the doubles are placed.
3. Good domains are descriptive. Your domain must indicate to visitors what your website is about. Why? Because most people will use your domain when linking to your website, and if the domain itself is descriptive, people will be more likely to click on it and to visit your website. For example, FitnessCentral.com tells people what the website is about right away, while MrJones.com doesn't.
4. Good domains have a .com, .net or .org extension. When purchasing a domain name you'll be able to choose from many different extensions. However, there are only three that you should consider. The first one is the .com, which should always be your first call. If you can't get the .com version of the domain you want, then going with .net or .org should be fine. Just stay away from extensions such as .biz, .us and .info because most spam and malicious websites use these extensions, meaning that both human visitors and search bots will get suspicious when visiting your site.

A Brainstorming Strategy

If you are having a hard time coming up with domains that respect all the guidelines above, here is a simple strategy you can use: come up with a list of main keywords related to the topic of your website, and then add prefixes (e.g., super, mega, fast, quick, hot) and suffixes (e.g., central, spot, corner, zone, bay, hub, home) to these keywords. For example, if you want to start a website about computers, your main keywords could be computer, computers, pc, tech and so on. By adding prefixes and suffixes you would then have SuperComputer.com, SuperComputers.com, EasyPC.com, ComputersHub.com, PCZone.com, ComputersCentral.com, TechBay.com and so on. You can change the extension on each domain too, from .com to .net or .org.

How To Find If the Domains Are Available

By now you should have a list of potential domain names for your website. But how do you find if these domains have already been registered by someone else, or if they are still available? You need a whois tool for that, which is basically a website that will access the database of registered domains for you.
Screenshot of AjaxWhois
A very simple and user friendly whois tool can be found at AjaxWhois.com. The tool will tell you whether the domains you are looking for are available or not in real time, as you type them.

How To Buy the Domain Name

Once you have found a domain name that you like and that is available, you'll just need to buy it (or register it, as the process is called). The easiest way to do this is by simply getting a hosting plan, as most hosting companies will give you the option to register a new domain name on the fly. In other words, you just need to sign-up for a hosting plan and they will register and configure your domain for you. In the next step we talk about how to choose a good hosting plan.

Step 2: Getting A Hosting Plan

The second step is to choose a hosting plan for your website. You'll basically be renting a web server (i.e., a computer that has always-on Internet access) from a hosting company, and they'll host your website for you, making it accessible for any Internet user around the world. Choosing the right hosting plan is important, because it will have a direct impact on the performance of your website. Here are some guidelines you should follow:

1. Do not use a free or a cheap hosting company. While it is possible to host your website for free, we highly recommend that you don't do it. Why? Because free web hosts usually display their own ads on your website (they need to make money somewhere after all), and because the service quality is usually terrible. Choosing a hosting company that costs only $1.99 or so would be an bad idea, too. Remember that you get what you pay for, and most reliable companies charge at least $7 per month.
2. Choose a Linux-based hosting plan. When signing up for a hosting plan you'll notice that the two main options you have are Windows based plans and Linux based plans. Does it make a difference which one you pick? Absolutely! You should go with a Linux based plan. Note that this has nothing to do with the operating system you use in your computer. A Linux based hosting means that your web server will be using Linux, regardless of your own OS. Linux based hosting plans are superior because they are more secure and have more features available.
3. Make sure your plan uses cPanel. The last point you need to pay attention to when choosing a hosting plan is the control panel. Some companies use their own control panel software. You should avoid them. Instead look for a company that uses cPanel, which is the industry standard. Apart from having more features, cPanel allows you to easily backup and restore your website, and it also comes with many pre-installed software packages.
Screenshot of HostGator
If you want a recommendation for a hosting company that meets all the guidelines mentioned above, check HostGator.com. It is one of the largest and most reliable companies on the Internet, and yes, we use their services too.
Once on their homepage, click on "View Web Hosting Plans," and then choose the "Hatchling Plan." It is the smallest plan, but it is good enough for anyone starting out. Plus it only costs $8.95 monthly (or $6.95 if you pay annually). On the next page you'll be asked if you want to register a new domain, or if you already have one. Choose the "Register A New Domain" option on the left, and simply put the domain you have chosen there, as the image below illustrates:
Screenshot of HostGator Domain
On that same screen you'll be able to enter coupon code at the bottom. You can use the coupon "makeawebsite" (without the quotation marks) to get a discount of $10 on your order. After that you'll just need to complete your personal details and pay (either with Paypal or with a credit card). Your hosting plan should be active after one hour, and you'll receive an email confirmation with all the details.

Step 3: Installing WordPress

If you try to open your website at this point (by typing your domain in the address bar of your browser) you'll just see a white page with the specifications of your web server, as the image below illustrates.
Screenshot of blank website page
The next step is to install a content management system (CMS) on your site. The CMS makes managing your site, its design and internal pages a very simple task. We highly recommend that you use a CMS called WordPress. It is an open source software, meaning that it is free and supported by a very large community of website owners. Secondly, most hosting plans come with an automatic installation script for WordPress, so getting it up and running will be straight forward. We use WordPress to power this website too.
First of all log into your cPanel (the control panel of your website). You can do this by typing www.yourdomain.com/cpanel on your browser, and then by entering your username and password (you'll find this information in the email you received from the hosting company).
Screenshot cPanel
Now scroll down until you find the "Software/Services" box, and click on on the "Fantastico De Luxe" icon. On the next page click on "WordPress." You'll find it on the left menu, under "Blogs." After that click on "New Installation."
On that new page you'll need to fill in the details about your site. You don't need to change anything in the "Installation location" section. Your domain should already be selected there, and the "Install in directory" field should be left blank, because we don't want to install WordPress in a directory (e.g., www.yourdomain/blog/) but rather in the root of your domain (e.g., www.domain.com).
Below that you'll find the "Admin access data," where you'll put your admin username and password. Finally, there is the "Base configuration" section, where you need to put your admin nickname, your email address, the name and description of your website. The page should look like this:
Screenshot of the WordPress Install
When everything is set you can click on "Install WordPress." The next page will confirm the name of the database that will be created for your site. You can click on "Finish installation" there. On that final page you'll get the details of the installation. At the bottom you'll see a form that you can use to email yourself the details of the installation (e.g., admin username and password). It is recommended that you use it so you won't lose that data.
Type your domain name in a new browser window to see how your website looks now. It should be something like this:
Screenshot of the WordPress Default Theme

Step 4: Choosing a Template for Your Website

A big advantage of using WordPress to power your website is the fact that there are literally thousands of free templates available, created by the community of WordPress users. Note that these templates are called "themes."
You should start your search for a suitable theme at the Official Themes Directory. On the first page you'll find a list of featured themes. Alternatively you can use the "Filters and Tags" interface to narrow your search to themes specific characteristics. Finally, you can also use the search box if you are looking for something specific. For example, if you are creating a website for your company, you could search for "business" or "corporate."
Screenshot of the WordPress Themes Directory
If you can't find a good theme in the directory, try using Google. Do you want to create a blog about swimming? Search on Google for "swimming wordpress theme." Do you want to to create an online store to sell products? Search for "online store wordpress theme." So on and so forth. Remember that you'll be able to customize your theme later on, so just worry about finding something that fits your general requirements.
Depending on your budget you might also consider purchasing a premium WordPress theme. It will cost anywhere from $20 up to $60, but the quality is usually higher when compared with the free themes. One website we recommend for premium themes is ThemeForest.com. The prices are quite affordable (around $30 per theme), and they have over 2,000 themes for all sorts of purposes and requirements.
Once you find a theme that is suitable for your website (either a free or a premium one) simply download the .zip file to your computer. Now you'll need to log in the WordPress admin panel. You can do that by typing www.yourdomain.com/wp-admin into your browser. After entering your username and password you'll be redirected to the Dashboard of the admin panel, which looks like this:
Screenshot of the WordPress Dashboard
You'll have time to familiarize yourself with all the features and links you see there. For now just open the "Appearance" menu on the left, and then click on "Themes." On top of that new page you'll find a tab called "Install Themes." Go ahead and click on it. Now select "Upload", and choose the theme file you have downloaded to your computer. On the next page you'll need to put in your FTP information (you'll find this in the email you received from the hosting company as well). Click on "Proceed" and WordPress should upload and install the theme for you.
Screenshot of the WordPress FTP
If for some reason the automatic theme install fails, you can always do it manually. You'll just need to unzip the theme on your computer, and then to upload it to your server via FTP. We recommend that you use a free program called FileZilla to do that. With the program running, connect to ftp.yourdomain.com, using the FTP username and password provided by your hosting company (you can leave the "Port" field blank). Once the connection is established, open the "public_html" folder you'll find on the right side of the program, then open the "wp-content" folder, then open the "themes" folder, and finally upload your theme there (the whole folder).
Screenshot of the FileZilla
Now log back into the WordPress admin panel, click on "Themes" under the "Appearance" menu again, and you should see your theme listed there. Simply click on it to see a preview, and then click on "Activate," on the top right corner. Once your theme is active you can visit your website URL to see how it looks. Here is a screenshot of a sample theme we activated:
Screenshot of our website finished

Step 5: Customizing Your Design

Once your selected theme is active, you can start customizing your design. The first decision you must make is whether you want a static front page or a dynamic one. If your website will be a content based one, like a blog where new articles get published frequently, then you probably want to go with a dynamic front page, displaying all the latest articles and posts there. In this case you don't need to change anything, as WordPress comes with a dynamic front page by default.
If you are making a website for your company, to sell products or to offer your services, then a static front page is a better idea. You can create one by opening the "Pages" menu on the WordPress admin panel, and then by clicking on "Add New." After that simply write the title and the content of your page. You can add images, video and scripts if you want. Once you are happy with the page, click on "Publish."
Screenshot of the WordPress Static Page
The page should be live now, but it is still a normal page. In order to make it the front page you'll need to open the "Settings" menu, and then click on "Reading." Right on top you'll find a check box you can use to determine what should be used as the front page. Simply select the one you just created, and click on "Save Changes."
You can also customize any other aspect of your design by opening the "Appearance" menu and clicking on "Editor." Each file present there controls a different aspect of your theme. The "Stylesheet," for example, controls the general design settings like font size, color, theme widths, headline styles and so on. These settings apply to all pages of your website.
Screenshot of the WordPress Theme Editor
The .php files, on the other hand, control the layout of specific pages. The index.php file, for instance, controls the content of your front page. The single.php file controls the content of the single post pages. The footer.php controls the content of the footer of your website, and so on. Just remember to backup each file (i.e., copy the text to a word processor) before you start changing it, so that if anything goes wrong you can restore the working version.
Screenshot of the WordPress Widgets
Another section worth exploring is the "Widgets" one (you'll find the link inside the "Appearance" menu as well). On most WordPress themes you can add or remove design features (e.g., menus, links, search boxes) simply by dragging and dropping the widgets into your sidebar.

Sunday, 16 September 2012

How to Get MAC Address Remotely On Network by Computer Name or IP Address

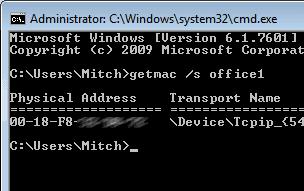
using the getmac command


MAC address of a network card by IP address or Computer Name by using the GETMAC command.

To use this command, do the following:

1. Open a command prompt with administrator privileges.

2. You can use one of the following commands

GETMAC /s computername - Get MAC by Computer Name

GETMAC /s 192.168.1.1 – Get MAC by IP Address


How to Get Mac Address Of Your Computer Lan or Wifi Adapter From Command Prompt


How to Get Mac Address Of Your Computer Lan or Wifi Adapter From Command Prompt. with easy step .

You may need the MAC Address of your network card to connect to a network secured using MAC Address Filtering. Here’s how to find it using DOS commands.

1. Hold down the Windows Key and press R.

2. Type CMD and press Enter.

3. Type getmac and press Enter.

4. The Physical Address is listed, that is the MAC Address of your network card.


How To Enable and Use Net Send Service On Win Xp To Message Any Computer Without Third Party Software


Command For Net Send Is : CLick (Start) Click (Run) Type = (net send) (Computer IP Or Computer Name) (Message) EXAMPLE : net send 192.168.0.56 TEST TEST

1. Right-click My Computer, and click Manage.

2. Click the plus sign next to Services and Applications, and then click Services.

3. Double-click Messenger.

4. Click the General tab and select Automatic from the Startup type list, and then click Apply.

5. Under Service status, click Start, and click OK.

6. Click OK, then OK again.

Be sure to perform these steps on both the sending computer and the receiving computer.


Samsung's Galaxy Note 10.1 Vs Apple's New iPad 3

Smartphone's Samsung's Galaxy Note 10.1 and Apple's New iPad 3 so that you can decide yourself which one is best for your personal use and for business purpose use. Apple has recently launched its new iPad version called "The New iPad" but most people is now aware of its fully hardware and software compatibility. On other side Samsung has also launched its new Galaxy series smartphone called "Galaxy Note 10.1" which is also quite good in terms of hardware and software compatibility.


Apple's latest New iPad 3 is now become the top competitor of Samsung's Galaxy series smartphones and tablets but Samsung feels that they don't need to release something new to compete with it, according to their latest assessment of their closest rival. The Android-based Galaxy Note 10.1 is Samsung's latest tablet model, taking its design from the Galaxy Note 'phablet', which is just about the right size to be a challenge to fit into your pocket. You can check yourself the following Samsung's Galaxy Note and Apple's New iPad 3 Hardware and Software Comparison image and decide yourself which one is best in terms of features.

How To: Charge Batteries of iPhone 4S, iPhone 4, iPhone 3GS, iPod 4G Touch, iPod 3G Touch, The New iPad 3, iPad 2 and iPad 1 Devices Wirelessly

How To: Charge Batteries of iPhone 4S, iPhone 4, iPhone 3GS, iPod 4G Touch, iPod 3G Touch, The New iPad 3, iPad 2 and iPad 1 Devices Wirelessly - Full Video Tutorial Guide

If you're an Apple iPhone, iPad and iPod idevices users than you must be aware of the concept of Wireless Access of iTunes via iPhone, iPad and iPod devices on previous version of iOS 5 but now the new way has been introduced which provide an option to iPhone 4S, iPhone 4, iPhone 3GS, iPod 4G Touch, iPod 3G Touch, The New iPad 3, iPad 2 and iPad 1 devices owners to Wirelessly Charge Batteries of iDevices. The new amazing technology has been introduced which provides an opportunity to Charge iPhone 4S, iPhone 4, iPhone 3GS, iPod 4G Touch, iPod 3G Touch, The New iPad 3, iPad 2 and iPad 1 Devices Wirelessly and without the use of any cord and adapters. This amazing technology and idea has been introduced for the next generation of iPhone, iPad and iPod devices.

Charge iPhone iPad iPod Wirelessly

In this post we will show you How to Charge Batteries of iPhone 4S, iPhone 4, iPhone 3GS, iPod 4G Touch, iPod 3G Touch, The New iPad 3, iPad 2 and iPad 1 Devices Wirelessly without the use of cord, adapters and other wire oriented gadgets. To Charge iPhone 4S, iPhone 4, iPhone 3GS, iPod 4G Touch, iPod 3G Touch, The New iPad 3, iPad 2 and iPad 1 Wirelessly is an easy task for any users and owners but for developing it is quite a risky and hard procedure and it may be dangerous way which will cause a bad effect on your iPhone, iPad and iPod devices permanently and may voids your warranty period as well. So iDevice users should be beware before trying or implementing the following video tutorial, try it only when you can afford this risk. You can follow the following simple Steps, Guidelines and Video Tutorial to Charge Batteries of iPhone 4S, iPhone 4, iPhone 3GS, iPod 4G Touch, iPod 3G Touch, The New iPad 3, iPad 2 and iPad 1 Devices Wirelessly.

Important Instructions for iPhone, iPad and iPod Devices:
  • Pin 25 is Data-
  • Pin 27 is Data+
  • Pin 16 is 0v or Ground
  • Pin 23 is +5v
Video Tutorial to Charge iPhone 4S, iPhone 4, iPhone 3GS, iPod 4G Touch, iPod 3G Touch, The New iPad 3, iPad 2 and iPad 1 Devices Wirelessly:

Before watching the following video tutorial you need a special expertise and techniques about electric circuits as well as the soldering knowledge. Additionally, a spare charging assembly, an extra Apple iPhone’s, iPad's and iPod's back cover and a very thin gauge wire and a wireless charger circuit like one used in video. You can find all the mentioned gadgets requirements from here. Let’s Start Now.
make-money-468x60