Social Icons

Showing posts with label Internet. Show all posts

Tuesday, 25 September 2012

Warid Telecom : SMS Daily and Weekly SMS Subscribe Details | Warid Wap, GPRS, MMS Settings Details


To subscribe the bundle 
Daily SMS Bundle, write “DS” and SMS to 3333.
Weekly SMS Bundle, write “WS” and SMS to 3333.
To de-activate the bundle 
Daily SMS Bundle, write “SMS off” and SMS to 3333.
Weekly SMS Bundle, write “SMS off” and SMS to 3333

Warid Wap, GPRS, MMS Settings


Online CAP Results 2012


The system of Centralized Admission Policy (CAP) was introduced in the year 2000 by the Education Department, Government of Sindh for the admissions in class XI in the colleges and higher secondary schools of Karachi. The objective of the policy is to make more efficient the procedure of admissions and root out every sort of indiscretion as well as to offer equal prospect to the students for taking admission in the colleges of their selection on the root of marks merit. The Cap system is the very reliable and easy to take admission in the colleges and running successfully since it started. Find CAP Result 2011-2012 (Regular and private) of Pre Medical, Pre Engineering, Commerce, Humanities, economics and computer science of Male & Female Candidates


CHECK YOUR RESULT ON CAP OFFICIAL SITE 

Providing This Information is Only to Help User to Get there Results.  

Friday, 21 September 2012

Download Dell Latitude | D610, 620, D630 Drivers For Windows Xp


Download Dell Latitude D610 Lan-Audio Drivers WindowsXP


Dell Latitude D610 Broadcom 57XX Gigabit Integrated Controller Aplications  Download
***
Dell Latitude D610 Broadcom 570x Gigabit Integrated Controller Driver Download
***
Dell Latitude D610 SIGMATEL STAC 975X AC97 Audio Sound  Download
***
Dell Latitude D610 Intel Mobile Chipset Download

Thursday, 20 September 2012

All Common Router Default IP Address

ROUTER IP ADDRESS
3Com 192.168.1.1
Apple 10.0.1.1
Asus 192.168.1.1, 192.168.1.220
Belkin 192.168.2.1, 10.1.1.1
Buffalo 192.168.11.1
Dell 192.168.1.1
D-Link 192.168.0.1, 0.30, 0.50, 1.1, 10.1.1.1
Linksys 192.168.0.1, 1.1
Microsoft 192.168.2.1
Motorola 192.168.10.1, 20.1, 30.1, 62.1, 100.1, 102.1, 1.254
MSI 192.168.1.254
Netgear 192.168.0.1, 0.227
Senao 192.168.0.1
SpeedTouch 10.0.0.138, 192.168.1.254
Trendnet 192.168.0.1, 1.1, 2.1, 10.1,
U.S. Robotics 192.168.1.1, 2.1, 123.254
Zyxel 192.168.1.1, 2.1, 4.1, 10.1, 1.254, 10.0.0.2, 0.138

How to Track Your Laptop If Stolen...

Anti-virus software developer company "Quick Heal" has launched their new service, which helps Individuals with the help of law enforcement agencies in tracking and recovering stolen laptop. To avail the service, a laptop owner has to first register with ‘Quick Heal’ website through a Mac-id, and it keeps continuous track of the laptop.

If the laptop is stolen, the tracker service traces it on the basis of Mac-id and IP addresses. This information can then be used by the police to track the laptop down and retrieve it. The service  totally free and can be availed by anybody.
The method is aimed at helping police by providing them an interface with the website. “This technology from Quick Heal will provide a powerful tool to the society at large and to the police.
Launched as part of corporate social responsibility, the service is free of charge and can be availed by anybody, whether a ‘Quick Heal‘ user or not, he said. The service, already launched in Indore and Jaipur, would soon be started in other cities. Besides, the company also aims to create a database of stolen laptops for the help of users and potential buyers.
This Information is Only for Information Purpose. and Found on internet. The Parents Site is Giving Blow.
Parents Site

Speed Up Your Browser Browsing..


  Just follow these steps:

Click Start then Run and type "gpedit.msc" without quotes.This opens the group policy
editor. Go to=>Local Computer Policy=>Computer Configuration=>Administrative Templates=>Network=>QOS Packet Scheduler and=>to Limit Resealable Bandwidth.

Double click on Limit Resealable bandwidth. It will say it is not configured."By default, the Packet Scheduler limits the system to 20 percent of the bandwidth of a connection, but you can use this setting to override the default."
So the trick is to ENABLE resealable bandwidth, then set it to ZERO. This will allow the
system to reserve nothing, rather than the default 20%.It works on Win 2000 as well.
"This information is only for knowledge Purpose"

How to Create Blog On Blogspot Free Complete Tuter With Pics


Hello Viewers, after so many days, I'm again with so popular & essential subject, "HOW TO MAKE A SITE IN BLOGSPOT.COM." But why we blog? Now it's the time of Globalization means the whole world have turned into a small village because of ICT & blog is the most powerful digital media to share your thoughts, opinion, comment's about any subject around the world. It's also the optional way to make some extra money from home. So why r we late?


After reading this post carefully you will be able 100% to make your one & own blogsite, under the tech giant Googles Unlimited hosting service & free blogspot domain. I'm saying again, "IT'S TOTALLY FREE!!" So no more delay, grab a chair & hook up with me. Now let's start........


First go to BLOGSPOT. Then SIGN UP for a free account and it's simple, needs no extra knowledge to create. Just like an email account creation. After completing your account SIGN IN. Then you'll see a page like this.


Means you got it. Then click on NEW POST. After that you'll see a page like this.


FOLLOW steps as shown in the pics. Give a name for your post in the title box. Then write/create the main article or anything by your CHOISE. You are not bound to select any topic. Allow readers comment by the allow/disallow radio button. After completing click on FINISH POST at the end of the page. You can edit your post by clicking on the tab named EDIT POSTS. You can edit & add pictures, videos and many more things as shown. Upload/directly select videos from worlds largest video sharing site YOUTUBE.COM


Blogspot.com has one more exclusive built in feature like create pages. As for example HOME, ABOUT ME, CONTACT US etc. All you have to do, click on EDIT PAGES, then create new page. Give a title, create information then publish. Then you'll see a Horizontal bar above your blog site like this.


You can create up to 10 different pages like it. It gives a more attractive look to your site. 


You are free to choose your own settings & personalization by the SETTINGS tab like this. There are so many options under this tab & very easy to understand & use. Just try it. If problem arises just inform me.


Blogspot.com is offering some attractive templates & advanced design to design your site freely. Just try, click on DESIGN as shown on the page.


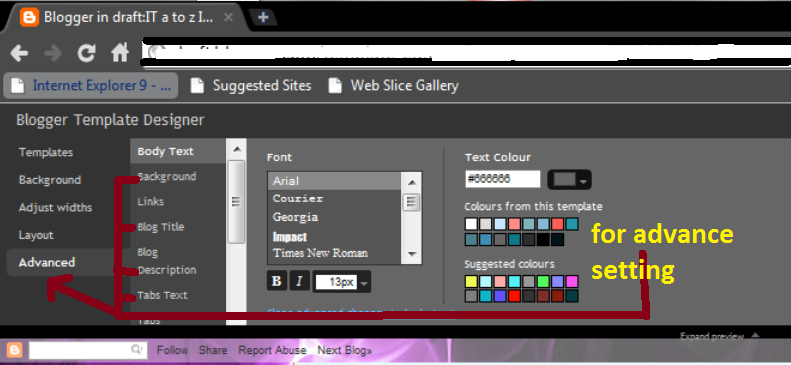
Set up page elements, add exclusive & wonderful free gadgets from Googles gadgets store. Design your site, make attractive it to your viewers. Here you'll find a sub tab named template designer. From here you can select a template that fit with your subject and can apply advance settings. There are so many templates, chose your own.


Give a background.


Adjust width for your main blog and side banners.


Choose a layout.


Then click on advance menu, set advance options to your site. Click on APPLY TO BLOG. 
Then finish and BACK TO BLOGGER.


Now just enjoy. Finally your site is ready to show. Checkout by clicking on VIEW BLOG.

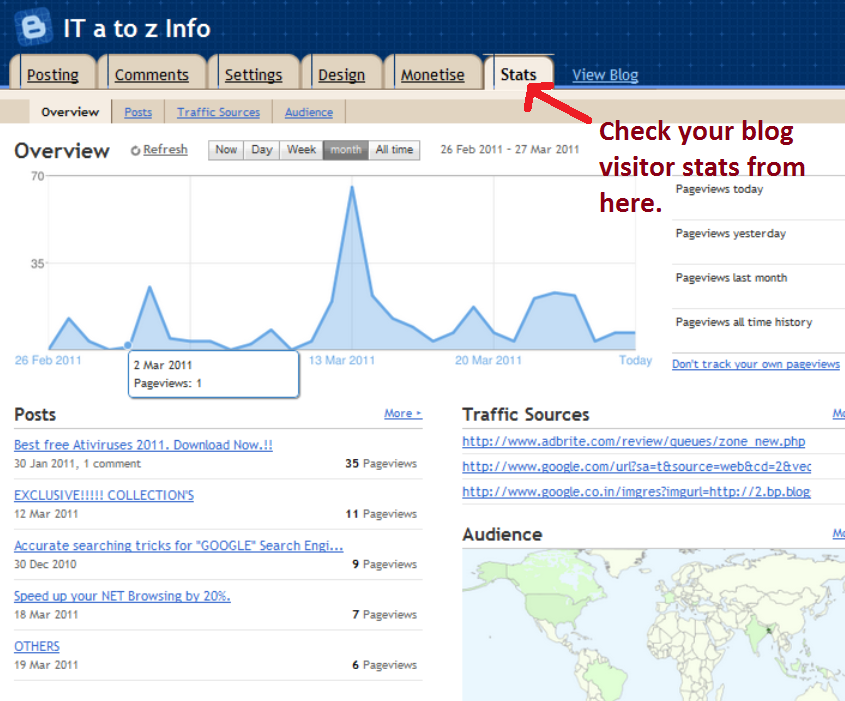
If you want to check your site visitor stats, just click on STATS, then view by month, week or by All time.


Your site is completed finally. If you need any help, just contact me or click on HELP.


How to Secure Your Wireless Network or Wifi With Password


1. Change Default Administrator Usernames and Passwords

Most routers or access points come enabled with a default set of username/password combinations. These combinations are well documented and available online for hackers to use. If a hacker can access your device’s administrative pages they can modify the configuration and control all aspects of your device. These username/password combinations can be changed from the administrative panel.

2. Turn on WPA / WEP Encryption

All Wireless devices support some form of encryption. Encryption technology scrambles messages sent over the air and ensures that they cannot be intercepted by hackers. Several encryption technologies exist for wireless communication today. WPA is the strongest commonly available encryption technology for home devices, however, WEP can also be used.

Wifi network

3. Change the Default SSID

Access points and routers all use a network name called the SSID. Manufacturers normally ship their products with the same SSID set for all routers. For example, the SSID for Netgear devices is normally “NETGEAR”. The Default SSID can be changed from the administrative panel and should be set to something unique.

4. Enable MAC Address Filtering

Each wireless device possesses a unique identifier called the physical address or MAC address. Access points and routers keep track of the MAC addresses for all devices that connect to them. Wireless routers offer the option to key in the MAC addresses of your home equipment so as to restrict the network to only allow connections from those devices. It ensures that rogue users cannot connect to the wireless router without using advanced MAC spoofing techniques.

5. Assign Static IP Addresses to Devices

Most home wireless devices use dynamic IP addresses, which are randomly assigned by DHCP servers. Unfortunately, dynamic IP allocation also works to the advantage of network attackers, who can easily obtain valid IP addresses from your network’s DHCP pool. Turn off DHCP on the router or access point, set a fixed IP address range instead and then configure each connected device to match. Using a private IP address range (like 10.0.0.x) prevents computers from being directly reached from the Internet.

6. Disable SSID Broadcast

The wireless access point or router typically broadcasts the network name (SSID) over the air at regular intervals. This feature was designed for businesses and mobile hotspots where wireless clients may roam in and out of range. For the home user, this roaming feature is unnecessary as it increases the likelihood of an unauthorised gaining access to your home network. Fortunately, most wireless access points allow the SSID broadcast feature to be disabled by the network administrator. Your SSID name can be manually inputted into your devices.

7. Enable Firewalls On Each Computer and Router

Modern network routers contain built-in firewall capability, which can be easily disabled.
Ensure that your router’s firewall is turned on. For added security, consider installing and running personal firewall software on each computer connected to the router.

8. Turn Off Network During Extended Periods of Non-Use

Shutting down your network when not in use will most certainly prevent outside hackers from breaking in. While impractical to frequently switch off and on the devices, at least consider doing so during travel or extended periods of downtime.


But we have inform one thing also, that the scientists & researchers revealed that the WIFI Zone is harmful for the trees  according to the study of Netherlands. So be careful when U use it outside & don't make the environment harmful to others. 


If You follow these steps properly we hope U'r network will be more safer than any other time before.

Wednesday, 19 September 2012

How to Make Web Site

Step 1: Choosing A Domain Name

The first step is to choose the domain name for your website, which is nothing more than its address (e.g., google.com, cocacola.com, soccerblog.net and so on).

Identifying A Good Domain Name

If you are not sure what you should look for in a domain name, here are 4 guidelines that will help you pick a good one:
1. Good domains are short. The shorter your domain, the better. Consider that one word domains like Mobiles.com or Pizza.com are worth millions of dollars. You wont find any one-word domains available, however, so aim to get a domain with two words, like MobilesHub.com or SleekPizza.net. Choosing a domain with three or more words is fine as long as the domain makes sense.
2. Good domains are easy to spell. Your domain needs to be easy to spell, or else your visitors will end up on some other website. This means that you should avoid tricky and foreign words if possible. For example, the domain CappuccinoBar.com might be problematic for English speaking visitors. Cappuccino is an Italian word, and not everyone is aware where the doubles are placed.
3. Good domains are descriptive. Your domain must indicate to visitors what your website is about. Why? Because most people will use your domain when linking to your website, and if the domain itself is descriptive, people will be more likely to click on it and to visit your website. For example, FitnessCentral.com tells people what the website is about right away, while MrJones.com doesn't.
4. Good domains have a .com, .net or .org extension. When purchasing a domain name you'll be able to choose from many different extensions. However, there are only three that you should consider. The first one is the .com, which should always be your first call. If you can't get the .com version of the domain you want, then going with .net or .org should be fine. Just stay away from extensions such as .biz, .us and .info because most spam and malicious websites use these extensions, meaning that both human visitors and search bots will get suspicious when visiting your site.

A Brainstorming Strategy

If you are having a hard time coming up with domains that respect all the guidelines above, here is a simple strategy you can use: come up with a list of main keywords related to the topic of your website, and then add prefixes (e.g., super, mega, fast, quick, hot) and suffixes (e.g., central, spot, corner, zone, bay, hub, home) to these keywords. For example, if you want to start a website about computers, your main keywords could be computer, computers, pc, tech and so on. By adding prefixes and suffixes you would then have SuperComputer.com, SuperComputers.com, EasyPC.com, ComputersHub.com, PCZone.com, ComputersCentral.com, TechBay.com and so on. You can change the extension on each domain too, from .com to .net or .org.

How To Find If the Domains Are Available

By now you should have a list of potential domain names for your website. But how do you find if these domains have already been registered by someone else, or if they are still available? You need a whois tool for that, which is basically a website that will access the database of registered domains for you.
Screenshot of AjaxWhois
A very simple and user friendly whois tool can be found at AjaxWhois.com. The tool will tell you whether the domains you are looking for are available or not in real time, as you type them.

How To Buy the Domain Name

Once you have found a domain name that you like and that is available, you'll just need to buy it (or register it, as the process is called). The easiest way to do this is by simply getting a hosting plan, as most hosting companies will give you the option to register a new domain name on the fly. In other words, you just need to sign-up for a hosting plan and they will register and configure your domain for you. In the next step we talk about how to choose a good hosting plan.

Step 2: Getting A Hosting Plan

The second step is to choose a hosting plan for your website. You'll basically be renting a web server (i.e., a computer that has always-on Internet access) from a hosting company, and they'll host your website for you, making it accessible for any Internet user around the world. Choosing the right hosting plan is important, because it will have a direct impact on the performance of your website. Here are some guidelines you should follow:

1. Do not use a free or a cheap hosting company. While it is possible to host your website for free, we highly recommend that you don't do it. Why? Because free web hosts usually display their own ads on your website (they need to make money somewhere after all), and because the service quality is usually terrible. Choosing a hosting company that costs only $1.99 or so would be an bad idea, too. Remember that you get what you pay for, and most reliable companies charge at least $7 per month.
2. Choose a Linux-based hosting plan. When signing up for a hosting plan you'll notice that the two main options you have are Windows based plans and Linux based plans. Does it make a difference which one you pick? Absolutely! You should go with a Linux based plan. Note that this has nothing to do with the operating system you use in your computer. A Linux based hosting means that your web server will be using Linux, regardless of your own OS. Linux based hosting plans are superior because they are more secure and have more features available.
3. Make sure your plan uses cPanel. The last point you need to pay attention to when choosing a hosting plan is the control panel. Some companies use their own control panel software. You should avoid them. Instead look for a company that uses cPanel, which is the industry standard. Apart from having more features, cPanel allows you to easily backup and restore your website, and it also comes with many pre-installed software packages.
Screenshot of HostGator
If you want a recommendation for a hosting company that meets all the guidelines mentioned above, check HostGator.com. It is one of the largest and most reliable companies on the Internet, and yes, we use their services too.
Once on their homepage, click on "View Web Hosting Plans," and then choose the "Hatchling Plan." It is the smallest plan, but it is good enough for anyone starting out. Plus it only costs $8.95 monthly (or $6.95 if you pay annually). On the next page you'll be asked if you want to register a new domain, or if you already have one. Choose the "Register A New Domain" option on the left, and simply put the domain you have chosen there, as the image below illustrates:
Screenshot of HostGator Domain
On that same screen you'll be able to enter coupon code at the bottom. You can use the coupon "makeawebsite" (without the quotation marks) to get a discount of $10 on your order. After that you'll just need to complete your personal details and pay (either with Paypal or with a credit card). Your hosting plan should be active after one hour, and you'll receive an email confirmation with all the details.

Step 3: Installing WordPress

If you try to open your website at this point (by typing your domain in the address bar of your browser) you'll just see a white page with the specifications of your web server, as the image below illustrates.
Screenshot of blank website page
The next step is to install a content management system (CMS) on your site. The CMS makes managing your site, its design and internal pages a very simple task. We highly recommend that you use a CMS called WordPress. It is an open source software, meaning that it is free and supported by a very large community of website owners. Secondly, most hosting plans come with an automatic installation script for WordPress, so getting it up and running will be straight forward. We use WordPress to power this website too.
First of all log into your cPanel (the control panel of your website). You can do this by typing www.yourdomain.com/cpanel on your browser, and then by entering your username and password (you'll find this information in the email you received from the hosting company).
Screenshot cPanel
Now scroll down until you find the "Software/Services" box, and click on on the "Fantastico De Luxe" icon. On the next page click on "WordPress." You'll find it on the left menu, under "Blogs." After that click on "New Installation."
On that new page you'll need to fill in the details about your site. You don't need to change anything in the "Installation location" section. Your domain should already be selected there, and the "Install in directory" field should be left blank, because we don't want to install WordPress in a directory (e.g., www.yourdomain/blog/) but rather in the root of your domain (e.g., www.domain.com).
Below that you'll find the "Admin access data," where you'll put your admin username and password. Finally, there is the "Base configuration" section, where you need to put your admin nickname, your email address, the name and description of your website. The page should look like this:
Screenshot of the WordPress Install
When everything is set you can click on "Install WordPress." The next page will confirm the name of the database that will be created for your site. You can click on "Finish installation" there. On that final page you'll get the details of the installation. At the bottom you'll see a form that you can use to email yourself the details of the installation (e.g., admin username and password). It is recommended that you use it so you won't lose that data.
Type your domain name in a new browser window to see how your website looks now. It should be something like this:
Screenshot of the WordPress Default Theme

Step 4: Choosing a Template for Your Website

A big advantage of using WordPress to power your website is the fact that there are literally thousands of free templates available, created by the community of WordPress users. Note that these templates are called "themes."
You should start your search for a suitable theme at the Official Themes Directory. On the first page you'll find a list of featured themes. Alternatively you can use the "Filters and Tags" interface to narrow your search to themes specific characteristics. Finally, you can also use the search box if you are looking for something specific. For example, if you are creating a website for your company, you could search for "business" or "corporate."
Screenshot of the WordPress Themes Directory
If you can't find a good theme in the directory, try using Google. Do you want to create a blog about swimming? Search on Google for "swimming wordpress theme." Do you want to to create an online store to sell products? Search for "online store wordpress theme." So on and so forth. Remember that you'll be able to customize your theme later on, so just worry about finding something that fits your general requirements.
Depending on your budget you might also consider purchasing a premium WordPress theme. It will cost anywhere from $20 up to $60, but the quality is usually higher when compared with the free themes. One website we recommend for premium themes is ThemeForest.com. The prices are quite affordable (around $30 per theme), and they have over 2,000 themes for all sorts of purposes and requirements.
Once you find a theme that is suitable for your website (either a free or a premium one) simply download the .zip file to your computer. Now you'll need to log in the WordPress admin panel. You can do that by typing www.yourdomain.com/wp-admin into your browser. After entering your username and password you'll be redirected to the Dashboard of the admin panel, which looks like this:
Screenshot of the WordPress Dashboard
You'll have time to familiarize yourself with all the features and links you see there. For now just open the "Appearance" menu on the left, and then click on "Themes." On top of that new page you'll find a tab called "Install Themes." Go ahead and click on it. Now select "Upload", and choose the theme file you have downloaded to your computer. On the next page you'll need to put in your FTP information (you'll find this in the email you received from the hosting company as well). Click on "Proceed" and WordPress should upload and install the theme for you.
Screenshot of the WordPress FTP
If for some reason the automatic theme install fails, you can always do it manually. You'll just need to unzip the theme on your computer, and then to upload it to your server via FTP. We recommend that you use a free program called FileZilla to do that. With the program running, connect to ftp.yourdomain.com, using the FTP username and password provided by your hosting company (you can leave the "Port" field blank). Once the connection is established, open the "public_html" folder you'll find on the right side of the program, then open the "wp-content" folder, then open the "themes" folder, and finally upload your theme there (the whole folder).
Screenshot of the FileZilla
Now log back into the WordPress admin panel, click on "Themes" under the "Appearance" menu again, and you should see your theme listed there. Simply click on it to see a preview, and then click on "Activate," on the top right corner. Once your theme is active you can visit your website URL to see how it looks. Here is a screenshot of a sample theme we activated:
Screenshot of our website finished

Step 5: Customizing Your Design

Once your selected theme is active, you can start customizing your design. The first decision you must make is whether you want a static front page or a dynamic one. If your website will be a content based one, like a blog where new articles get published frequently, then you probably want to go with a dynamic front page, displaying all the latest articles and posts there. In this case you don't need to change anything, as WordPress comes with a dynamic front page by default.
If you are making a website for your company, to sell products or to offer your services, then a static front page is a better idea. You can create one by opening the "Pages" menu on the WordPress admin panel, and then by clicking on "Add New." After that simply write the title and the content of your page. You can add images, video and scripts if you want. Once you are happy with the page, click on "Publish."
Screenshot of the WordPress Static Page
The page should be live now, but it is still a normal page. In order to make it the front page you'll need to open the "Settings" menu, and then click on "Reading." Right on top you'll find a check box you can use to determine what should be used as the front page. Simply select the one you just created, and click on "Save Changes."
You can also customize any other aspect of your design by opening the "Appearance" menu and clicking on "Editor." Each file present there controls a different aspect of your theme. The "Stylesheet," for example, controls the general design settings like font size, color, theme widths, headline styles and so on. These settings apply to all pages of your website.
Screenshot of the WordPress Theme Editor
The .php files, on the other hand, control the layout of specific pages. The index.php file, for instance, controls the content of your front page. The single.php file controls the content of the single post pages. The footer.php controls the content of the footer of your website, and so on. Just remember to backup each file (i.e., copy the text to a word processor) before you start changing it, so that if anything goes wrong you can restore the working version.
Screenshot of the WordPress Widgets
Another section worth exploring is the "Widgets" one (you'll find the link inside the "Appearance" menu as well). On most WordPress themes you can add or remove design features (e.g., menus, links, search boxes) simply by dragging and dropping the widgets into your sidebar.

Thursday, 13 September 2012

How To Add Random Posts Widget On Blogger, Blogspot

Random posts widget is another great widget and very important in a blog also if you want to show your readers other stuffs you have in your blog. This widget I have here display some of your posts randomly. Same as the related posts widget but different because this only shows your other posts either related or not. Below is an image of this widget.


1. Go to your Dashboard > Design.
2. Then click on Add a Gadget and select HTML/JavaScript.
3. Copy the code below and paste on the HTML/JavaScript gadget.


4. Preview your blog.
5. If you can see the gadget running perfectly then SAVE it.


Configuration:

numofpost=6 - the number of posts to be shown in the widget. You can change the numerical value as you want.


Just follow the steps and you will have it in your blog in no time. Leave a comment you have something to say.

How To Add Meta Tags in Blogger , Blogspot for SEO

Meta tags / content is a very important factor in search engine optimization. This means that this will help search engine crawlers to find your blog. This tags will not be seen in your homepage or your blog because this is placed in the blog HTML and only crawlers and of course you can see it. Some blogger templates have built-in meta tags in their blogger HTML so the only thing to do is to configure the meta tags. But most of the blogger templates don't have meta tags in their blog HTML so it is your initiative to add the meta tags to make your blog more SEO friendly.


Adding Meta Tags / Content On Blogger HTML

Please Backup your Blog Template Before Updating Meta Tags for safety Reasons
  1. Now go to your Dashboard > Design > Edit HTML.
  2. Find the line below in your HTML.
3. Configure the js below:


Link

DESCRIPTION HERE : Change it with your blog description.
KEYWORDS HERE : Change it your KEYWORDS, separate keywords with comma.


4. Now add the configured script just below the code in step 2.
5. SAVE your template.

If you followed the steps above then you successfully added Meta Tags / Content in your blog HTML. Good luck in your SEO adventure. Drop a comment if you have something to say!

How to Improve Your Blog Search Engine Optimization By Changing Your Post Title Before Blog, Blogger Name

how to improve search engine optimization (SEO) of your Blogger blog (Blogspot blog) by optimizing your post title tags for search engines like Google and Yahoo. How to improve search engine results by optimizing post title tags.

By default your Blogger blog (Blogspot blog) does not have search engine optimised title tags. This puts your blog at a disadvantage compared to other blogs that have inbuilt SEO or enhanced SEO modules as these sites are likely to be placed more highly in search engine results.

The title tags of your blog are ordered by blog name first followed by the title of the post. This is not ideal for popular search engines like Google and Yahoo which give more importance to the first words of a title. By way of example take a look at how the title tags of this blog were viewed in a browser before any SEO. Note the order of the tags: Blog Name | Post Name.

How Blogger Title Tags are viewed in an IE browser

When this site was first indexed by Google this is the search engine results this site received. Note how the blog name is first in all the results.

Search engine result for blogknowhow.blogspot.com before the tweak

Fortunately there is a simple tweak to your template which can rectify this problem. By simply reversing the position of the blog name and page title significant improvement can be gained in search engine results. See the difference in the example below:

How Your Blogger Title Tags are viewed in your browser with change

Follow the step by step guide below to achieve higher rankings in search engine results.

Tweak of Title Tags for New Blogger (beta) Blogs

1. Login to your blog at Blogger.com and navigate to Design > Edit HTML

2. Backup your template by downloading it to your computer. This will ensure that you can upload your template before these changes in case of problems.

3. Replace the following line of code (about 5-10 lines from the top):

<data:blog.pageTitle/>


with (highlight code, Ctrl + C to copy)


<data:blog.pageName/> |<br /><data:blog.title/>

<data:blog.pageTitle/>

4. Click on Save Template and then View Blog. Navigate to an individual post. You will see that your page title is now first followed by your blog title. A pipe symbol separates the two.


Below is an example of the change in search engine results since the tweak was implemented for this site. Since optimising for search engine friendly page titles there has been a significant improvement in traffic accessing the site. This didn't happen right away but if you too implement this page title tweak and continue to deliver quality content you are on your way toward higher search engine rankings.

Blog Know How Search Engine Results in Google with Title Tags Tweaked

Troubleshooting
Several readers have reported issues with the line:


If you experience problems try inserting this line instead which works on many blogs. Ensure you have double quote marks around item followed by a single quote mark:


For more on this please read the comments section.

UPDATE
Due to the number of readers experiencing problems with their browsers reading this post I have created a PDF file of this article which is free to download

This Blogger tutorial (Blogspot tutorial) has discussed how to adapt the title tags of a Blogger (Blogspot) blog to improve search engine optimization (SEO) by Google,Yahoo and other search engines.

Wednesday, 12 September 2012

How to add Recent Comments Widget with Avatars and Without AvatarsTo Blogger

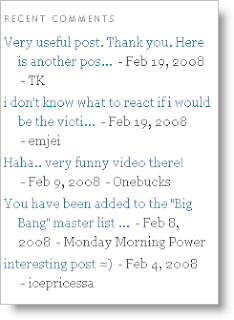
If in the past tutorial i've talked about a simple Recent Comments widget, now i'll be sharing to you a stylish Recent comments widget with round avatars, which comes along with comment excerpts.
You have the option to change default Anonymous Avatar Image as well.

How to add recent comments widget with avatars

Step 1. Go to Blogger Dashboard, then go to Design >> Page Elements and Add a Gadget.
In the popup window scroll down + choose HTML/Javascript and paste in the following code:

If Gadget Script not Show than Click Here to View COdes --> CLICK

Settings:
Link

- Replace your-blog with the name of your blog.
- Replace the "5" values in red, with the number of comments you want to appear, from:

  • numComments = 5

and

  • &max-results=5

- To change the anonymous avatar, replace the following address with your own:

  • http://www.gravatar.com/avatar/?d=mm

- To change the size of the avatar, replace 60 value in green with your own

After you've made the changes, click Save... and you're done!

WITHOUT AVATARS


1. Log in to your dashboard--> layout- ->Page Elements

2. Click on 'Add a Gadget.' Select 'HTML/Javascript'.

3. Select the whole code given below and paste it in the widget box you have just opened above.
Note : Replace "http://YOURBLOG.blogspot.com" with Your blogspot URL.

4. Now Click Save and Refresh Your site.

IF YOU DONT FIND THE CODE PLEASE CLICK HERE FOR CODES

Tuesday, 11 September 2012

How to Add Animated Flash Cloud Label In Blogspot, Blogger By blogumus by roy tanck

Another widgets tools for blogger I will share. The "Blogumus" is an Flash based tag cloud widget which uses scripts converted from Roy Tanck's WP Cumulus plugin for Wordpress. The result is the widget you can see in action at the top of this post. Hover your mouse over the Flash object to see the animation begin. In this post, I'll explain how you can add Blogumus to your own Blogger layout with ease!

How to Add flash Animated label cloud Blogumus for Blogger

Step 1:
First Of all Goto Your blogger Layout>Page Elements page and add a Labels Widget there..You can Do that using the Add a Page Element Option on that

Choose to sort the labels Alphabetically when prompted.
Step 2:
After Adding the Label Widget Goto Layout>Edit Html (Do not expand the widget templates for the sake of easy explanation)

You will find some code similar to


  • ()


    Immediately after this line, paste the following section of code:


    Finally, preview your template. If installed correctly, you should see the tag cloud appear in your sidebar.
    If you want to change the size and colour of the label cloud , just play around with the highlighted numbers in the code and you will do fine.
    make-money-468x60