


- Start Outlook 2011 for Mac
- Go to File and than click Import
- Select Outlook Data File (pst or olm) and click on the next arrow
- Select Outlook for Windows Data File (.pst) and click on the next arrow
- Locate the PST file. Outlook will now import the PST file
- Click Done to close the import process
- The PST file will be available now in the left side of the screen “ON MY COMPUTER”
Showing posts with label System Support. Show all posts
Showing posts with label System Support. Show all posts
Friday, 5 October 2012
How to Import a .PST ( Email ) File From Windows Outlook To Outlook 2011 for iMac


Thursday, 4 October 2012
How to Fix Dell Latitude D610 Restart, Hang Problem
First remove the top cover plate by prying up on the right side and rocking it back and forth to disconnect it.

Next remove the 2 screws that hold down the keyboard. To remove the keyboard unhook the catch that is on each side of it then unplug it from the motherboard. The second screw is above the F4 key.

Next locate the screws that hold down the processor heat sink and loosen them. They stay attached to the heat sink.

When you remove the heat sink you should be able to see if it is clogged with dust like this one. Remove the dust and then put everything back together.

Be sure to check to see if the cooling fan runs on start up. It usually shuts off until it gets hot then it turns back on again automatically.
Tuesday, 25 September 2012
Warid Telecom : SMS Daily and Weekly SMS Subscribe Details | Warid Wap, GPRS, MMS Settings Details

To subscribe the bundle
Daily SMS Bundle, write “DS” and SMS to 3333.
Weekly SMS Bundle, write “WS” and SMS to 3333.
To de-activate the bundle
Daily SMS Bundle, write “SMS off” and SMS to 3333.
Weekly SMS Bundle, write “SMS off” and SMS to 3333
Warid Wap, GPRS, MMS Settings
Online CAP Results 2012

The system of Centralized Admission Policy (CAP) was introduced in the
year 2000 by the Education Department, Government of Sindh for the
admissions in class XI in the colleges and higher secondary schools of
Karachi. The objective of the policy is to make more efficient the
procedure of admissions and root out every sort of indiscretion as well
as to offer equal prospect to the students for taking admission in the
colleges of their selection on the root of marks merit. The Cap system
is the very reliable and easy to take admission in the colleges and
running successfully since it started. Find CAP Result 2011-2012
(Regular and private) of Pre Medical, Pre Engineering, Commerce,
Humanities, economics and computer science of Male & Female
Candidates
CHECK YOUR RESULT ON CAP OFFICIAL SITE
Providing This Information is Only to Help User to Get there Results.
Providing This Information is Only to Help User to Get there Results.
Thursday, 20 September 2012
How To FIx Computer Common Errors & Troubleshooting It...!!!

Tips is Given Here:
1. The computer isn't starting :
If
the computer does not turn on when you press the power button, the
following suggestions may help you to determine why the computer will
not start up. First of all, check if the computer is plugged in to an AC
outlet properly. Plug another electrical device into the outlet to be
sure that the outlet is providing adequate power.
2. The computer screen is blank:
If
the screen is blank, the computer may not be set to display the image
on the computer screen. First, check if the monitor is plugged in to a
power outlet and is connected to the computer securely and make sure the
monitor power button is on. If the power light is not on, it means that
the outlet is not delivering power to the monitor. Fixing the power
outlet in such cases should help you.
3. Trouble with Graphics card: If
the power light of the computer and monitor is on and nothing comes up
on the screen when you start your computer then there must be something
wrong with video card. You should take your computer to a repair shop or
change its video or the graphics card with a new one.
4. OS or some Software is functioning abnormally: If
the Operating System (OS) or some other software is unresponsive or
responds abnormally, follow these tips. Restart your computer and run a
virus scan. For this purpose you should have a reliable antivirus
software installed on the computer to fix this issue.
5. Windows do not boot properly: If
windows do not boot properly then you should reinstall windows with the
windows recovery disk. Most of the times, this should help you get rid
of the problem.

6. The computer is on but not responding: If
the computer is turned on but not responding to software or keyboard
commands, then it must be frozen or halted. Press and hold the power
button for at least 5 seconds, it will be turn off. Now restart your
computer. This should fix things up.
7. Any Removable device is not working: If
an external device does not function as expected, turn it on according
to Manufacturers instruction; be sure that all device connections are
secure and receiving electrical power and compatible with the operating
system. And that the correct drivers are installed and updated.
8. Slow working internet: To
increase your browser performance, you must frequently clear cookies
and internet temporary files. In the Windows search bar type – %temp%
and hit enter to open the temporary files folder. You can use Ctrl+A to
select all of them and then press Delete. Please note that some of the
files may not get deleted if they are being used by the OS; but that is
fine.
9. Internet network problem: If
your computer can not get connected to internet then check IP address,
check network cables are connected properly, make sure that servers or
gateways firewall application is not blocking http requests from your
PC.
Sunday, 16 September 2012
How to Get MAC Address Remotely On Network by Computer Name or IP Address
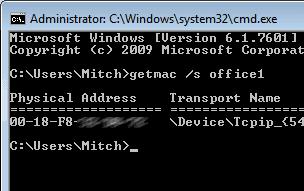
MAC address of a network card by IP address or Computer Name by using the GETMAC command.
To use this command, do the following:
1. Open a command prompt with administrator privileges.
2. You can use one of the following commands
GETMAC /s computername - Get MAC by Computer Name
GETMAC /s 192.168.1.1 – Get MAC by IP Address
How to Get Mac Address Of Your Computer Lan or Wifi Adapter From Command Prompt

How to Get Mac Address Of Your Computer Lan or Wifi Adapter From Command Prompt. with easy step .
You may need the MAC Address of your network card to connect to a network secured using MAC Address Filtering. Here’s how to find it using DOS commands.
1. Hold down the Windows Key and press R.
2. Type CMD and press Enter.
3. Type getmac and press Enter.
4. The Physical Address is listed, that is the MAC Address of your network card.
How To Enable and Use Net Send Service On Win Xp To Message Any Computer Without Third Party Software

Command For Net Send Is : CLick (Start) Click (Run) Type = (net send) (Computer IP Or Computer Name) (Message) EXAMPLE : net send 192.168.0.56 TEST TEST
1. Right-click My Computer, and click Manage.
2. Click the plus sign next to Services and Applications, and then click Services.
3. Double-click Messenger.
4. Click the General tab and select Automatic from the Startup type list, and then click Apply.
5. Under Service status, click Start, and click OK.
6. Click OK, then OK again.
Be sure to perform these steps on both the sending computer and the receiving computer.
Friday, 14 September 2012
How to Create and Configure VPN Site to Site On ISA Server 2006

F.1
The first, we need setupConfigure IP Address at lab machines as figure 1
Join server ISA-msviet to DCmsviet (msviet.com)
Join server ISA-vispro to Dcvispro (vispro.com)
Step 2:
At ISA-msviet create new user: vispro / password
At ISA-vispro create new user: msviet / password
At the moment, confer these user have allow access in Dial-in Tab
Step 3:
Install Isa 2006 standar to ISA-msviet and ISA-vispro
Configure ISA rule, the following figure:

F.2
The IP range: 100.100.100.1 – 100.100.100.254 (customize) is virtual range IP which assigned automatic for clientvpn access to Internal (192.168.10.0/24)
To continue, select Remote sites Tab: create new connection

F.3
Note: site name = username which create at last step, here( ISA-mviet) sitename= vispro
Select Point-to-Point at next table.
In table Remote Site Gateways, enter the IP Address of Remote site VPN server that allow Internal connect out site, here we type 192.168.1.201 – interface WAN in ISA-vispro.
Click next, we to Remote Authentication tab, at that type user remote is created out site (vispro) – msviet / password
The part Network Address, specify IP range Internal on out site, at here we type 192.168.11.1 - 192.168.11.254
To continue, click next and select protocol (all outbound traffic), the end click finish.
Step 4:
Right mouse on Virtual Private Network and select properties, at tab access network we tick EXT, vispro as following figure:

F.4
Ok, we configure successful in ISA-msviet. Analog simulator, we’ll configuration on server ISA-vispro
Step 5: at both ISA server,
Start Routing and Remote access, ensure Network interface is connected

F.5
Note, in ISA2006, we must edit system policy on Firewall Policy ( both isa server)

F.6
Now, we can access resource from site msviet to site vispro.a
Wednesday, 12 September 2012
How to Create and Configure L2TP Connection in Windows 2000, 2003, XP Machine
 From the Start menu, select Settings, select Network and Dial-up Connections, and then click Make New Connection.
 For Windows XP, goto Control Panel and select Network Connections. Then click Create a new connection.
 From the Network Connection Wizard, click Next.
 From Network Connection Type, click to select Connect to a private network through the Internet, and then click Next. For Windows XP, choose Connect to the network at my workplace. Then select Virtual Private Network connection.
 You may see the Public Network screen at this time. Click to select the dial-up connection that connects you to your ISP. If your physical connection is an Ethernet connection, select Do not dial initial connection. If the physical connection is through an ISP, select Automatically dial this initial connection. Click Next. For Windows XP, you will be prompted first for a connection name first.


 From the Completing the Network Connection Wizard, enter a connection name, and then click Finish. For Windows XP, the connection name was entered before step 4.
 Click Properties.
 Click to select the Security tab, click to select Advanced (custom settings), and then click Settings.
 From Advanced Security Settings, from the Data encryption drop-down menu, click to select Optional encryption (connect even if no encryption).
 From Logon security, click to select Allow these protocols. Click to select only Unencrypted password (PAP) and Challenge Handshake Authentication Protocol (CHAP). Click to clear any protocols that do not apply.


 Click Connect.
Subscribe to:
Posts (Atom)


