Social Icons

Showing posts with label IT. Show all posts

Tuesday, 20 November 2012

How to Make icons background transparent in Windows XP

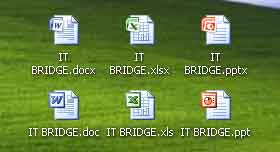
If you’ve been wondering why your XP desktop icons have a background color, you’ll be glad to know you can flip a checkbox and have them go back to a normal transparent background.
See the two below:
icons with backgroundicons without background
To set the transparent background on the icons, we’ll need to open System Properties in Control Panel (or right-click on My Computer and select Properties).
system properties 343
In this dialog, click the Advanced tab, and then the Settings button under the Performance section.
232
Now scroll down to the button where you’ll find a checkbox for “Use drop shadows for icon labels on the desktop”. Make sure you check this box if you want transparent backgrounds on the icons.
Why this option isn’t just labeled “Enable Transparent Icons On the Desktop”, I just can’t say.
if checking it doesn’t fix your problem there is another step you must do. Follow this procedure:
Control Panel > Display > Desktop > Customize Desktop > Web > Uncheck everything here > OK > Apply

Monday, 15 October 2012

How to Secure Private Cloud Security Services Data Usefull Tips, Tricks and Guidelines

Many organizations use private clouds to ensure safety and easy handling of data. However, when the number of people who control the data increases, the risk of hackers tampering the safety measures increases too. It is critical to form and implement foolproof strategies to protect the data that’s on the cloud. Though there is strict monitoring of online activities and logins, hackers break in often. There’s no storage system that hasn't been tampered by hackers. To make cloud computing safe, companies use private clouds but these private clouds are no exceptions when it comes to security. All these incidents make companies, especially those who are in the cloud, diffident about their data storage system. There are some tips to strengthen your cloud security.


Cloud Computing Tips
1.    Single Tenant Clouds:
Using a single tenant cloud is very important to manage your data efficiently. Ask your service provider about the data storage location before signing up for their service. If the physical location of data is distributed among different servers, there are high possibilities of tampering and you may not be able to track the online activities effectively. Under single tenancy architecture, a single instance of software is used to serve each client. You can customize the software as per your needs and the data center model you want to have can be designed without any need for changing according to vendor restrictions.
2.    Classify Data:
All types of data don’t need the same security level. Confidential and sensitive data needs a higher level of security than public data. To make your private cloud secure, classify data based on the levels of security needed. This will help you focus on the safety of most critical data and implement lower levels of security strategy for other types of data. For example, the budget for the different departments needn’t be known to the entire organization, and so the security level of such files should be higher than the security level of other types of files.
3.    Configure Firewalls:
Configuring firewalls is as important as owning a private cloud. There are multiple ways to configure firewalls. And the responsibility doesn't stop with installing and configuring firewalls. You need to try and test your firewall to detect any loopholes through which your data may be mined out. Try penetrating your own firewall using different methods both internally and externally. It will give you different ideas on how you need to monitor the activities and secure your system.
4.    Encryption:
The next best thing you can do is to encrypt the data. This statement seems like a no-brainier because almost all clouds have encryption. However, not all the data in the cloud are encrypted. Most clouds encrypt only data that is in transit. Other data that is stored and is idle is not encrypted. Ensure that even the idle data is encrypted so that you will not end up losing your data and identity.
5.    Monitor and Store Logs:
You should also monitor all online activities like logins, file transfers, file sharing, link sharing, password changes, etc. As monitoring becomes difficult when the number of authentications to be done in a day crosses a limit, organizations tend to give up keeping a tight rein on authenticating. This is the most common cause of data loss and hacking.
Implementing effective strategies and relying on good service providers are the basic steps to safeguard your cloud. Some of the steps discussed here seem to be complex and unnecessary but you can reap long term benefits by following these.
Author Bio: - The above content and topic was provided by Samantha Kirk from mytechhelp.com, a site that offers savings and current information on Toshiba Support.

Saturday, 13 October 2012

How to Set the Snapshot Resolution, Pixel in Adobe Acrobat Reader For Image

found in Adobe, is under Edit | Preferences | General, there is an option to set the snapshot tool resolution to a fixed number. I use 300pixels/inch’
The Adobe Acrobat Reader Preferences
300 PPI is a good resolution for printed images. 96PPI would be fine for on-line documents.
The Adobe Acrobat Reader Fixed pixel resolution
You can now use the Marque snap shot tool to capture images from a PDF file at a vastly improved quality.
The Adobe Acrobat Marquee select snapshot tool


How to Set the Snapshot Resolution, Pixel in Adobe Acrobat Reader For Image

Friday, 12 October 2012

Open Office 2007 Xlsx Files in MS Office 2003 / XP / 2000

Open Office 2007 files in MS Office 2003/ XP/2000

Most of the users get the problem that he is not able to open Microsoft office 2007 files with extensions “.docx” – Word Document, “.xlsx” – MS excel file and “.pptx” – Powerpoint presentations in office 2003 or lower versions.


This is a common problem with many users who use MS office versions which are older than MS office 2007. The documents saved by the new office software are not backward compatible directly. But there is a very useful and easy add-on available from Microsoft itself.

Also we will tell you a workaround to save your documents in such a way that will open it on any computer with older version of Microsoft office.

Way 01:
Install the compatibility pack on a computer that is running Microsoft Office 2003 programs, Microsoft Office XP programs, or Microsoft Office 2000 programs

Way 02:
Save Files In Compatible Format

Way 01 : Download Compatibility Pack

Microsoft has added the new Office Open XML Formats to the following 2007 Microsoft Office programs:
  • Microsoft Office Excel 2007
  • Microsoft Office PowerPoint 2007
  • Microsoft Office Word 2007
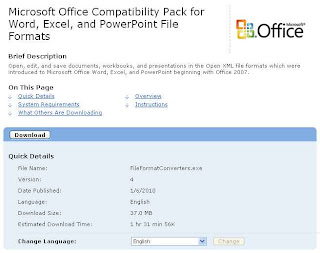
A compatibility pack is available to make sure that you can open and save Office Open XML Formats (Office 2007) in earlier versions of Microsoft Office (Office 2003, 2000 or XP).

Follow the given steps to download free Microsoft compatibility pack and install it.

To use this feature, you will need to be logged into your computer with administrative rights.


When you have downloaded the file, double click on FileFormatConveter.exe file to start installation.

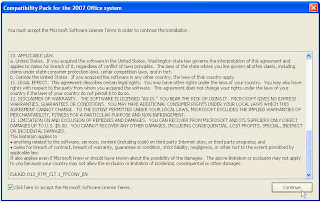
Now here it’s simply a case of pretending you’ve read the license terms and clicking continue


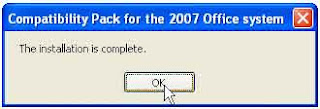
Now Click OK to Complete Installation.

Once the process is done, you can open new Office files in older version.


Way 02: Save Files In Compatible Format

You can install this compatibility pack in your computer, but if you need to send your document to a client or a friend or anyone else who does not have this compatibility pack, then you will still be in trouble. To avoid such trouble we give you a very useful tip, because we always believe “Prevention is better than cure”.

We will tell you how you can save the documents in older formats which will open the documents with the new as well as old versions of MS office, without any problem.

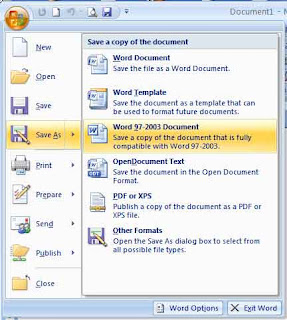
To save it in compatible format, simply click on the circular office logo at the top left corner of MS word / or Excel or PowerPoint > click on Save As arrow > and select the MS office 97-2003 compatible version as shown in images below.


Or else you can change the saving option permanently in new Office option.

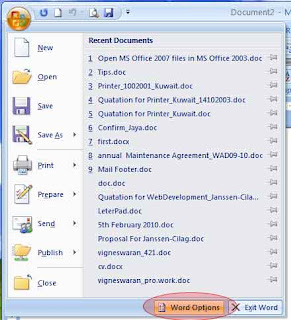
Click Office Button >> Word Options


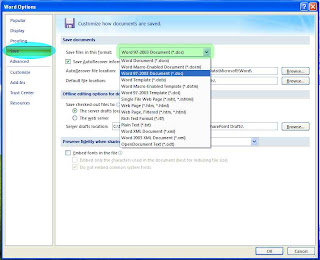
Select older extension as a default saving option.


Now you can enjoy.

Friday, 5 October 2012

How to Import a .PST ( Email ) File From Windows Outlook To Outlook 2011 for iMac

  • Start Outlook 2011 for Mac
  • Go to File and than click Import
  • Select Outlook Data File (pst or olm) and click on the next arrow
  • Select Outlook for Windows Data File (.pst) and click on the next arrow
  • Locate the PST file. Outlook will now import the PST file
  • Click Done to close the import process
  • The PST file will be available now in the left side of the screen “ON MY COMPUTER”

Customize the Mission Control Wallpaper in Apple iMac Lion

You have probably noticed when you activate Mission Control, in Mac OS X Lion, that there is a second background image behind the wallpaper you may have already chosen for the desktop. The Linen tiled picture is selected by default for the operating system, but you can change this to a custom image if you desire to give it your own unique look and feel.


Setting Up Your Image

Lion's processing will not recognize a file that does not have the proper extension for the file of the picture you will be using. So, in order for this to work, you will need to either make a new picture in an application of your choosing, or you can simply copy and paste your ready image to an app and export the file with the PNG format. To simplify this process, just follow these steps:

Open the file you want to use as the new Wallpaper (we are using Preview for these directions):

• Go to File, and select Export

• Next, choose the format PNG, and save as "defaultdesktop.png"

If you want to optimize the look of the wallpaper before exporting, you should see if
the resolution of your display matches that of the file you will be using. If the file is too long or too wide you could run into problems with how it displays. The default Linen image is 256 x 256 pixels small square that is used as a tiled pattern. You can check the resolution of your monitor by simply launching System Preferences and going to Displays.


Replace the Mission Control Background Picture


Buried within the system files, this little file is hidden waiting for you to change it. You cannot find this particular file by using Spotlight or the Finder search. Instead, follow these steps to get to it:

• Choose Go from the Finder menu (or hit Command + Shift + G) and type in this location:
/System/Library/CoreServices/Dock.app/Contents/Resources/

• Look through the folders and files until you see "defaultdesktop.png" (you can make a copy of this if you want to revert back to this easily at a later time).

• Select your file you named "defaultdesktop.png" and move it to this Resources folder. You can do this the easiest way by dragging the file over the open Finder window. A window will pop up asking which option you would like to use. Choose Replace. You may have to enter your User Password to Authenticate this process.


• Next, launch Terminal from Spotlight and type the following command:
killall Dock


Now, whenever you use Mission Control by using the assigned F3 key or the three finger upward swipe or by simply using the icon on the dock, you will see your chosen beautiful custom picture appear before your eyes.

If you want to use an existing OS X Lion desktop image as a new Mission Control background, just as we have here in our example, you can find these desktop files by selecting "Go" from the Finder menu, and click "Go to Folder", then type "/Library/Desktop Pictures/". Once here, you can choose a file to copy. Select it, and go to the Finder menu and under Edit, hit Copy. Next, paste to the Desktop or wherever you want to paste. Then open the file in Preview, from there, follow the same process to export the file in the PNG format. After this has been accomplished, go once again to the Resources folder and drag the file over as shown in the preview steps above. Enter your password to Authenticate if needed. And Presto!

If you would like to go back to the default setting, you can just replace the file in the Resources folder with the original backed up Linen image file.

Thursday, 4 October 2012

How to Fix Dell Latitude D610 Restart, Hang Problem

I bought a used Dell D610 laptop a year ago and really like it. Since then I have purchased over 6 of them. Recently one of them started overheating and shutting down. Normally these laptops are a lot of work to get apart, but I figured out a quick 5 minute repair for this problem.

First remove the top cover plate by prying up on the right side and rocking it back and forth to disconnect it.


Next remove the 2 screws that hold down the keyboard. To remove the keyboard unhook the catch that is on each side of it then unplug it from the motherboard.  The second screw is above the F4 key.


Next locate the screws that hold down the processor heat sink and loosen them. They stay attached to the heat sink.


When you remove the heat sink you should be able to see if it is clogged with dust like this one. Remove the dust and then put everything back together.


Be sure to check to see if the cooling fan runs on start up. It usually shuts off until it gets hot then it turns back on again automatically.

Friday, 28 September 2012

KMS Activator for Office 2010: Genuine Activation Key

Microsoft has already launched its new Office version Microsoft Office 2010 and every office users are switching to this new version and they are not aware of how to activate Microsoft Office 2010 and they are getting trial period of 30 days of product activation and also facing Microsoft Office 2010 Genuine Activation problem. So today I am going to share how you can activate Microsoft Office 2010 and avoid 30 days trial period and make your Office 2010 copy fully genuine and activate for a life time.


Now you don’t have to crack your Microsoft Office 2010 and also you don’t have to search Genuine Keys for your Microsoft Office 2010 because no serial keys and cracks will helps you to make your office 2010 copy genuine accept the license serial keys and working activation crack. After a lot of research on internet I have finally found Two Ways to Activate Microsoft Office 2010
One way is to use working genuine crack which is known as KMS Activator for Microsoft Office 2010 and the other way is to Manually Activate Microsoft Office 2010 copy and makes it permanently genuine. So I am going to share both method of activation. But in this post I will let you know how you can activate Ms. Office 2010 with KMS Activator.

How to Activate Microsoft Office 2010 by using KMS Activator:

Download KMS Activator Software for your Ms. Office 2010 Now and get rid of 30 Days trial period and make your Office 2010 fully genuine and download updates directly from Microsoft without any interruption and also bypass your activation pop-up window and get all your Office 2010 Update without any problem. Simply follow the following steps to activate your Ms. Office 2010 and make it genuine.
Installation Instruction:
  • First Disable your all kind of Anti-Virus/Security Software. (Recommended)
  • Run KMS Activator Software.
  • Click on Install/Uninstall KMService Tab.
  • Then Click on Activation Office 2010 VL.
  • Follow the instruction inside the window.
  • Your Microsoft Office 2010 is genuine now.
  • Check the status of your Ms. Office 2010 by click on Activation Check Office 2010.
  • Hurray! Enjoy Genuine Ms. Office 2010.
Note:
If above KMS Activation Method doesn't work for you, than you can also try to use Manually Activation Method of Microsoft Office 2010.
File Download Instruction:
After opening above download link Click on Slow Download Button for Free User Downloading and Don't Use Any Download Manager when downloading above File (You may face Download Interruption).

Saturday, 22 September 2012

How to Update to ICS 4.0.4 from 2.3.4/2.3.6 (Without Rooting) Samsung Nexus S i9020a

Update from 2.3.4 (GTJ61)/2.3.6 (GRK39C) to 2.3.6 (GRK39F)


  1. Download this file
  2. Rename the downloaded file to update.zip
  3. Put it update.zip you have downloaded on your sd card. 
  4. Turn off your device 
  5. Go to Bootloader (press&hold volume up button then press&hold power button) 
  6. When in Fastboot mode navigate to Recovery using volume up/down buttons 
  7. Press the power key to select Recovery 
  8. If you see a warning logo, press the power button and then press volume up button then release both to go to the Main Recovery menu
  9. From the menu, select Apply update from /sdcard, and choose update.zip from the list. 
  10. When update is finished go back and select reboot system now
Update from 2.3.6 (GRK39F) to 4.0.4 (IMM76D)

  1. Download this file
  2. Use the above steps again to update.

Friday, 21 September 2012

Download Dell Latitude | D610, 620, D630 Drivers For Windows Xp


Download Dell Latitude D610 Lan-Audio Drivers WindowsXP


Dell Latitude D610 Broadcom 57XX Gigabit Integrated Controller Aplications  Download
***
Dell Latitude D610 Broadcom 570x Gigabit Integrated Controller Driver Download
***
Dell Latitude D610 SIGMATEL STAC 975X AC97 Audio Sound  Download
***
Dell Latitude D610 Intel Mobile Chipset Download

Thursday, 20 September 2012

All Common Router Default IP Address

ROUTER IP ADDRESS
3Com 192.168.1.1
Apple 10.0.1.1
Asus 192.168.1.1, 192.168.1.220
Belkin 192.168.2.1, 10.1.1.1
Buffalo 192.168.11.1
Dell 192.168.1.1
D-Link 192.168.0.1, 0.30, 0.50, 1.1, 10.1.1.1
Linksys 192.168.0.1, 1.1
Microsoft 192.168.2.1
Motorola 192.168.10.1, 20.1, 30.1, 62.1, 100.1, 102.1, 1.254
MSI 192.168.1.254
Netgear 192.168.0.1, 0.227
Senao 192.168.0.1
SpeedTouch 10.0.0.138, 192.168.1.254
Trendnet 192.168.0.1, 1.1, 2.1, 10.1,
U.S. Robotics 192.168.1.1, 2.1, 123.254
Zyxel 192.168.1.1, 2.1, 4.1, 10.1, 1.254, 10.0.0.2, 0.138

How To FIx Computer Common Errors & Troubleshooting It...!!!

The computer troubleshooting tips those are given bellow if applied carefully will save your day and working time. 

Tips is Given Here:


1. The computer isn't  starting :
If the computer does not turn on when you press the power button, the following suggestions may help you to determine why the computer will not start up. First of all, check if the computer is plugged in to an AC outlet properly. Plug another electrical device into the outlet to be sure that the outlet is providing adequate power.
2. The computer screen is blank:
If the screen is blank, the computer may not be set to display the image on the computer screen. First, check if the monitor is plugged in to a power outlet and is connected to the computer securely and make sure the monitor power button is on. If the power light is not on, it means that the outlet is not delivering power to the monitor. Fixing the power outlet in such cases should help you.
3. Trouble with Graphics card: If the power light of the computer and monitor is on and nothing comes up on the screen when you start your computer then there must be something wrong with video card. You should take your computer to a repair shop or change its video or the graphics card with a new one.
4. OS or some Software is functioning abnormally: If the Operating System (OS) or some other software is unresponsive or responds abnormally, follow these tips. Restart your computer and run a virus scan. For this purpose you should have a reliable antivirus software installed on the computer to fix this issue.
5. Windows do not boot properly: If windows do not boot properly then you should reinstall windows with the windows recovery disk. Most of the times, this should help you get rid of the problem.
6. The computer is on but not responding: If the computer is turned on but not responding to software or keyboard commands, then it must be frozen or halted. Press and hold the power button for at least 5 seconds, it will be turn off. Now restart your computer. This should fix things up.
7. Any Removable device is not working: If an external device does not function as expected, turn it on according to Manufacturers instruction; be sure that all device connections are secure and receiving electrical power and compatible with the operating system. And that the correct drivers are installed and updated.
8. Slow working internet: To increase your browser performance, you must frequently clear cookies and internet temporary files. In the Windows search bar type – %temp% and hit enter to open the temporary files folder. You can use Ctrl+A to select all of them and then press Delete. Please note that some of the files may not get deleted if they are being used by the OS; but that is fine.
9. Internet network problem: If your computer can not get connected to internet then check IP address, check network cables are connected properly, make sure that servers or gateways firewall application is not blocking http requests from your PC.

How To Convert Hard Disk Partition From FAT to NTFS..!!!

Just follow this simple steps. It's easy.

1. Click Start, click Programs, and then click Command Prompt. In Windows XP, click Start, click Run, type cmd and then click OK.
2. At the command prompt, type CONVERT [driveletter]: /FS:NTFS. Convert.exe will attempt to convert the partition to NTFS.

NOTE:
Although the chance of corruption or data loss during the conversion from FAT to NTFS is minimal, it is best to perform a full backup of the data on the drive that it is to be converted prior to executing the convert command

Speed Up Your Browser Browsing..


  Just follow these steps:

Click Start then Run and type "gpedit.msc" without quotes.This opens the group policy
editor. Go to=>Local Computer Policy=>Computer Configuration=>Administrative Templates=>Network=>QOS Packet Scheduler and=>to Limit Resealable Bandwidth.

Double click on Limit Resealable bandwidth. It will say it is not configured."By default, the Packet Scheduler limits the system to 20 percent of the bandwidth of a connection, but you can use this setting to override the default."
So the trick is to ENABLE resealable bandwidth, then set it to ZERO. This will allow the
system to reserve nothing, rather than the default 20%.It works on Win 2000 as well.
"This information is only for knowledge Purpose"

How To Windows 7 Security and Maintenance with Action Center

Security and Maintenance are important with any computer, and Windows 7 has made a number of improvements that make it easier than ever to keep your computer in good shape.

In this lesson, you will learn how to use the Action Center, User Account Control Settings, and Troubleshooting to keep your computer running as smoothly as possible. You will also learn how to recover your system settings with System Restore to fix more serious issues.

To Use the Action Center:

If you have any important messages, the flag icon on the taskbar will display a red "X" symbol.
  1. To open the Action Center, click on the small flag icon on the taskbar.
  2. Review the messages.
  3. Click Open Action Center to respond to messages.


To Access the Action Center from the Control Panel:

  1. Click Start.
  2. Go to the Control Panel.
  3. Click Review Your Computer's Status under System and Security.

Fixing problems using the Action Center:

Your messages are displayed in the Action Center pane. Important messages will have a red bar, and less important ones will have a yellow bar. If a security or maintenance issue has a solution, there will be a button on the right side of the message.
Some messages are just notifications and do not indicate a problem with your computer. Those messages will not include a solution button, but they may still have important information or instructions.
  • To fix a problem, click the (solution) button and follow the directions on the screen. When you are done, the message will disappear from the Action Center.   


What is User Account Control?

User Account Control warns you when a program or user is trying to change your computer's settings. It puts a temporary lock on your computer until you confirm that you want to allow the changes. This helps to protect your computer from malicious software. When it was introduced in Windows Vista, many users found that it generated too many disruptive pop-up warnings. Windows 7 now lets the user decide how often they will receive those warnings.

To Change Your User Account Control Settings:

  1. Open the Action Center.
  2. Click Change User Account Control settings.

Use the slider to choose the level of protection you want from User Account Control. It is recommended that you use one of the top two settings. The other two should only be used in special circumstances. It may be best to choose the highest setting and if you end up getting too many pop-ups, you can always lower it to the second setting.


Not all computer problems will be shown in the Action Center. For example, you may be having trouble with aparticular program or device, or with connecting to the internet. For these types of problems, you will want to view the Troubleshooting options.
  • To get there, click Troubleshootingat the bottom of the Action Center pane.


How to Take Backup From Computer and Network Free Backup Software

FBackup4.8 has a simple interface and guides you through the process of defining a backup job using a friendly wizard that asks you:
  • Where do you want to store the backup (the destination).
  • What do you want to backup (the sources).
  • How do you want to run the backup (using full backup that zips the files, or mirror backup that doesn't zip them).
  • When do you want to run the backup (you can schedule it to run automatically or run it manually).
FBackup
Once a backup job is defined, you can run it manually by pressing the Backup button (or F6), or if you add a scheduler it will run automatically. FBackup can easily back up sources from local drives (including USB connected drives) to destinations such as USB/Firewire connected devices or mapped network locations. It creates either standard zip files (when using "full backup"), or exact copies of the original sources without any compression (using "mirror backup").
make-money-468x60