Social Icons

Showing posts with label OSI. Show all posts

Friday, 14 September 2012

How to Install Mac OS X on any Intel Based PC By iBoot and MultiBeast

Any OSx86 installation guide can seem daunting at first glance, especially when trying to remember cryptic terminal commands and sorting through volumes of misinformation on the web. This guide requires no coding, terminal work, or Mac experience of any kind. You will not need access to a Mac. In fact, it's easier and faster for me to install Snow Leopard with fully working components on my system than it is to install Windows 7. And more fun.

The iBoot + MultiBeast method is designed and tested for any desktop or laptop running the latest line of Intel processors, the Core i3/i5/i7s. I have had reports of success with older machines as well including CoreDuo, Core2Duo, and even Pentium 4. However, AMD processors are not supported.

YOU WILL NEED

  • A computer running an Intel Processor
  • A blank CD
  • A Mac OS X Snow Leopard Retail DVD
  • To leave any fear of your computer at the door.
  • Patience and humility- it may not work out perfectly the first time- but with enough tenacity and grit, you'll reach the promised land. It's easy to get frustrated, but don't give up! There are a community of users with similar hardware in the tonymacx86 Forum to provide support if you get stuck.
BEFORE YOU BEGIN
  • If you have greater than 4gb of RAM, remove the extra RAM for a maximum of 4gb. You can put back any extra RAM in after the installation process.
  • Use only 1 graphics card in the 1st PCIe slot with 1 monitor plugged in.
  • Remove any hard drives besides the blank drive being used for OS X.
  • Remove any USB peripherals besides keyboard and mouse.
  • Remove any PCI cards besides graphics- they may not be Mac compatible.
  • If using a Gigabyte 1156 board, use the blue Intel SATA ports- not the white Gigabyte SATA ports.
  • It's best to use an empty hard drive- you will have to partition and format the drive.
  • Always back up any of your important data.
STEP 1: BIOS SETTINGS
You will need to set your BIOS to ACHI mode and your Boot Priority to boot from CD-ROM first. This is the most important step, and one many people overlook. Make sure your bios settings match these. It's not difficult- the only thing I did on my Gigabyte board besides setting Boot Priority to CD/DVD first was set Optimized Defaults, change SATA to AHCI mode, and set HPET to 64-bit mode.

STEP 2: INSTALL MAC OS X

In order to boot the Mac OS X Retail DVD, you'll need to download and burn iBoot. For desktops and laptops using unsupported Intel CPUs and graphics, a legacy version of iBoot can be downloaded here.

  1. Download iBoot
  2. Burn the image to CD
  3. Place iBoot in CD/DVD drive
  4. Restart computer
  5. At boot prompt, eject iBoot


  6. Insert your Mac OS X Snow Leopard Retail DVD and press F5
  7. When you see the screen below, press enter to begin the boot process
  8. When you get to the installation screen, open Utilities/Disk Utility. NOTE: If you cannot get to the installation screen, retry from Step 4, type PCIRootUID=1 before hitting enter. If that doesn't work then try PCIRootUID=1 -x or just -x which will enter Mac OS X Safe Mode and will allow you to proceed. For some graphics cards, use GraphicsEnabler=No boot flag to proceed.
  9. Partition your hard drive to GUID Partition Table
  10. Format your hard drive to Mac OS Extended (Journaled). NOTE: The bootloader can only boot from a disk or partition of 1 TB or less. Partition larger drives.
  11. For the purposes of this guide, name it Snow Leopard. You can rename it later.
  12. Close Disk Utility
  13. When the installer asks you where to install, choose Snow Leopard
  14. Choose Customize‚ and uncheck additional options. This will hasten the install process. You can always install this stuff later.
  15. Restart computer.
  16. Place iBoot back in drive.
  17. When you get to the boot selection screen, choose your new Snow Leopard installation.
  18. View the super-cool Mac OS X Snow Leopard Welcome Video, and set up your computer!

STEP 3: UPDATE TO 10.6.8
If you have a Sandy Bridge system, please follow these specialized instructions to update to 10.6.8.
  1. Open Finder and navigate to your Snow Leopard drive.
  2. Download the Mac OS X 10.6.8 Combo Update
  3. Download MultiBeast
  4. Open MultiBeast- don't run it yet, just leave it open. Set up windows as shown.
  5. Mount MacOSXUpdCombo10.6.8.dmg
  6. Install MacOSXUpdCombo10.6.8.pkg
  7. Upon completion, the installer will ask you to reboot. DO NOT REBOOT.
  8. Switch to the already open MultiBeast. If it closes, just re-open it.
STEP 4: MULTIBEAST
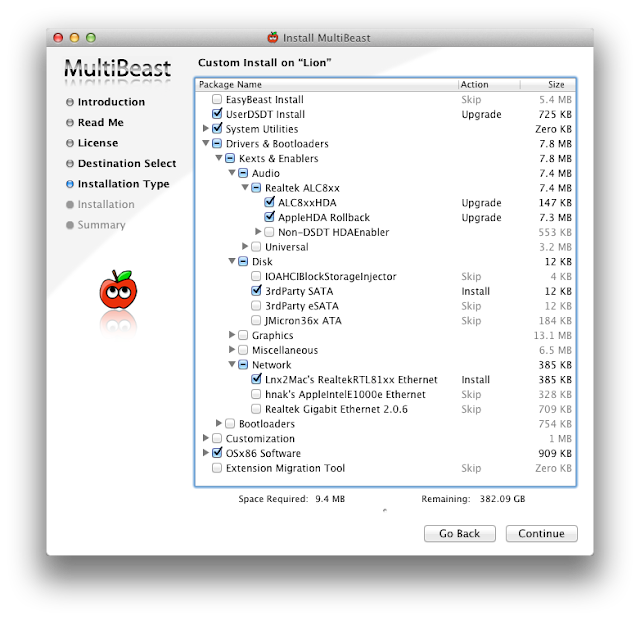
MultiBeast is an all-in-one post-installation tool designed to enable boot from hard drive, and install support for Audio, Network, and Graphics. It contains two different complete post-installation solutions: EasyBeast and UserDSDT. In addition it includes System Utilities to rebuild caches and repair permissions and a collection of drivers, boot loaders, boot time config files and handy software.

Choose one of the following options directly following a fresh installation and update:

EasyBeast is a DSDT-free solution for any Core/Core2/Core i system. It installs all of the essentials to allow your system to boot from the hard drive. Audio, Graphics and Network will have to be enabled separately.

UserDSDT is a bare-minimum solution for those who have their own pre-edited DSDT. Place your DSDT.aml on the desktop before install. Audio, Graphics and Network will have to be enabled separately. HINT: Check the DSDT Database for a pre-edited DSDT.
  1. Run MultiBeast.
  2. If you have a custom DSDT that's been edited, place the file on your desktop and choose UserDSDT.
  3. All others select EasyBeast
  4. Select System Utilities.
  5. Optionally, you may install further drivers via Advanced Options to enable ethernet, sound, graphics, etc... Be sure to read the documentation provided about each installation option. NOTE: EasyBeast, and UserDSDT install the bootloader by default, so you'll not need to check that option.
  6. MultiBeast Demo Videos
  7. Install to Snow Leopard- it should take about 4 minutes to run scripts.
  8. Eject iBoot.
  9. Reboot- from your new Snow Leopard installation drive.
If your drive doesn't boot on its own, and you get an error referencing boot0, fix it using the methods listed here.


Congratulations! You're done!!

Your PC is now fully operational, while running the latest version of Mac OS X Snow Leopard! And you have a nice Boot CD to get into your system in case things go awry. Boot your system from iBoot if you have issues. You may run MultiBeast as often as you like.

If you can't boot, try typing -x at the boot prompt to enter safe mode, or just boot with iBoot. When you get to the desktop, you can make all of the changes you need to. The best way to start fresh is delete whatever you're trying to get rid of- including the whole /Extra folder, as most kexts are installed there. Then you can re-run MultiBeast. As long as you rebuild caches and repair permissions after you're done, you can do just about anything you want to /Extra/Extensions and /System/Library/Extensions. Anything can be tweaked and enabled upon subsequent uses of MultiBeast.

If you've had success using iBoot + MultiBeast, consider a contribution to help keep the sites going. We're constantly updating and tweaking our tools to help you.

Thanks in advance!

-tonymacx86 & MacMan
For our most current workarounds and solutions for issues such as USB and audio, check out the Mac OS X 10.6.3 Update, Mac OS X 10.6.4 Update, Mac OS X 10.6.5 Update, Mac OS X 10.6.6 Update, Mac OS X 10.6.7 Update, and Mac OS X 10.6.8 Update articles. Good luck, and see you on the forum!

How to Install Mac OS X Lion Using an All In One Bootable USB Drive : UniBeast :

Introducing UniBeast- our new tool to create a bootable USB drive from your Mac App Store purchased copy of Install Mac OS X Lion or Apple Store purchased Mac OS X Lion USB Thumb Drive. This all-in-one bootable USB drive can also be used as a rescue boot drive for system recovery.

UniBeast + MultiBeast is the easiest method to do a clean install of Mac OS X Lion or update any Snow Leopard system. The following guide requires no coding, terminal work, or Mac experience of any kind.

You Will Need


8GB or larger USB Drive

Install Mac OS X Lion Application

OR
Mac OS X Lion USB Thumb Drive
STEP 1: Purchase Mac OS X Lion
The operating system is not free. There are two ways to purchase your copy of Mac OS X Lion. The simplest way is to download the Application from the Mac App Store. Alternately, the OS X Lion USB Thumb is available online at Apple.com or any Apple Store retail location.

STEP 2: Create a Bootable USB Drive Using UniBeast
Take a deep breath and take your time- this is pretty simple, but it's easy to miss things if you rush. Follow each step to the letter.

1. Insert USB drive
2. Open /Applications/Utilities/Disk Utility
3. Highlight USB drive in left column
4. Click Partition tab
5. Click Current and choose 1 Partition

6. Click Options...
7. Choose Master Boot Record
8. Under Name: type USB (You can rename it later)
9. Under Format: choose Mac OS Extended (Journaled)
10. Click Apply then Partition
11. If using the Install Mac OS X Lion Application, it must be in /Applications folder.
12. If using the Mac OS X Lion USB Thumb Drive, make sure it's plugged in and mounted.
13. Download and run UniBeast
14. Click Continue, Continue, Continue, Agree
15. At Destination Select, choose USB and click Continue
16. If using the Mac App Store "Install Mac OS X Lion" App choose that option.
17. If using the Apple Store "OS X Lion USB Thumb Drive" choose that option.
18. If using a laptop, choose Laptop Support in addition to one of the above options.
19. Click Continue
20. Enter password and click Install

The process will take about 10-15 minutes, depending on system and drive speed, but will show hours. Do not unplug or stop during this time.

STEP 3: Install Mac OS X Lion
You're almost done! All you need to do is boot from the USB drive and install! Your hard drive should be set in BIOS to AHCI mode. For recommended BIOS settings and screenshots, check out iBoot + MultiBeast.

1. If you have a Gigabyte motherboard press F12 to choose boot device.


2. Choose USB-HDD
3. At Chimera Boot Screen, choose USB

You may have to type extra command line flags to reach the installer.
  • Asus Motherboard + NVIDIA Graphics - type PCIRootUID=0
  • Unsupported graphics - type GraphicsEnabler=No
  • Boot in Single-user mode - type -s
  • Boot in Verbose mode - type -v
  • Boot in Safe mode - type -x

4. When you arrive at the Installer, choose language.

If updating an existing Snow Leopard install, skip 5-14.

5. In the top menubar choose Utilities, and open Disk Utility
6. Highlight your target hard drive for the Lion installation in left column.
7. Click Partition tab
8. Click Current and choose 1 Partition
9. Click Options...
10. Choose GUID Partition Method
11. Under Name: type Lion (You can rename it later)
12. Under Format: choose Mac OS Extended (Journaled)
13. Click Apply then Partition
14. Close Disk Utility
15. When the installer asks you where to install, choose Lion, or your existing install.
16. Upon completion, restart system

The installation is complete, but the drive isn't bootable yet. Boot from the USB again, this time choosing Lion.

17. If you have a Gigabyte motherboard, press F12 to choose boot device.
18. Choose USB-HDD
19. At Chimera Boot Screen, choose your new Lion installation.


STEP 4: Post-Installation Using MultiBeast
MultiBeast is an all-in-one post-installation tool designed to enable boot from hard drive, and install support for Audio, Network, and Graphics. In addition it includes System Utilities to repair permissions and a collection of drivers, bootloaders, config files and handy software.

1. Complete Mac OS X Lion setup.
2. When you arrive at desktop, open Safari
3. Browse to tonymacx86.com and log in. If you don't have a user account, create one!
4. Go to tonymacx86.com/downloads to download the latest MultiBeast
5. Go to the DSDT Database to download your motherboard's DSDT
6. Open Downloads folder and move the .aml file to the Desktop
7. Open and run Multibeast's UserDSDT
8. Restart system

If your drive doesn't boot on its own, and you get an error referencing boot0, fix it using the methods listed here.


The above photo will provide general post-installation support for any recommended CustoMac build.

You may also use MultiBeast to install further drivers to enable ethernet, sound, graphics, etc... Be sure to read the documentation provided in MultiBeast Features.pdf about each option. Both UserDSDT and EasyBeast install the proper bootloader by default, so you'll not need to check that option.

Congratulations!


You now have a fully updated bootable version of Mac OS X Lion on your CustoMac! And a handy USB rescue drive to boot from in case things go pear-shaped. It's easy to get frustrated, but don't give up! If you get stuck, there are many users with similar hardware in the tonymacx86 Forum to provide support. Special thanks to everyone in the community, and our Mods for testing!

If you've had success using this guide, consider a contribution to help keep the sites going. We're constantly updating and tweaking our tools to help you.

Tuesday, 11 September 2012

OSI (Open System Interconnection)

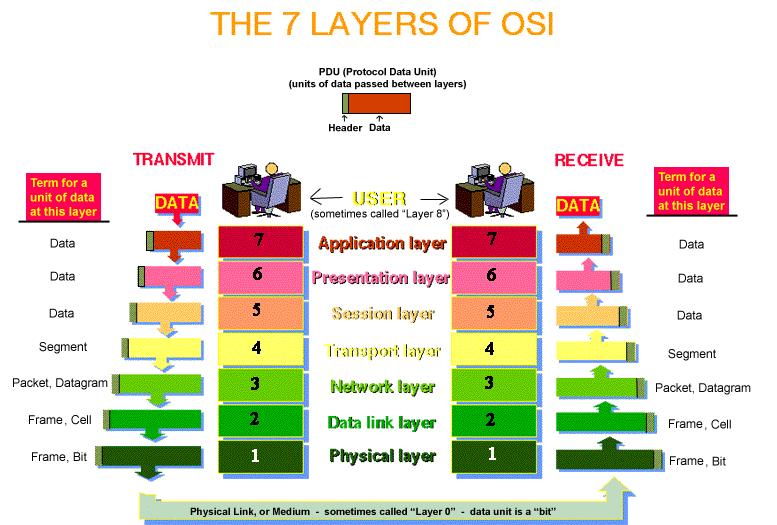
The most popular packet-based structure of layers, or protocol stack, is called the OSI model (Open System Interconnection) which was created, oddly enough by the reverse acronymn, the ISO (International Organization for Standardization). It defines 7 layers. The user interface (Application Layer) is the top layer, since users work directly with applications. As you work your way down toward the lower layers, the protocols become more detailed toward the nuts and bolts of the operation. They define the details of actually preparing and moving data.
Although there is officially no layer 0 or 8 – conceptually they exist as the physical link (the cable) and the User, as shown below. Note how the packets get larger as each successive layer adds it’s own header to the packet that was handed down to it from the layer above.

make-money-468x60