Friday, 14 September 2012
The Ultimate Post Installation Utility for Apple, Mac Book
Choose one of the following options directly following a fresh installation and update:
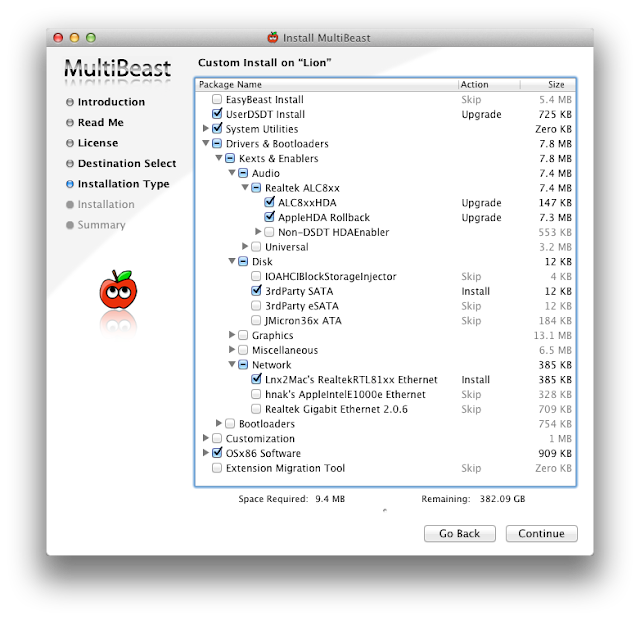
EasyBeast is a DSDT-free solution for any Core/Core2/Core i system. It installs all of the essentials to allow your system to boot from the hard drive. Audio, Graphics and Network will have to be enabled separately.
UserDSDT is a bare-minimum solution for those who have their own pre-edited DSDT. Place your DSDT.aml on the desktop before install. Audio, Graphics and Network will have to be enabled separately.
For full guide and method, check out iBoot + MultiBeast.
For demonstration videos and updates, check out MultiBeast 2.0.
How to Install Mac OS X Lion Using an All In One Bootable USB Drive : UniBeast :

UniBeast + MultiBeast is the easiest method to do a clean install of Mac OS X Lion or update any Snow Leopard system. The following guide requires no coding, terminal work, or Mac experience of any kind.


Install Mac OS X Lion Application OR |

Mac OS X Lion USB Thumb Drive |


You may have to type extra command line flags to reach the installer.
- Asus Motherboard + NVIDIA Graphics - type PCIRootUID=0
- Unsupported graphics - type GraphicsEnabler=No
- Boot in Single-user mode - type -s
- Boot in Verbose mode - type -v
- Boot in Safe mode - type -x


16. Upon completion, restart system

MultiBeast is an all-in-one post-installation tool designed to enable boot from hard drive, and install support for Audio, Network, and Graphics. In addition it includes System Utilities to repair permissions and a collection of drivers, bootloaders, config files and handy software.
1. Complete Mac OS X Lion setup.
2. When you arrive at desktop, open Safari
3. Browse to tonymacx86.com and log in. If you don't have a user account, create one!
4. Go to tonymacx86.com/downloads to download the latest MultiBeast
5. Go to the DSDT Database to download your motherboard's DSDT
6. Open Downloads folder and move the .aml file to the Desktop
7. Open and run Multibeast's UserDSDT
8. Restart system
If your drive doesn't boot on its own, and you get an error referencing boot0, fix it using the methods listed here.

You may also use MultiBeast to install further drivers to enable ethernet, sound, graphics, etc... Be sure to read the documentation provided in MultiBeast Features.pdf about each option. Both UserDSDT and EasyBeast install the proper bootloader by default, so you'll not need to check that option.

You now have a fully updated bootable version of Mac OS X Lion on your CustoMac! And a handy USB rescue drive to boot from in case things go pear-shaped. It's easy to get frustrated, but don't give up! If you get stuck, there are many users with similar hardware in the tonymacx86 Forum to provide support. Special thanks to everyone in the community, and our Mods for testing!
If you've had success using this guide, consider a contribution to help keep the sites going. We're constantly updating and tweaking our tools to help you.
Thursday, 6 September 2012
How to Save Your Laptop Battery For Long Life
FlashFrozen maybe the answer to your short battery life. If you use Google Chrome, Firefox 4, and in Safari on 64-bit Macs, the Flash plug-in is pushed onto its own process. FlashFrozen lives as a tiny menu app, monitoring this process and will warn you (by turning red) if Flash is using a relatively significant amount of processor cycles. You can then go to FlashFrozen's menu to kill the Flash plug-in.
Any running Flash content is replaced with the broken plugin icon. Want to get Flash working again? Simply reload the page, or go to a new one. The next time Flash is needed, it'll come back to life. Flash ads or other Flash-related junk forces our processors to run hot and leech our precious battery fluids.
Flash animations and videos are among the top processor hogs on Mac OS X. A single poorly-designed Flash banner - even in an inactive window or tab - can suck up an entire processor core with its shady mortgage offers.
Your 5-hour battery life gets cut in half, your laptop runs hotter, and your legs cook to medium-rare.
That's where FlashFrozen comes into play.
FlashFrozen lets you stop the Flash plug-in dead in its tracks, letting your new-fangled Mac cool down, use less power, and give you more time to do whatever it is you do. Probably blog or tweet or something.
And the new AutoKill mode actively stops Flash at all times. Turn this on and off at will to save even more battery life.
How to Close Your iPad Open Apps At Ones on 1 Click
- Start out by “double-clicking” the Home button on your iPad, iPhone or iPod Touch. The Home button is the one at the bottom of your iDevice, as illustrated in the image below.
- This will bring up the ‘list’ of currently running Apps – by way of an “App bar” at the bottom of your screen. Tap and hold down on any one of the currently running Apps (even if it’s not the one you want to close).
- You’ll notice that each App will start to “wiggle” and now has a small “minus sign” circle in the upper left corner. Tap the “minus sign” of the App you want to close/quit.
- That App will now close. NOTE: This will close the App, not delete it.
- You can continue tapping the “minus signs” to close all open Apps, if needed.
How to Close Your iPad Open Apps At Ones on 1 Click
- Start out by “double-clicking” the Home button on your iPad, iPhone or iPod Touch. The Home button is the one at the bottom of your iDevice, as illustrated in the image below.
- This will bring up the ‘list’ of currently running Apps – by way of an “App bar” at the bottom of your screen. Tap and hold down on any one of the currently running Apps (even if it’s not the one you want to close).
- You’ll notice that each App will start to “wiggle” and now has a small “minus sign” circle in the upper left corner. Tap the “minus sign” of the App you want to close/quit.
- That App will now close. NOTE: This will close the App, not delete it.
- You can continue tapping the “minus signs” to close all open Apps, if needed.
ow to Fix the Apple Keyboard with Numeric Keypad Problems
It happen to me this week, I was entering a password which had numerical numbers and I was using the numerical pad on the right side of my keyboard and I kept getting the wrong password message. I used the numbers above the letters on the keyboard and they worked.
So I thought I had a bad keyboard, until I did a simple search and there it was at Apple support, "Unable to type while Mouse Keys is enabled in Mac OS X"
Seams like I wasn't the only one having this problem.
How to Fix:
- Choose System Preferences from the Apple menu.
- Choose Universal Access from the View menu.
- Click the Mouse tab or in Lion Click Mouse & Trackpad
- Click Off, next to Mouse Keys. If you have already logged in as a different user where Mouse Keys is disabled, click On and then click Off next to Mouse Keys, to return the keyboard to normal operation.
Note: If you are logged on to a user where Mouse Keys is already disabled, but your keyboard is not responding properly, toggle the radio buttons for Mouse Keys "On" then "Off" to restore normal functionality.
Tuesday, 4 September 2012
How To Install Alfa AWUS036 NHR on Mac OS Lion 10.7
This is going to be a very short post
Very simple...
Extremely simple ...
How To Install Alfa AWUS036NHR on Mac OS Lion 10.7?
Like that:
Alfa AWUS036NHR Mac Drivers For Lion 10.7
Voila!
That was easy, huh?
Now something more important:
The Realtek Uninstaller provided with this package does not close "sudo" after use. As per Apple Dev. this could leave a security hole. Close sudo by opening terminal and type "sudo -k". -Without quotes
Friday, 31 August 2012
How to Install Mac OS X On Windows XP & 7 Local PC Through VMware Workstation 7
This Step by step Tuter will help you in installing Mac OS X Snow Leopard as a guest virtual machine in Windows 7. You’ll need to have a system with an Intel processor which supports hardware virtualization, original OS X Snow Leopard retail disk, VMware Workstation 7 and Windows 7, Vista or XP installed as host operating system. If you meet all these requirements, you can then install OS X Snow Leopard as a VM under Windows and can enjoy the best of both worlds.
1. Download and install VMware Workstation 7.
2: Download pre-made modified version of Snow Leopard.vmdk and darwin_snow.iso files required to get this thing to work. Please don’t ask for the link to these files. You can find them easily elsewhere on the web.
3: Start VMware Workstation and open up “Mac OS X Server 10.6 (experimental).vmx” file which you downloaded in Step 2.
4: Click on”Edit virtual machine settings”, select CD/DVD (IDE) option from left hand side and then and select “Use ISO image file” option. Point it to “darwin_snow.iso” which you downloaded in Step 2.
5: Now power on the virtual machine and hit “F8” key. You should now have a screen similar to the one shown below.
6: Now you’ll have to point your virtual machine to OS X Snow Leopard retail DVD instead of “darwin_snow.iso”. To do this, right click on CD/DVD option found in lower right most corner of your VMware window and select settings.
Insert OS X Snow Leopard retail DVD in your DVD drive and select the “Use physical drive” option.
7: Now go back and select “c” option (Boot DVD) from the prompt which you got in Step 5 to boot from the OS X retail DVD. OS X boot screen with Apple logo should now appear. If the boot screen doesn’t appear for you, try booting it in verbose mode by pressing “F8” key after selecting “c” option, and then enter “-v” (without quotes). This will enable the system to boot OS X DVD using verbose mode.
8: Wait for a couple of minutes for the Installation Setup screen to show up. From here on, simply follow the onscreen setup instructions to install OS X Snow Leopard. Make sure you format your virtual hard drive in “Mac OS Extended (Journaled)” format using Disk Utility. Customize your installation with minimum set of printer drivers and language options for a lightweight trouble free installation experience.
9: Once the installation is completed. System will automatically reboot. At this point, close your guest virtual machine and change your CD/DVD option again like you did in Step 2 to point it to “darwin_snow.iso”.
10: Start the virtual machine again. Press “F8” key and select “h” option to “Boot first hard disk”. Voila! Snow Leopard should now be running live under Windows 7.
Note : This guide is for informational purposes only. If you like OS X Snow Leopard, Get a Mac.
Via: (LINK)
How to Access HP Cloud Storage from Mac OS X
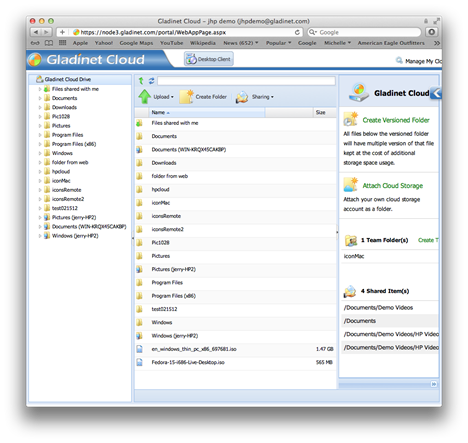
If you have an HP Cloud account, you may be familiar with the following screen, which is the HP web based storage browser for HP Cloud Object Storage. You can upload, download and browse the files and folders in your HP Cloud Object Storage. Besides the HP Cloud Storage Web Browser access, you may also want to access the cloud storage from PC, from Mac, from mobile devices or from file servers. This is when Gladinet Cloud can help.
This article documents how you can access HP Cloud Storage from your Mac.
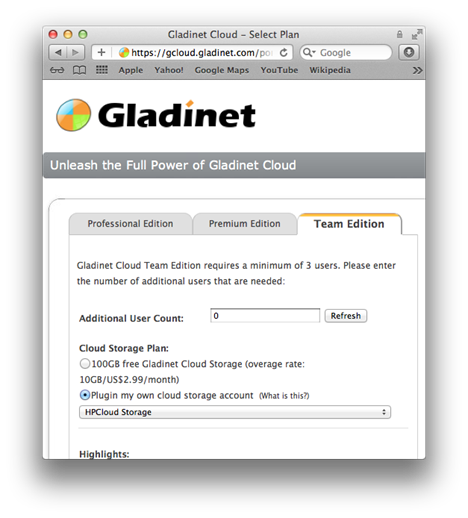
First you need to sign up for the Gladinet Cloud Team Edition, during the sign up, you can select to plugin your own cloud storage account, which is HP Cloud Storage. From Gladinet’s home page, you can select Team Edition. At the following screen, you can select “Plugin my own cloud storage account”, and select “HPCloud Storage” from the drop down list.
After you sign up, you will see the web browser based file explorer. You will see your HP Cloud Storage account files and folders showing up.
You can click the “Desktop Client” button at the top of the web browser page. From there, you can download and install the Gladinet Cloud Mac Client. (See this article for details)
After that, you just need to run the “Gladinet Cloud Mac Client” and log in to the same account that is connected to the HP Cloud Storage account.
Soon, the files and folders from your HP Cloud Storage account will show up in the Mac Finder, under the DEVICES section. You can also save directly from applications to your HP Cloud Storage account.
Wednesday, 22 August 2012
Latest Microsoft Office for iPad
This is one of the best news that I've heard in recent days and is it seems that Microsoft is released a version of Microsoft Office for iPad in the next year 2012.While it is true that we have the option of using Pages, Keynote, and Numbers in the iPad, is also true that habemos many that we would like to count with Office automation package most popular of all time: Microsoft Office.
Microsoft Office for iPad would be released in individual applications Word, Excel, Powet Point and Outlook for iPad at a cost of 9.99 dollars.
To be honest, I think that would be a good move by Microsoft and that it would help consolidate as a device suitable for the dumb business (which has been one of the main approaches to Apple) to the iPad.