Social Icons

Showing posts with label Networking. Show all posts

Tuesday, 20 November 2012

How to Make icons background transparent in Windows XP

If you’ve been wondering why your XP desktop icons have a background color, you’ll be glad to know you can flip a checkbox and have them go back to a normal transparent background.
See the two below:
icons with backgroundicons without background
To set the transparent background on the icons, we’ll need to open System Properties in Control Panel (or right-click on My Computer and select Properties).
system properties 343
In this dialog, click the Advanced tab, and then the Settings button under the Performance section.
232
Now scroll down to the button where you’ll find a checkbox for “Use drop shadows for icon labels on the desktop”. Make sure you check this box if you want transparent backgrounds on the icons.
Why this option isn’t just labeled “Enable Transparent Icons On the Desktop”, I just can’t say.
if checking it doesn’t fix your problem there is another step you must do. Follow this procedure:
Control Panel > Display > Desktop > Customize Desktop > Web > Uncheck everything here > OK > Apply

Thursday, 20 September 2012

Speed Up Your Browser Browsing..


  Just follow these steps:

Click Start then Run and type "gpedit.msc" without quotes.This opens the group policy
editor. Go to=>Local Computer Policy=>Computer Configuration=>Administrative Templates=>Network=>QOS Packet Scheduler and=>to Limit Resealable Bandwidth.

Double click on Limit Resealable bandwidth. It will say it is not configured."By default, the Packet Scheduler limits the system to 20 percent of the bandwidth of a connection, but you can use this setting to override the default."
So the trick is to ENABLE resealable bandwidth, then set it to ZERO. This will allow the
system to reserve nothing, rather than the default 20%.It works on Win 2000 as well.
"This information is only for knowledge Purpose"

How to Secure Your Wireless Network or Wifi With Password


1. Change Default Administrator Usernames and Passwords

Most routers or access points come enabled with a default set of username/password combinations. These combinations are well documented and available online for hackers to use. If a hacker can access your device’s administrative pages they can modify the configuration and control all aspects of your device. These username/password combinations can be changed from the administrative panel.

2. Turn on WPA / WEP Encryption

All Wireless devices support some form of encryption. Encryption technology scrambles messages sent over the air and ensures that they cannot be intercepted by hackers. Several encryption technologies exist for wireless communication today. WPA is the strongest commonly available encryption technology for home devices, however, WEP can also be used.

Wifi network

3. Change the Default SSID

Access points and routers all use a network name called the SSID. Manufacturers normally ship their products with the same SSID set for all routers. For example, the SSID for Netgear devices is normally “NETGEAR”. The Default SSID can be changed from the administrative panel and should be set to something unique.

4. Enable MAC Address Filtering

Each wireless device possesses a unique identifier called the physical address or MAC address. Access points and routers keep track of the MAC addresses for all devices that connect to them. Wireless routers offer the option to key in the MAC addresses of your home equipment so as to restrict the network to only allow connections from those devices. It ensures that rogue users cannot connect to the wireless router without using advanced MAC spoofing techniques.

5. Assign Static IP Addresses to Devices

Most home wireless devices use dynamic IP addresses, which are randomly assigned by DHCP servers. Unfortunately, dynamic IP allocation also works to the advantage of network attackers, who can easily obtain valid IP addresses from your network’s DHCP pool. Turn off DHCP on the router or access point, set a fixed IP address range instead and then configure each connected device to match. Using a private IP address range (like 10.0.0.x) prevents computers from being directly reached from the Internet.

6. Disable SSID Broadcast

The wireless access point or router typically broadcasts the network name (SSID) over the air at regular intervals. This feature was designed for businesses and mobile hotspots where wireless clients may roam in and out of range. For the home user, this roaming feature is unnecessary as it increases the likelihood of an unauthorised gaining access to your home network. Fortunately, most wireless access points allow the SSID broadcast feature to be disabled by the network administrator. Your SSID name can be manually inputted into your devices.

7. Enable Firewalls On Each Computer and Router

Modern network routers contain built-in firewall capability, which can be easily disabled.
Ensure that your router’s firewall is turned on. For added security, consider installing and running personal firewall software on each computer connected to the router.

8. Turn Off Network During Extended Periods of Non-Use

Shutting down your network when not in use will most certainly prevent outside hackers from breaking in. While impractical to frequently switch off and on the devices, at least consider doing so during travel or extended periods of downtime.


But we have inform one thing also, that the scientists & researchers revealed that the WIFI Zone is harmful for the trees  according to the study of Netherlands. So be careful when U use it outside & don't make the environment harmful to others. 


If You follow these steps properly we hope U'r network will be more safer than any other time before.

Sunday, 16 September 2012

Use Net Send Command In GUI Mode with This Great Free Software Net Send GUI

Net Send GUI

Fomine Net Send GUI is a simple and FREE alternative for the Windows Net Send functionality.

The Definite Net Send

If you ever used the Ned Send command to send instant messages over Winpopup protocol, you already know there's little excitement in using the black-and-white command line to send messages. If you ever ran Windows Messenger or MSN Messenger, you can imagine the gap between these products and the Net Send command. No GUI, no contact list.

Why a Third-Party Net Send?

Windows Vista no longer has the Net Send command. Microsoft has removed the Net Send command, Messenger service and Winpopup protocol altogether from Windows Vista because of the many security problems associated with the protocol.

But what about those who are still using applications that rely on the instant messaging functionality once built into Windows? What about those who desperately need instant messaging over local networking but no longer have it? They are left without any official support from Microsoft except Internet-based Windows Messenger. That's why you need third-party software to fill the void.


For Download Visit There Official Website

How to Get MAC Address Remotely On Network by Computer Name or IP Address

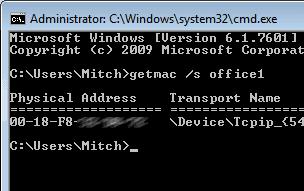
using the getmac command


MAC address of a network card by IP address or Computer Name by using the GETMAC command.

To use this command, do the following:

1. Open a command prompt with administrator privileges.

2. You can use one of the following commands

GETMAC /s computername - Get MAC by Computer Name

GETMAC /s 192.168.1.1 – Get MAC by IP Address


How to Get Mac Address Of Your Computer Lan or Wifi Adapter From Command Prompt


How to Get Mac Address Of Your Computer Lan or Wifi Adapter From Command Prompt. with easy step .

You may need the MAC Address of your network card to connect to a network secured using MAC Address Filtering. Here’s how to find it using DOS commands.

1. Hold down the Windows Key and press R.

2. Type CMD and press Enter.

3. Type getmac and press Enter.

4. The Physical Address is listed, that is the MAC Address of your network card.


How To Enable and Use Net Send Service On Win Xp To Message Any Computer Without Third Party Software


Command For Net Send Is : CLick (Start) Click (Run) Type = (net send) (Computer IP Or Computer Name) (Message) EXAMPLE : net send 192.168.0.56 TEST TEST

1. Right-click My Computer, and click Manage.

2. Click the plus sign next to Services and Applications, and then click Services.

3. Double-click Messenger.

4. Click the General tab and select Automatic from the Startup type list, and then click Apply.

5. Under Service status, click Start, and click OK.

6. Click OK, then OK again.

Be sure to perform these steps on both the sending computer and the receiving computer.


How To: Charge Batteries of iPhone 4S, iPhone 4, iPhone 3GS, iPod 4G Touch, iPod 3G Touch, The New iPad 3, iPad 2 and iPad 1 Devices Wirelessly

How To: Charge Batteries of iPhone 4S, iPhone 4, iPhone 3GS, iPod 4G Touch, iPod 3G Touch, The New iPad 3, iPad 2 and iPad 1 Devices Wirelessly - Full Video Tutorial Guide

If you're an Apple iPhone, iPad and iPod idevices users than you must be aware of the concept of Wireless Access of iTunes via iPhone, iPad and iPod devices on previous version of iOS 5 but now the new way has been introduced which provide an option to iPhone 4S, iPhone 4, iPhone 3GS, iPod 4G Touch, iPod 3G Touch, The New iPad 3, iPad 2 and iPad 1 devices owners to Wirelessly Charge Batteries of iDevices. The new amazing technology has been introduced which provides an opportunity to Charge iPhone 4S, iPhone 4, iPhone 3GS, iPod 4G Touch, iPod 3G Touch, The New iPad 3, iPad 2 and iPad 1 Devices Wirelessly and without the use of any cord and adapters. This amazing technology and idea has been introduced for the next generation of iPhone, iPad and iPod devices.

Charge iPhone iPad iPod Wirelessly

In this post we will show you How to Charge Batteries of iPhone 4S, iPhone 4, iPhone 3GS, iPod 4G Touch, iPod 3G Touch, The New iPad 3, iPad 2 and iPad 1 Devices Wirelessly without the use of cord, adapters and other wire oriented gadgets. To Charge iPhone 4S, iPhone 4, iPhone 3GS, iPod 4G Touch, iPod 3G Touch, The New iPad 3, iPad 2 and iPad 1 Wirelessly is an easy task for any users and owners but for developing it is quite a risky and hard procedure and it may be dangerous way which will cause a bad effect on your iPhone, iPad and iPod devices permanently and may voids your warranty period as well. So iDevice users should be beware before trying or implementing the following video tutorial, try it only when you can afford this risk. You can follow the following simple Steps, Guidelines and Video Tutorial to Charge Batteries of iPhone 4S, iPhone 4, iPhone 3GS, iPod 4G Touch, iPod 3G Touch, The New iPad 3, iPad 2 and iPad 1 Devices Wirelessly.

Important Instructions for iPhone, iPad and iPod Devices:
  • Pin 25 is Data-
  • Pin 27 is Data+
  • Pin 16 is 0v or Ground
  • Pin 23 is +5v
Video Tutorial to Charge iPhone 4S, iPhone 4, iPhone 3GS, iPod 4G Touch, iPod 3G Touch, The New iPad 3, iPad 2 and iPad 1 Devices Wirelessly:

Before watching the following video tutorial you need a special expertise and techniques about electric circuits as well as the soldering knowledge. Additionally, a spare charging assembly, an extra Apple iPhone’s, iPad's and iPod's back cover and a very thin gauge wire and a wireless charger circuit like one used in video. You can find all the mentioned gadgets requirements from here. Let’s Start Now.

How to Easy Boost your Laptop or Desktop Computer Wi-Fi Signals Easy

How to Easy Boost your Laptop or Desktop Computer Wi-Fi Signals Easy


Friday, 14 September 2012

How to Create and Configure VPN Site to Site On ISA Server 2006


F.1
The first, we need setup
Configure IP Address at lab machines as figure 1
Join server ISA-msviet to DCmsviet (msviet.com)
Join server ISA-vispro to Dcvispro (vispro.com)
Step 2:
At ISA-msviet create new user: vispro / password
At ISA-vispro create new user: msviet / password
At the moment, confer these user have allow access in Dial-in Tab
Step 3:
Install Isa 2006 standar to ISA-msviet and ISA-vispro
Configure ISA rule, the following figure:
F.2

The IP range: 100.100.100.1 – 100.100.100.254 (customize) is virtual range IP which assigned automatic for clientvpn access to Internal (192.168.10.0/24)
To continue, select Remote sites Tab: create new connection

F.3


Note: site name = username which create at last step, here( ISA-mviet) sitename= vispro

Select Point-to-Point at next table.
In table Remote Site Gateways, enter the IP Address of Remote site VPN server that allow Internal connect out site, here we type 192.168.1.201 – interface WAN in ISA-vispro.
Click next, we to Remote Authentication tab, at that type user remote is created out site (vispro) – msviet / password
The part Network Address, specify IP range Internal on out site, at here we type 192.168.11.1 - 192.168.11.254
To continue, click next and select protocol (all outbound traffic), the end click finish.
Step 4:
Right mouse on Virtual Private Network and select properties, at tab access network we tick EXT, vispro as following figure:

F.4

Ok, we configure successful in ISA-msviet. Analog simulator, we’ll configuration on server ISA-vispro


Step 5: at both ISA server,
Start Routing and Remote access, ensure Network interface is connected

F.5


Note, in ISA2006, we must edit system policy on Firewall Policy ( both isa server)

F.6
Now, we can access resource from site msviet to site vispro.a

How to Install Mac OS X Lion Using an All In One Bootable USB Drive : UniBeast :

Introducing UniBeast- our new tool to create a bootable USB drive from your Mac App Store purchased copy of Install Mac OS X Lion or Apple Store purchased Mac OS X Lion USB Thumb Drive. This all-in-one bootable USB drive can also be used as a rescue boot drive for system recovery.

UniBeast + MultiBeast is the easiest method to do a clean install of Mac OS X Lion or update any Snow Leopard system. The following guide requires no coding, terminal work, or Mac experience of any kind.

You Will Need


8GB or larger USB Drive

Install Mac OS X Lion Application

OR
Mac OS X Lion USB Thumb Drive
STEP 1: Purchase Mac OS X Lion
The operating system is not free. There are two ways to purchase your copy of Mac OS X Lion. The simplest way is to download the Application from the Mac App Store. Alternately, the OS X Lion USB Thumb is available online at Apple.com or any Apple Store retail location.

STEP 2: Create a Bootable USB Drive Using UniBeast
Take a deep breath and take your time- this is pretty simple, but it's easy to miss things if you rush. Follow each step to the letter.

1. Insert USB drive
2. Open /Applications/Utilities/Disk Utility
3. Highlight USB drive in left column
4. Click Partition tab
5. Click Current and choose 1 Partition

6. Click Options...
7. Choose Master Boot Record
8. Under Name: type USB (You can rename it later)
9. Under Format: choose Mac OS Extended (Journaled)
10. Click Apply then Partition
11. If using the Install Mac OS X Lion Application, it must be in /Applications folder.
12. If using the Mac OS X Lion USB Thumb Drive, make sure it's plugged in and mounted.
13. Download and run UniBeast
14. Click Continue, Continue, Continue, Agree
15. At Destination Select, choose USB and click Continue
16. If using the Mac App Store "Install Mac OS X Lion" App choose that option.
17. If using the Apple Store "OS X Lion USB Thumb Drive" choose that option.
18. If using a laptop, choose Laptop Support in addition to one of the above options.
19. Click Continue
20. Enter password and click Install

The process will take about 10-15 minutes, depending on system and drive speed, but will show hours. Do not unplug or stop during this time.

STEP 3: Install Mac OS X Lion
You're almost done! All you need to do is boot from the USB drive and install! Your hard drive should be set in BIOS to AHCI mode. For recommended BIOS settings and screenshots, check out iBoot + MultiBeast.

1. If you have a Gigabyte motherboard press F12 to choose boot device.


2. Choose USB-HDD
3. At Chimera Boot Screen, choose USB

You may have to type extra command line flags to reach the installer.
  • Asus Motherboard + NVIDIA Graphics - type PCIRootUID=0
  • Unsupported graphics - type GraphicsEnabler=No
  • Boot in Single-user mode - type -s
  • Boot in Verbose mode - type -v
  • Boot in Safe mode - type -x

4. When you arrive at the Installer, choose language.

If updating an existing Snow Leopard install, skip 5-14.

5. In the top menubar choose Utilities, and open Disk Utility
6. Highlight your target hard drive for the Lion installation in left column.
7. Click Partition tab
8. Click Current and choose 1 Partition
9. Click Options...
10. Choose GUID Partition Method
11. Under Name: type Lion (You can rename it later)
12. Under Format: choose Mac OS Extended (Journaled)
13. Click Apply then Partition
14. Close Disk Utility
15. When the installer asks you where to install, choose Lion, or your existing install.
16. Upon completion, restart system

The installation is complete, but the drive isn't bootable yet. Boot from the USB again, this time choosing Lion.

17. If you have a Gigabyte motherboard, press F12 to choose boot device.
18. Choose USB-HDD
19. At Chimera Boot Screen, choose your new Lion installation.


STEP 4: Post-Installation Using MultiBeast
MultiBeast is an all-in-one post-installation tool designed to enable boot from hard drive, and install support for Audio, Network, and Graphics. In addition it includes System Utilities to repair permissions and a collection of drivers, bootloaders, config files and handy software.

1. Complete Mac OS X Lion setup.
2. When you arrive at desktop, open Safari
3. Browse to tonymacx86.com and log in. If you don't have a user account, create one!
4. Go to tonymacx86.com/downloads to download the latest MultiBeast
5. Go to the DSDT Database to download your motherboard's DSDT
6. Open Downloads folder and move the .aml file to the Desktop
7. Open and run Multibeast's UserDSDT
8. Restart system

If your drive doesn't boot on its own, and you get an error referencing boot0, fix it using the methods listed here.
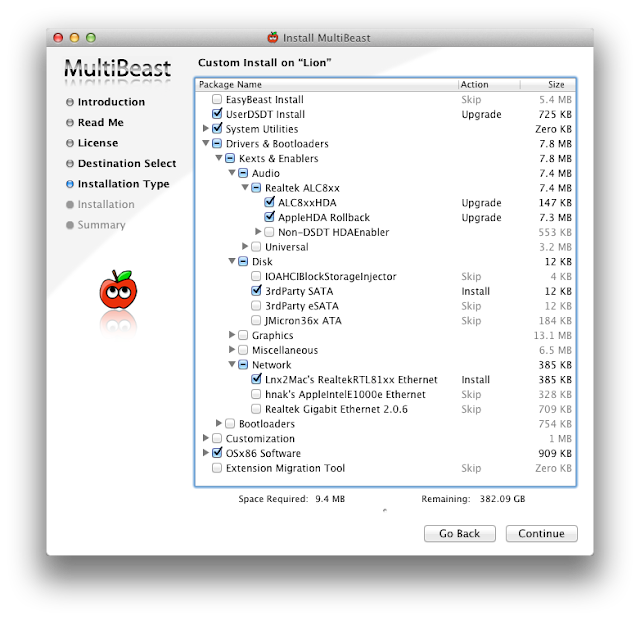

The above photo will provide general post-installation support for any recommended CustoMac build.

You may also use MultiBeast to install further drivers to enable ethernet, sound, graphics, etc... Be sure to read the documentation provided in MultiBeast Features.pdf about each option. Both UserDSDT and EasyBeast install the proper bootloader by default, so you'll not need to check that option.

Congratulations!


You now have a fully updated bootable version of Mac OS X Lion on your CustoMac! And a handy USB rescue drive to boot from in case things go pear-shaped. It's easy to get frustrated, but don't give up! If you get stuck, there are many users with similar hardware in the tonymacx86 Forum to provide support. Special thanks to everyone in the community, and our Mods for testing!

If you've had success using this guide, consider a contribution to help keep the sites going. We're constantly updating and tweaking our tools to help you.

Thursday, 13 September 2012

How To Share Scanner Remotly on Lo0cal Area Network (Lan) With BlindScanner Software

artwork.jpg

The BlindScanner software will share and open access to remote scanner on the local area network that is not directly connected to your computer, but installed on a computer located in the neighboring room, for example. Easiness of use, saving to various formats, compressing images, scanning pages automatically, scanning multiple pages, supporting an automatic feeder - these are not all program features. Now you can scan images using your favorite software, text and image editors, just select BlindScanner Pro in the list of installed scanners, specify the necessary color, resolution and size of the image.
The program will be useful not only in office where it will help you save several hundred dollars you could spend on a new scanner, but also at home for scanning from a notebook in a wireless home local area network. BlindScanner works with any flatbed TWAIN scanner and also supports scanners with automatic feeders.

Client of BlindScanner Pro

For Further Detail Visit The Official Site : BlindScanner

Wednesday, 12 September 2012

How to add Recent Comments Widget with Avatars and Without AvatarsTo Blogger

If in the past tutorial i've talked about a simple Recent Comments widget, now i'll be sharing to you a stylish Recent comments widget with round avatars, which comes along with comment excerpts.
You have the option to change default Anonymous Avatar Image as well.

How to add recent comments widget with avatars

Step 1. Go to Blogger Dashboard, then go to Design >> Page Elements and Add a Gadget.
In the popup window scroll down + choose HTML/Javascript and paste in the following code:

If Gadget Script not Show than Click Here to View COdes --> CLICK

Settings:
Link

- Replace your-blog with the name of your blog.
- Replace the "5" values in red, with the number of comments you want to appear, from:

  • numComments = 5

and

  • &max-results=5

- To change the anonymous avatar, replace the following address with your own:

  • http://www.gravatar.com/avatar/?d=mm

- To change the size of the avatar, replace 60 value in green with your own

After you've made the changes, click Save... and you're done!

WITHOUT AVATARS


1. Log in to your dashboard--> layout- ->Page Elements

2. Click on 'Add a Gadget.' Select 'HTML/Javascript'.

3. Select the whole code given below and paste it in the widget box you have just opened above.
Note : Replace "http://YOURBLOG.blogspot.com" with Your blogspot URL.

4. Now Click Save and Refresh Your site.

IF YOU DONT FIND THE CODE PLEASE CLICK HERE FOR CODES

How to Create and Configure L2TP Connection in Windows 2000, 2003, XP Machine

Step one: From the Start menu, select Settings, select Network and Dial-up Connections, and then click Make New Connection.

Note: For Windows XP, goto Control Panel and select Network Connections. Then click Create a new connection.

Image of step one

Step two: From the Network Connection Wizard, click Next.

Image of step two

Step three: From Network Connection Type, click to select Connect to a private network through the Internet, and then click Next.

Note: For Windows XP, choose Connect to the network at my workplace. Then select Virtual Private Network connection.

Image of step three

Step four: You may see the Public Network screen at this time. Click to select the dial-up connection that connects you to your ISP. If your physical connection is an Ethernet connection, select Do not dial initial connection. If the physical connection is through an ISP, select Automatically dial this initial connection. Click Next.

Note: For Windows XP, you will be prompted first for a connection name first.

Image of step four

Note: For this example, we used Do not dial the initial connection.

Step five: From Destination Address, in the Host name or IP address box, enter the IP address or hostname of your Juniper Firewall's Untrust interface, and then click Next.

Image of step five

Note: For this example, we have used 1.1.1.1 as the Untrust IP address.

Step six: From Connection Availability, click to select For all users, and then click Next.

Image of step six

Step seven: From the Completing the Network Connection Wizard, enter a connection name, and then click Finish.

Note: For Windows XP, the connection name was entered before step 4.

Image of step seven

Step eight: Click Properties.

Image of step eight

Step nine: Click to select the Security tab, click to select Advanced (custom settings), and then click Settings.

Image of step nine

Step ten: From Advanced Security Settings, from the Data encryption drop-down menu, click to select Optional encryption (connect even if no encryption).

Image of step ten

Step eleven: From Logon security, click to select Allow these protocols. Click to select only Unencrypted password (PAP) and Challenge Handshake Authentication Protocol (CHAP). Click to clear any protocols that do not apply.

Image of step eleven and twelve

Step twelve: Click OK.

Step thirteen: Click to select the Networking tab. From the Type of VPN server I am calling drop-down menu, click to select Layer-2 Tunneling Protocol (L2TP).

Note: For Windows XP, select L2TP IPSec VPN.

Image of step thirteen and fourteen

Step fourteen: Click OK.

Step fifteen: From Network and Dial-up Connections, double-click the Dial-up Connection.

Image of step fifeteen

Step sixteen: Enter your User name and Password.

Note: The User name and Password matches the username and password of the L2TP user configured on the Firewall.

Image of step sixteen and seventeen

Step seventeen: Click Connect.
make-money-468x60