Monday, 13 May 2013
How To Install Windows 7 On MacBook Pro Using Boot Camp | Installation Guide Step By Step
Thursday, 20 September 2012
How To Windows 7 Security and Maintenance with Action Center
In this lesson, you will learn how to use the Action Center, User Account Control Settings, and Troubleshooting to keep your computer running as smoothly as possible. You will also learn how to recover your system settings with System Restore to fix more serious issues.
To Use the Action Center:
- To open the Action Center, click on the small flag icon on the taskbar.
- Review the messages.
- Click Open Action Center to respond to messages.
To Access the Action Center from the Control Panel:
- Click Start.
- Go to the Control Panel.
- Click Review Your Computer's Status under System and Security.
Fixing problems using the Action Center:
- To fix a problem, click the (solution) button and follow the directions on the screen. When you are done, the message will disappear from the Action Center.
What is User Account Control?
To Change Your User Account Control Settings:
- Open the Action Center.
- Click Change User Account Control settings.
Use the slider to choose the level of protection you want from User Account Control. It is recommended that you use one of the top two settings. The other two should only be used in special circumstances. It may be best to choose the highest setting and if you end up getting too many pop-ups, you can always lower it to the second setting.
- To get there, click Troubleshootingat the bottom of the Action Center pane.
Sunday, 16 September 2012
Use Net Send Command In GUI Mode with This Great Free Software Net Send GUI
Fomine Net Send GUI is a simple and FREE alternative for the Windows Net Send functionality.
The Definite Net SendIf you ever used the Ned Send command to send instant messages over Winpopup protocol, you already know there's little excitement in using the black-and-white command line to send messages. If you ever ran Windows Messenger or MSN Messenger, you can imagine the gap between these products and the Net Send command. No GUI, no contact list.
Why a Third-Party Net Send?
Windows Vista no longer has the Net Send command. Microsoft has removed the Net Send command, Messenger service and Winpopup protocol altogether from Windows Vista because of the many security problems associated with the protocol.
But what about those who are still using applications that rely on the instant messaging functionality once built into Windows? What about those who desperately need instant messaging over local networking but no longer have it? They are left without any official support from Microsoft except Internet-based Windows Messenger. That's why you need third-party software to fill the void.
Monday, 3 September 2012
How to Import Multiple vCards in Outlook 2007 and above Version
There has been a lot of said and done about this issue, but fact is Outlook would still not allow you to import multiple vCards: yes, even the latest version 2010. I found this especially disturbing when I attempted to import my iPhone contacts to Outlook. All I could do was to import the vCard files I exported from my iPhone to my PC one by one : try that for 500 contacts!
However, using a 3rd party tool to export my iPhone contacts, I found a quicker method to import multiple vCard contacts into Outlook for free using your iPhone.
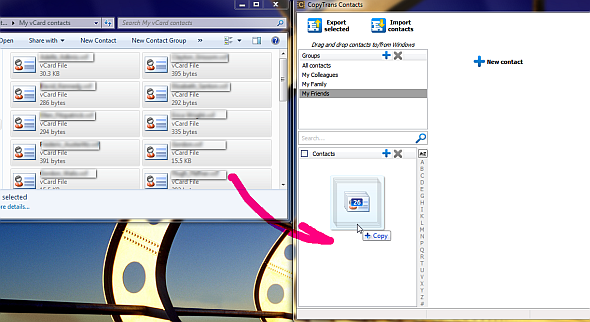
1. Have your iPhone ready, download and run the following app: import iPhone contacts, connect your iPhone to your computer and import all of your vCard files from your computer to your iPhone by dragging/dropping the entries directly to the main program window
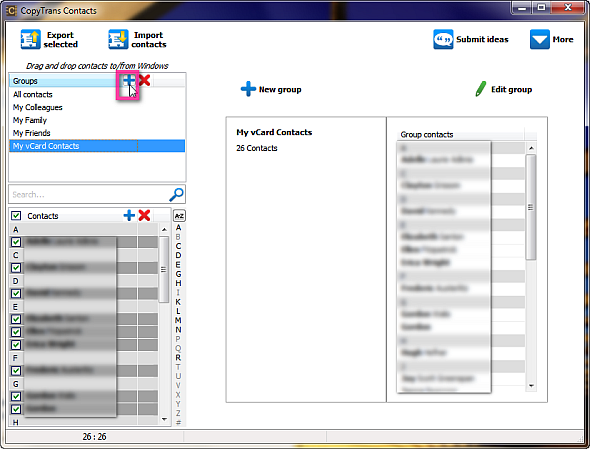
Note: to set the newly imported contacts from the contacts you already have on your iPhone, you can create a new contact group on your iPhone and drag/drop the vCard entries there. To set up a new group using the Contacts program, click on the “+” sign in the Groups pane
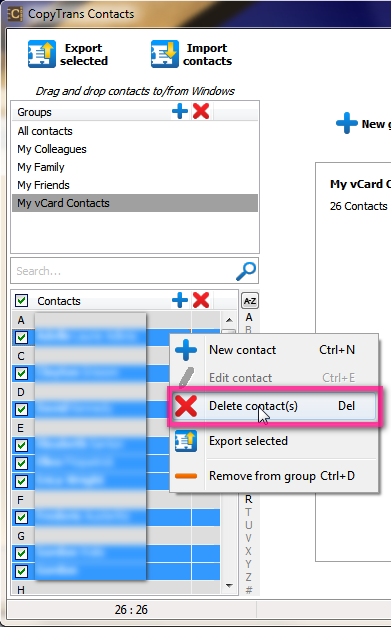
You can later delete the newly-imported contact entries if you wish to.
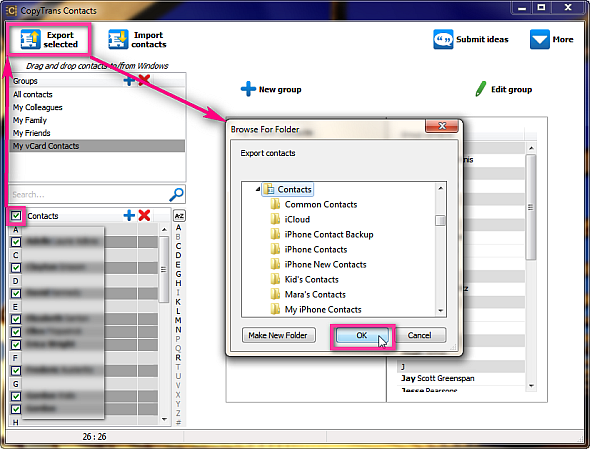
2. Now that all the information from the vCard entries has been successfully loaded to your iPhone in the form of iPhone contacts, select all the iPhone contact entries originating from your vCard files and hit the “Export selected” button
3. Navigate to the folder where you would normally have your Windows Contacts and hit OK. In Windows 7, it is normally found here:
C:\Users\YourUsername\Contacts
Note: if you are on Windows XP, navigate to your Windows Address book instead which is found here:
C:\Documents and Settings\Your Username\Application Data\Microsoft\Address Book\
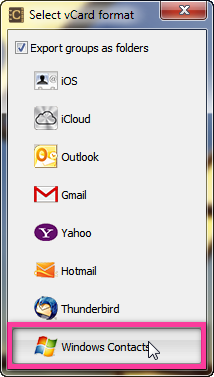
4. Upon prompt by the program, select “Windows Contacts”
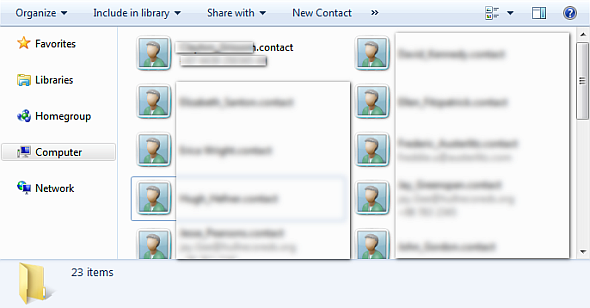
5. This will make sure that your vCard contact entries are now loaded directly into your Windows Contacts in the form of *.contact entries
Importing multiple contacts to Outlook:
With Outlook 2007 and 2010, it is easy to import all your Windows Contacts to Outlook at once. To do so:
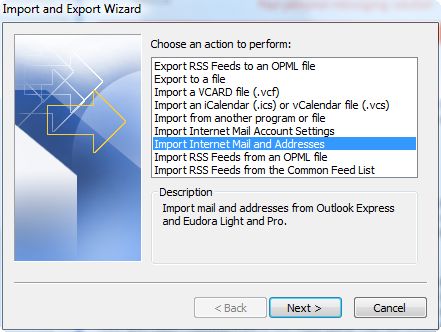
1. In Outlook 2007 go to File > Import and Export; in Outlook 2010, go to File > Open > Import
2. You will see the “Import and Export Wizard” load. Select “Import internet Mail and Addresses” and click Next
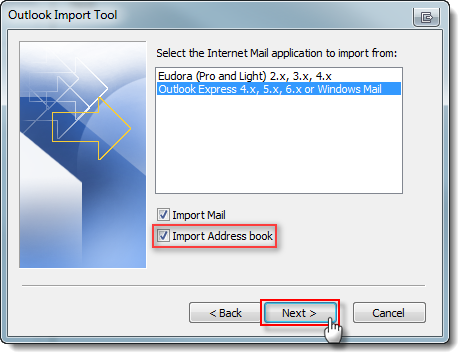
3. Next, choose “Outlook Express 4.x, 5.x, 6.x or Windows Mail”
4. Make sure to only have the “Import Address book” option selected and deselect the rest
5. From the next screen select “Do not import duplicates” and click “Finish”
6. All your contacts originating from vCard entries are now successfully imported in your Outlook
This is one of the easier methods I found to import multiple vCards into Outlook via your iPhone and a third party iPhone contacts exporter tool.
Friday, 31 August 2012
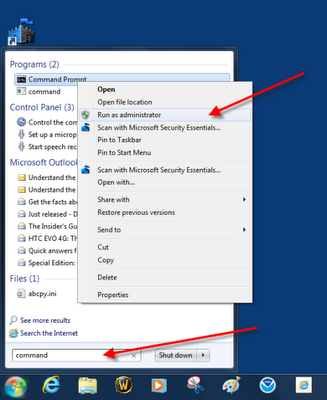
How to Repair your Windows & System Files With Easy Steps

After accepting the elevated permissions, at the prompt type this command:
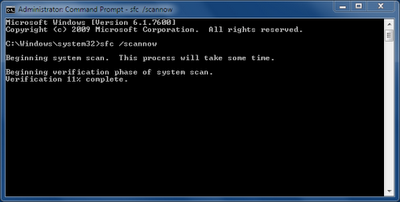
sfc /scannow
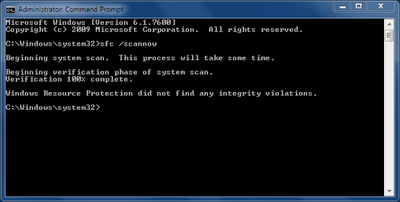
Now the system will verify the system
files and repair any corrupted files (Figure B).
Figure B


Tips and Trick Which you Must Know to Operate WIndows 7

- Right-click the Start button and select Properties.
- Click the Taskbar tab.
- Select the Use Small Icons check box and click Apply.
If you don’t like the way Windows 7 combines icons for all instances of an application, you can change that, too. On the same tab, click the down arrow on the Taskbar Buttons box and select Combine When Taskbar Is Full.
This dialog box also allows you to select the taskbar location on the screen (bottom, top, left, or right), customize which icons appear in the notification area (system tray), and decide whether to temporarily minimize all open windows when you place your mouse on the far end (or bottom) of the taskbar (Desktop Preview).
3. Put different wallpapers on multiple monitors
If you’re using Windows 7 with two or more monitors, you’ll be pleased to find that multi-monitor support has been improved. One thing I really like about Windows 7 is that when I connect to it via Remote Desktop from another computer, it doesn’t rearrange all my icons as Vista often did with multiple monitors. However, one thing Microsoft didn’t build into Win 7 that some of us were hoping for is the ability to set different wallpapers on different monitors.
In XP and Vista, I used UltraMon to do that, but it costs $40. In a tough economy, many people don’t want to spend that much for a program of that kind. Besides, based on what I read in the forums, it doesn’t yet work reliably on Windows 7. Luckily, I was able to hunt down another application called DisplayFusion. The free version gives you multiple wallpaper support, and the paid version, which costs $20 less than UltraMon, gives you multiple taskbars and window management features. I’ve installed it on two Windows 7 computers and it works great. As you can see in Figure B, you can configure a variety of settings.
Figure B
4. Turn off Aero Snap
A new feature in Windows 7 is Aero Snap, which causes your application windows to automatically snap into a preconfigured place when you move them to the edges of the screen. Drag a window to the far right, and it will size itself to fill exactly half the screen. Drag it to the top corner and it will maximize to fill the whole screen. This can be handy, but it can also be annoying if you prefer that your windows stay the size you made them. Luckily, you can easily turn Snap off. Here’s how:
- Click Start and select Control Panel.
- Click Ease of Access Center.
- Click Make the Mouse Easier to Use.
- Select the Prevent Windows From Being Automatically Arranged When Moved To The Edge Of The Screen check box and click OK.

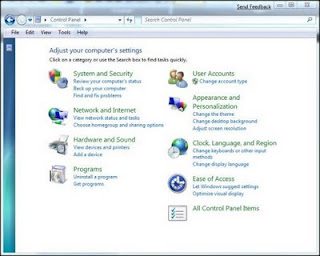
The default Control Panel view in Windows 7 is Category.
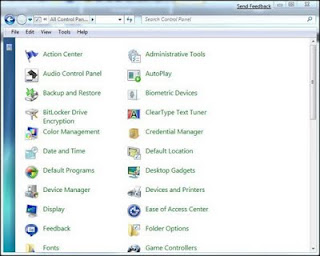
You can easily change to a more classic view by clicking All Control Panel Items at the bottom of the categories list, but that gives you a list of the items represented by large icons, as shown in Figure D.
Clicking All Control Panel Items gives you a view of the applets with large icons.
What if you’d like to display the items with small icons so more of them will fit in the same space? Your first thought might be to click the View menu on the taskbar, but at least in the public beta (build 7000), the icon size choices are all grayed out. However, there’s a little trick: Right-click on an empty space in the window, and you’ll get a context menu from which you can pick View Small Icons. Selecting this command will allow you to display many more items in the same size window.- Ctrl + Shift + L (once): Bulleted list
- Ctrl + Shift + L (twice): Numbered list
- Ctrl + Shift + >: Increase text size
- Ctrl + Shift + <: Decrease text size
- Ctrl + U: Underline
- Ctrl + T: Strikethrough
- Click Start | Control Panel and select Programs And Features.
- In the left pane, click Turn Windows Features On Or Off.
- Simply select or deselect the check boxes to enable or disable the various Windows features,
If you set Adobe not to display PDFs in the browser, it will open them without any problems. Here’s how to configure that:
- Open Adobe Reader.
- Click Edit | Preferences.
- Click Internet in the left Categories pane.
- Under Web Browser Options, deselect the Display PDF In Browser check box and click OK.
If you’re a fast typist and hate having to move your hands from the keyboard to the mouse, you’ll be happy to know that Windows 7 provides new shortcut key combos to let you do more without mousing. Here are a few to try out:
- Windows + E will open a new Explorer window.
- In Windows Explorer, press Alt + P to turn the preview pane on.
- Windows + P opens the Display Switcher applet.
- Windows + Spacebar shows the desktop (makes active windows transparent).
- Windows Logo Key + Plus (+) key turns on the Magnifier to zoom in on the desktop. Windows Logo key + Minus (-) key zooms back out.
- Ctrl + clicking an icon in the taskbar toggles between the open instances of the program.
- Windows Logo key + Left or Right Arrow key will shift the active window to the left or right side of the screen and make it fill half the screen (same as dragging the window to the left or right edge of the screen but without using the mouse).
- Windows Logo key + Shift + Left or Right Arrow key (with multiple monitors) will move the window to the left or right monitor.
If you’re so impressed with Windows 7 on your desktop computer that you want to install it on your laptop, what do you do if the laptop is an ultra compact that doesn’t have a DVD drive? Of course, you could connect a USB DVD drive, if you have one. Or you could put the installation files on a network drive and connect to it over the network.
But here’s another option that works surprisingly well: Copy the contents of the Windows 7 ISO image to a 4 GB or larger USB thumb drive (or a flash memory card, if the laptop has a built-in reader). Installing the OS this way is likely to be faster than using a DVD.