Social Icons

Showing posts with label How To. Show all posts

Saturday, 20 October 2012

How to Setup Yahoo! Mail in Android Device

Yahoo! Mail in Android 
1. Open the email app.
Open the android email app 
Select add account 
Select Others as the email server provider
4. Enter your Yahoo! Mail address and password. Check the “Send email from this account by default option” if you want to send email using this account by default. You can click Next and let the mail app to detect the settings. But in this guide, I’ll set it up using the manual method. So, click on “Manual setup” button.
Enter your Yahoo username and password and select Manual Setup
5. In the Incoming server settings screen, fill in your username (full email address) and password. The POP3 server is pop.mail.yahoo.com and the port is 995. For security type, select SSL.
Enter the Yahoo! Mail server details 
Keeping or not keeping your Yahoo! Mail after download 
6.  Next, enter the details of the SMTP server. This is the server that you’ll use for sending emails. The SMTP server is smtp.mail.yahoo.com, port is 465, security type is SSL and check the Require sign-in checkbox. Then enter your username (full email address) and password. Click Next.
Enter Yahoo! Mail SMTP server details 
Select your email checking frequency 
Give the email account a name and your name 
Yahoo! Mail in your android phone!

Monday, 15 October 2012

How to Secure Private Cloud Security Services Data Usefull Tips, Tricks and Guidelines

Many organizations use private clouds to ensure safety and easy handling of data. However, when the number of people who control the data increases, the risk of hackers tampering the safety measures increases too. It is critical to form and implement foolproof strategies to protect the data that’s on the cloud. Though there is strict monitoring of online activities and logins, hackers break in often. There’s no storage system that hasn't been tampered by hackers. To make cloud computing safe, companies use private clouds but these private clouds are no exceptions when it comes to security. All these incidents make companies, especially those who are in the cloud, diffident about their data storage system. There are some tips to strengthen your cloud security.


Cloud Computing Tips
1.    Single Tenant Clouds:
Using a single tenant cloud is very important to manage your data efficiently. Ask your service provider about the data storage location before signing up for their service. If the physical location of data is distributed among different servers, there are high possibilities of tampering and you may not be able to track the online activities effectively. Under single tenancy architecture, a single instance of software is used to serve each client. You can customize the software as per your needs and the data center model you want to have can be designed without any need for changing according to vendor restrictions.
2.    Classify Data:
All types of data don’t need the same security level. Confidential and sensitive data needs a higher level of security than public data. To make your private cloud secure, classify data based on the levels of security needed. This will help you focus on the safety of most critical data and implement lower levels of security strategy for other types of data. For example, the budget for the different departments needn’t be known to the entire organization, and so the security level of such files should be higher than the security level of other types of files.
3.    Configure Firewalls:
Configuring firewalls is as important as owning a private cloud. There are multiple ways to configure firewalls. And the responsibility doesn't stop with installing and configuring firewalls. You need to try and test your firewall to detect any loopholes through which your data may be mined out. Try penetrating your own firewall using different methods both internally and externally. It will give you different ideas on how you need to monitor the activities and secure your system.
4.    Encryption:
The next best thing you can do is to encrypt the data. This statement seems like a no-brainier because almost all clouds have encryption. However, not all the data in the cloud are encrypted. Most clouds encrypt only data that is in transit. Other data that is stored and is idle is not encrypted. Ensure that even the idle data is encrypted so that you will not end up losing your data and identity.
5.    Monitor and Store Logs:
You should also monitor all online activities like logins, file transfers, file sharing, link sharing, password changes, etc. As monitoring becomes difficult when the number of authentications to be done in a day crosses a limit, organizations tend to give up keeping a tight rein on authenticating. This is the most common cause of data loss and hacking.
Implementing effective strategies and relying on good service providers are the basic steps to safeguard your cloud. Some of the steps discussed here seem to be complex and unnecessary but you can reap long term benefits by following these.
Author Bio: - The above content and topic was provided by Samantha Kirk from mytechhelp.com, a site that offers savings and current information on Toshiba Support.

Saturday, 13 October 2012

How to Set the Snapshot Resolution, Pixel in Adobe Acrobat Reader For Image

found in Adobe, is under Edit | Preferences | General, there is an option to set the snapshot tool resolution to a fixed number. I use 300pixels/inch’
The Adobe Acrobat Reader Preferences
300 PPI is a good resolution for printed images. 96PPI would be fine for on-line documents.
The Adobe Acrobat Reader Fixed pixel resolution
You can now use the Marque snap shot tool to capture images from a PDF file at a vastly improved quality.
The Adobe Acrobat Marquee select snapshot tool


How to Set the Snapshot Resolution, Pixel in Adobe Acrobat Reader For Image

Friday, 5 October 2012

How to Convert DOC to PDF in Apple iMac, Apple Mac Book Pro, Apple Mac Book Air

You might be wondering if you can easily turn your Microsoft Document files into PDFs on the Mac. But, it turns out that there's an easy way of converting your microsoft .doc files to the PDF format natively in OS X.

1: Open your Microsoft Document file with TextEdit.


2: Type Command + P, or go to File and select Print.

3: Look to the lower left of the Print pane and you will see a "PDF" button. Click on it to see a drop-down menu.


4: Choose "Save as PDF...".

5: Choose where you would like to save your new PDF file.

How to Backup or Save Your iPhone Notes

Want to have an easy way of backing up your notes from your iPhone 2.0 or 2.2.1 or any firmware prior to 3.0? Unfortunately, iTunes does not allow you to backup any of your notes you have saved to your iPhone unless you upgrade to the new 3.0 firmware. If you do not want to upgrade your firmware, but still want to have your notes saved, rather than transcribing potentially many many sticky notes, you can use this simple application instead.


It's a little app called  iPhoneNotes. All you have to do is download the file, launch the installer, copy the application to your Applications folder. Now whenever you want to backup your notes from your iPhone, just launch the application first, and then connect your iPhone via USB and the iPhoneNotes will instantly recognize all of your notes.

The application will allow you to choose where you want to save your note files. You can also restore previously saved notes and put them back on your iPhone.

*Note, this application requires OpenSSH installed on a jailbroken iPhone.

How to Check Instant Spell of any Application in Imac


You can instantly check the spelling or grammar of anything you write in Safari, Mail, TextEdit, or any Application which has a space to write text.

You can simply type the text out as you like, and then highlight the word or set of words and right-click, or type Control + left-click to bring up a window with a selection that says "Spelling and Grammar", then clicking the sub-selection "Show Spelling and Grammar" will bring up a window (without loading any external Applications) with possible corrections, if any need be, for your text.

You can also check the spelling and grammar of an entire document without having to select text by typing "Command + Shift + ;".

How to Enable Magic Mouse Free-Scrolling in Leopard


You might have noticed the ability to scroll through web pages with the trackpad on the Magic Mouse in a way that is similar to the iPhone, iPod Touch and iPad.

It seems that Apple has only made this feature visible in System Preferences in Snow Leopard, but they have not added it to the interface on Leopard.

You can enable this kind of scrolling manually by typing some basic commands.

Simply start Terminal, and type the following (without quotation marks):

"defaults write com.apple.driver.AppleBluetoothMultitouch.mouse MouseMomentumScroll -bool yes"

After doing this, you might have to check and uncheck the Scroll option in System Preferences, and now you should have free scrolling fully enabled.

Thursday, 4 October 2012

How to Fix Dell Latitude D610 Restart, Hang Problem

I bought a used Dell D610 laptop a year ago and really like it. Since then I have purchased over 6 of them. Recently one of them started overheating and shutting down. Normally these laptops are a lot of work to get apart, but I figured out a quick 5 minute repair for this problem.

First remove the top cover plate by prying up on the right side and rocking it back and forth to disconnect it.


Next remove the 2 screws that hold down the keyboard. To remove the keyboard unhook the catch that is on each side of it then unplug it from the motherboard.  The second screw is above the F4 key.


Next locate the screws that hold down the processor heat sink and loosen them. They stay attached to the heat sink.


When you remove the heat sink you should be able to see if it is clogged with dust like this one. Remove the dust and then put everything back together.


Be sure to check to see if the cooling fan runs on start up. It usually shuts off until it gets hot then it turns back on again automatically.

Saturday, 22 September 2012

how To Transfer Photos to iPad from Any Sources

"I just gifted an iPad to my son as a birthday gift today. We had a very wonderful day and took a lot of wonderful family pictures with camera. My son is very happy. He wanted to sync photos to iPad to store these photos on iPad for convenient future review. I have tried iTunes and found it troublesome to do this. Is there any way or better software to help transfer pictures to iPad from camera directly?

There are always questions like the above one. In fact, I have written a post about transferring pictures from computer to iPad. In this post, I would like to talk about transferring pictures to iPad from various sources. The large screen and the high screen resolution of iPad make it really wonderful choice to view pictures. Thus, it is quite common for iPad users to wander how to transfer pictures to iPad from camera, computer, iTunes, Android devices, Microsoft Windows devices, and many other devices to realize picture sharing easily. So, is there any way to sync photos to iPad from various sources? Of course Yes. The below three ways are the most convenient methods I could think to help you easily and freely transfer photos to iPad.
The first method is to use iCloud. iCloud is a cloud storage and cloud computing service from Apple Inc. The service allows you to store data such as music files on remote computer servers for download to multiple devices such as iOS-based devices (except older iPhones), and personal computers running OS X or Microsoft Windows. What you need is only an Apple ID and WiFi network connectivity. Once you take photos with iPhone, you can sync photos to iPad via iCloud quickly. The disadvantage of iCloud is that it only supports to transfer pictures to iPad from computer and Apple products like iTunes, iPhone and iPod. You can't directly sync photos to iPad from your camera. 
Secondly, I would like to recommend iTunes. As the control center of all Apple iOS devices like iPod, iPhone and iPad, iTunes could help you easily transfer pictures to iPad from other iOS devices and computer. It could connect to the iTunes Store to purchase and download music, music videos, television shows, iPod games, audiobooks, podcasts, movies and movie rentals, ringtones and download application from the App Store for the iPhone, iPad and iPod Touch. But, if you want to transfer pictures to iPad from camera, you have to firstly move pictures in camera to computer folder or iTunes and then iTunes could help you transfer pictures to ipad, which makes the transferring a little bit troublesome. 

Well, it seems that iCloud and iTunes both could not perform well exactly on transferring pictures to iPad directly from camera. We have to look for some third-party tools to do this. From my personal experience, I would like to recommend a professional iPad photo transfer app. This iPad photo transfer program could be considered as enhanced iTunes. It could sync photos to iPad from iPad, iPod, iPhone, iTune, computer, and other non-iOS devices like Android smartphones, tablets, cameras, etc. Transferring pictures to iPad from camera is very easy with this iPad photo transfer. After starting this program on computer, you only need to drag pictures or folders in camera directly to Photo option under iPad device inside this app, no other operations needed. 

We can't say which one of the above three methods is the best. Different people have different requirements. The method that meets your requirements most would be your best choice.

How to Update to ICS 4.0.4 from 2.3.4/2.3.6 (Without Rooting) Samsung Nexus S i9020a

Update from 2.3.4 (GTJ61)/2.3.6 (GRK39C) to 2.3.6 (GRK39F)


  1. Download this file
  2. Rename the downloaded file to update.zip
  3. Put it update.zip you have downloaded on your sd card. 
  4. Turn off your device 
  5. Go to Bootloader (press&hold volume up button then press&hold power button) 
  6. When in Fastboot mode navigate to Recovery using volume up/down buttons 
  7. Press the power key to select Recovery 
  8. If you see a warning logo, press the power button and then press volume up button then release both to go to the Main Recovery menu
  9. From the menu, select Apply update from /sdcard, and choose update.zip from the list. 
  10. When update is finished go back and select reboot system now
Update from 2.3.6 (GRK39F) to 4.0.4 (IMM76D)

  1. Download this file
  2. Use the above steps again to update.

Thursday, 20 September 2012

How to Track Your Laptop If Stolen...

Anti-virus software developer company "Quick Heal" has launched their new service, which helps Individuals with the help of law enforcement agencies in tracking and recovering stolen laptop. To avail the service, a laptop owner has to first register with ‘Quick Heal’ website through a Mac-id, and it keeps continuous track of the laptop.

If the laptop is stolen, the tracker service traces it on the basis of Mac-id and IP addresses. This information can then be used by the police to track the laptop down and retrieve it. The service  totally free and can be availed by anybody.
The method is aimed at helping police by providing them an interface with the website. “This technology from Quick Heal will provide a powerful tool to the society at large and to the police.
Launched as part of corporate social responsibility, the service is free of charge and can be availed by anybody, whether a ‘Quick Heal‘ user or not, he said. The service, already launched in Indore and Jaipur, would soon be started in other cities. Besides, the company also aims to create a database of stolen laptops for the help of users and potential buyers.
This Information is Only for Information Purpose. and Found on internet. The Parents Site is Giving Blow.
Parents Site

How To Convert Hard Disk Partition From FAT to NTFS..!!!

Just follow this simple steps. It's easy.

1. Click Start, click Programs, and then click Command Prompt. In Windows XP, click Start, click Run, type cmd and then click OK.
2. At the command prompt, type CONVERT [driveletter]: /FS:NTFS. Convert.exe will attempt to convert the partition to NTFS.

NOTE:
Although the chance of corruption or data loss during the conversion from FAT to NTFS is minimal, it is best to perform a full backup of the data on the drive that it is to be converted prior to executing the convert command

Speed Up Your Browser Browsing..


  Just follow these steps:

Click Start then Run and type "gpedit.msc" without quotes.This opens the group policy
editor. Go to=>Local Computer Policy=>Computer Configuration=>Administrative Templates=>Network=>QOS Packet Scheduler and=>to Limit Resealable Bandwidth.

Double click on Limit Resealable bandwidth. It will say it is not configured."By default, the Packet Scheduler limits the system to 20 percent of the bandwidth of a connection, but you can use this setting to override the default."
So the trick is to ENABLE resealable bandwidth, then set it to ZERO. This will allow the
system to reserve nothing, rather than the default 20%.It works on Win 2000 as well.
"This information is only for knowledge Purpose"

How to Secure Your Wireless Network or Wifi With Password


1. Change Default Administrator Usernames and Passwords

Most routers or access points come enabled with a default set of username/password combinations. These combinations are well documented and available online for hackers to use. If a hacker can access your device’s administrative pages they can modify the configuration and control all aspects of your device. These username/password combinations can be changed from the administrative panel.

2. Turn on WPA / WEP Encryption

All Wireless devices support some form of encryption. Encryption technology scrambles messages sent over the air and ensures that they cannot be intercepted by hackers. Several encryption technologies exist for wireless communication today. WPA is the strongest commonly available encryption technology for home devices, however, WEP can also be used.

Wifi network

3. Change the Default SSID

Access points and routers all use a network name called the SSID. Manufacturers normally ship their products with the same SSID set for all routers. For example, the SSID for Netgear devices is normally “NETGEAR”. The Default SSID can be changed from the administrative panel and should be set to something unique.

4. Enable MAC Address Filtering

Each wireless device possesses a unique identifier called the physical address or MAC address. Access points and routers keep track of the MAC addresses for all devices that connect to them. Wireless routers offer the option to key in the MAC addresses of your home equipment so as to restrict the network to only allow connections from those devices. It ensures that rogue users cannot connect to the wireless router without using advanced MAC spoofing techniques.

5. Assign Static IP Addresses to Devices

Most home wireless devices use dynamic IP addresses, which are randomly assigned by DHCP servers. Unfortunately, dynamic IP allocation also works to the advantage of network attackers, who can easily obtain valid IP addresses from your network’s DHCP pool. Turn off DHCP on the router or access point, set a fixed IP address range instead and then configure each connected device to match. Using a private IP address range (like 10.0.0.x) prevents computers from being directly reached from the Internet.

6. Disable SSID Broadcast

The wireless access point or router typically broadcasts the network name (SSID) over the air at regular intervals. This feature was designed for businesses and mobile hotspots where wireless clients may roam in and out of range. For the home user, this roaming feature is unnecessary as it increases the likelihood of an unauthorised gaining access to your home network. Fortunately, most wireless access points allow the SSID broadcast feature to be disabled by the network administrator. Your SSID name can be manually inputted into your devices.

7. Enable Firewalls On Each Computer and Router

Modern network routers contain built-in firewall capability, which can be easily disabled.
Ensure that your router’s firewall is turned on. For added security, consider installing and running personal firewall software on each computer connected to the router.

8. Turn Off Network During Extended Periods of Non-Use

Shutting down your network when not in use will most certainly prevent outside hackers from breaking in. While impractical to frequently switch off and on the devices, at least consider doing so during travel or extended periods of downtime.


But we have inform one thing also, that the scientists & researchers revealed that the WIFI Zone is harmful for the trees  according to the study of Netherlands. So be careful when U use it outside & don't make the environment harmful to others. 


If You follow these steps properly we hope U'r network will be more safer than any other time before.

How to Take Backup From Computer and Network Free Backup Software

FBackup4.8 has a simple interface and guides you through the process of defining a backup job using a friendly wizard that asks you:
  • Where do you want to store the backup (the destination).
  • What do you want to backup (the sources).
  • How do you want to run the backup (using full backup that zips the files, or mirror backup that doesn't zip them).
  • When do you want to run the backup (you can schedule it to run automatically or run it manually).
FBackup
Once a backup job is defined, you can run it manually by pressing the Backup button (or F6), or if you add a scheduler it will run automatically. FBackup can easily back up sources from local drives (including USB connected drives) to destinations such as USB/Firewire connected devices or mapped network locations. It creates either standard zip files (when using "full backup"), or exact copies of the original sources without any compression (using "mirror backup").

Sunday, 16 September 2012

Use Net Send Command In GUI Mode with This Great Free Software Net Send GUI

Net Send GUI

Fomine Net Send GUI is a simple and FREE alternative for the Windows Net Send functionality.

The Definite Net Send

If you ever used the Ned Send command to send instant messages over Winpopup protocol, you already know there's little excitement in using the black-and-white command line to send messages. If you ever ran Windows Messenger or MSN Messenger, you can imagine the gap between these products and the Net Send command. No GUI, no contact list.

Why a Third-Party Net Send?

Windows Vista no longer has the Net Send command. Microsoft has removed the Net Send command, Messenger service and Winpopup protocol altogether from Windows Vista because of the many security problems associated with the protocol.

But what about those who are still using applications that rely on the instant messaging functionality once built into Windows? What about those who desperately need instant messaging over local networking but no longer have it? They are left without any official support from Microsoft except Internet-based Windows Messenger. That's why you need third-party software to fill the void.


For Download Visit There Official Website

How to Get MAC Address Remotely On Network by Computer Name or IP Address

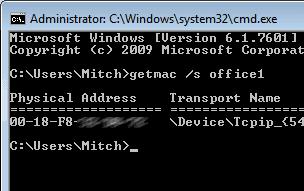
using the getmac command


MAC address of a network card by IP address or Computer Name by using the GETMAC command.

To use this command, do the following:

1. Open a command prompt with administrator privileges.

2. You can use one of the following commands

GETMAC /s computername - Get MAC by Computer Name

GETMAC /s 192.168.1.1 – Get MAC by IP Address


How to Get Mac Address Of Your Computer Lan or Wifi Adapter From Command Prompt


How to Get Mac Address Of Your Computer Lan or Wifi Adapter From Command Prompt. with easy step .

You may need the MAC Address of your network card to connect to a network secured using MAC Address Filtering. Here’s how to find it using DOS commands.

1. Hold down the Windows Key and press R.

2. Type CMD and press Enter.

3. Type getmac and press Enter.

4. The Physical Address is listed, that is the MAC Address of your network card.


How To Enable and Use Net Send Service On Win Xp To Message Any Computer Without Third Party Software


Command For Net Send Is : CLick (Start) Click (Run) Type = (net send) (Computer IP Or Computer Name) (Message) EXAMPLE : net send 192.168.0.56 TEST TEST

1. Right-click My Computer, and click Manage.

2. Click the plus sign next to Services and Applications, and then click Services.

3. Double-click Messenger.

4. Click the General tab and select Automatic from the Startup type list, and then click Apply.

5. Under Service status, click Start, and click OK.

6. Click OK, then OK again.

Be sure to perform these steps on both the sending computer and the receiving computer.


Samsung's Galaxy Note 10.1 Vs Apple's New iPad 3

Smartphone's Samsung's Galaxy Note 10.1 and Apple's New iPad 3 so that you can decide yourself which one is best for your personal use and for business purpose use. Apple has recently launched its new iPad version called "The New iPad" but most people is now aware of its fully hardware and software compatibility. On other side Samsung has also launched its new Galaxy series smartphone called "Galaxy Note 10.1" which is also quite good in terms of hardware and software compatibility.


Apple's latest New iPad 3 is now become the top competitor of Samsung's Galaxy series smartphones and tablets but Samsung feels that they don't need to release something new to compete with it, according to their latest assessment of their closest rival. The Android-based Galaxy Note 10.1 is Samsung's latest tablet model, taking its design from the Galaxy Note 'phablet', which is just about the right size to be a challenge to fit into your pocket. You can check yourself the following Samsung's Galaxy Note and Apple's New iPad 3 Hardware and Software Comparison image and decide yourself which one is best in terms of features.

make-money-468x60