Social Icons

Showing posts with label Windows XP Tips. Show all posts

Tuesday, 20 November 2012

How to Make icons background transparent in Windows XP

If you’ve been wondering why your XP desktop icons have a background color, you’ll be glad to know you can flip a checkbox and have them go back to a normal transparent background.
See the two below:
icons with backgroundicons without background
To set the transparent background on the icons, we’ll need to open System Properties in Control Panel (or right-click on My Computer and select Properties).
system properties 343
In this dialog, click the Advanced tab, and then the Settings button under the Performance section.
232
Now scroll down to the button where you’ll find a checkbox for “Use drop shadows for icon labels on the desktop”. Make sure you check this box if you want transparent backgrounds on the icons.
Why this option isn’t just labeled “Enable Transparent Icons On the Desktop”, I just can’t say.
if checking it doesn’t fix your problem there is another step you must do. Follow this procedure:
Control Panel > Display > Desktop > Customize Desktop > Web > Uncheck everything here > OK > Apply

Thursday, 20 September 2012

How To Convert Hard Disk Partition From FAT to NTFS..!!!

Just follow this simple steps. It's easy.

1. Click Start, click Programs, and then click Command Prompt. In Windows XP, click Start, click Run, type cmd and then click OK.
2. At the command prompt, type CONVERT [driveletter]: /FS:NTFS. Convert.exe will attempt to convert the partition to NTFS.

NOTE:
Although the chance of corruption or data loss during the conversion from FAT to NTFS is minimal, it is best to perform a full backup of the data on the drive that it is to be converted prior to executing the convert command

Sunday, 16 September 2012

Use Net Send Command In GUI Mode with This Great Free Software Net Send GUI

Net Send GUI

Fomine Net Send GUI is a simple and FREE alternative for the Windows Net Send functionality.

The Definite Net Send

If you ever used the Ned Send command to send instant messages over Winpopup protocol, you already know there's little excitement in using the black-and-white command line to send messages. If you ever ran Windows Messenger or MSN Messenger, you can imagine the gap between these products and the Net Send command. No GUI, no contact list.

Why a Third-Party Net Send?

Windows Vista no longer has the Net Send command. Microsoft has removed the Net Send command, Messenger service and Winpopup protocol altogether from Windows Vista because of the many security problems associated with the protocol.

But what about those who are still using applications that rely on the instant messaging functionality once built into Windows? What about those who desperately need instant messaging over local networking but no longer have it? They are left without any official support from Microsoft except Internet-based Windows Messenger. That's why you need third-party software to fill the void.


For Download Visit There Official Website

Wednesday, 5 September 2012

How to Increasing Graphics Performance Easy

Free computer tip for Increasing Graphics Performance
By default, Windows XP turns on a lot of shadows, fades, slides etc to menu items.
Most simply slow down their display.

To turn these off selectively:

Follow these steps to Increasing Graphics Performance

  • Right click on the My Computer icon
  • Select Properties
  • Click on the Advanced tab
  • Under Performance, click on the Settings button
  • To turn them all off, select Adjust for best performance
  • For best performance leave them all off except for "show shadows under mouse pointer and Show window contents while dragging"

    how to Increasing Graphics Performance

    Free computer tip for Increasing Graphics Performance


    By default, Windows XP turns on a lot of shadows, fades, slides etc to menu items.
    Most simply slow down their display.

    To turn these off selectively:

    Follow these steps to Increasing Graphics Performance

  • Right click on the My Computer icon
  • Select Properties
  • Click on the Advanced tab
  • Under Performance, click on the Settings button
  • To turn them all off, select Adjust for best performance
  • For best performance leave them all off except for "show shadows under mouse pointer and Show window contents while dragging"

Increase Your System Speed in 7 Step

Free computer tips for Increase your system speed
First of all make it sure that your system is not infected with virus, spyware, adware or any other malicious software. If yes then first of all remove it because they are main factor that decrease your system speed. Here are few thing on which you system speed depends.

  1. disk defragment
  2. temp files
  3. registry files
  4. virus/spyware
  5. adware
  6. milieus softwares
  7. cache memory

Follow this Steps to increase your CPU speed:

Scan your system on regular basis:
If you are using a system which is connected to Internet or new USB are usually connected to your system then it is recommended that you scan your system on daily bases and conclude that which virus is mostly attacking on your files. try different antivirus if you are facing problem.

Delete all temporary file

When you use Internet your browser will cache the page and save the image,video,text every thing present on the web pages.Some times they also contain virus and these are unwanted for operating system,will decrease your processor speed.Some time some malware will also present in this.Ad-ware will spy your behaviour using your cookies ,So clean this unwanted Temp files.

Cleanup your disk

Do Disk Cleanup daily .This is a tool provide by windows ,which is inbuilt in your windows .Disk CleanUp will delete all the Active X like files or application installed while browsing on Internet.To clean this go to system tools and click Disk Cleanup select the drive and click OK Delete all the unwanted files and application

Defragment your disk

when files are stored on the disk they are not well organized, disk Defragmenter will rearrange them in a good way that will increase your system speed Weekly do Disk Defragmenter ,this will arrange your files in disk .It will also provide by Windows and administrator can only use this .This will take more than 15-45min.

How To Make Your Own Screensaver Slide Show

Free computer tip on how to make your own screensaver


You can put your own digital photos as a screensaver, First of all you need to create a slide show presentation for use as a screen saver.

How to make a slide show


- Right-click an empty spot on your desktop and then click Properties.

- Click the Screensaver tab.

- In the Screen saver list, click My Pictures Slide show.

- click on the settings button and click on browse to locate your pictures

- In the settings you can make Settings to make any adjustments, such as how often the pictures should change, what size they should be, and whether you'll use transition effects between pictures, and then click OK.


Now your screen saver is a random display of the pictures taken from your located folder.

How to Speed Up Internet Connection


1. start>Run>type gpedit.msc >press Enter
2. "Group Policy" windows will appear
3.
select Computer Configaration >Administrative Templates>Network
4. look for the right windows find
"QoS Packet Scheduler"
5. Double click on
"Limit reservable bandwidth"
6.
you will see "Limit reservable bandwidth Properties"
7. select
"Setting" tab then click on "Enable"
8.
in the " bandwidth limit (%) : " change value to 0
9. Then Cilck OK
10.DONE!!
--------------------------------------------------------
Windows XP

How to Backup Your Computer Registry Files

How To backup registry files


First of all you need to backup all your registry file before modifying them because if you made a wrong editing it will help you restore original files. Secondly you must have basic knowledge about editing and modifying registry. You can backup the whole Registry and only Registry sub-keys.

Procedure for editing registry


Click Start Button then click run, type regedit in Run dialog box and click OK button. Here you can backup the whole Registry or you can locate the required sub-keys that contain the information that you want to edit.

Go to File menu option then click on Export option for backup and save it with on any your system drive with . Reg extension and you can restore this backup going File menu using import option.

Disable or Enable Auto Run CD

How to disable or enable auto run CD


Some times you may be irritating when suddenly a CD window pop up or a video begins to run as the CD is inserted. You can enable or disable auto run CD depending on your nature of work by making a simple change in registry. In user interface mode there is no option to disable or enable this feature and you must edit the registry of windows and be careful to work registry.

procedure


Click Start button then type regedit in Run option then press Enter for next.
Here locate the location to:
HKEY_LOCAL_MACHINE\SYSTEM\CurrentControlSet\Services\Cdrom
Here you can disable or enable automatically running your CD.
Change the value of Autorun to 0 for disable and change the value to 1 for enable.
After finishing editing you must restart your computer to see the effect of changes.

How to Change Your Ip Adress With Easy Method

I'll share the way to Change Your Ip Adress In Less Than 1 Minute

1. Click on "Start" in the bottom left hand corner of screen
2. Click on "Run"
3. Type in "command" and hit ok

You should now be at an MSDOS prompt screen.


4. Type "ipconfig /release" just like that, and hit "enter"
5. Type "exit" and leave the prompt
6. Right-click on "Network Places" or "My Network Places" on your desktop.
7. Click on "properties"

[You should now be on a screen with something titled "Local Area Connection", or something close to that, and, if you have a network hooked up, all of your other networks.]

8. Right click on "Local Area Connection" and click "properties"
9. Double-click on the "Internet Protocol (TCP/IP)" from the list under the "General" tab
10. Click on "Use the following IP address" under the "General" tab
11. Create an IP address (It doesn't matter what it is. I just type 1 and 2 until i fill the area up).
12. Press "Tab" and it should automatically fill in the "Subnet Mask" section with default numbers.
13. Hit the "Ok" button here
14. Hit the "Ok" button again

You should now be back to the "Local Area Connection" screen.

15. Right-click back on "Local Area Connection" and go to properties again.
16. Go back to the "TCP/IP" settings
17. This time, select "Obtain an IP address automatically"
tongue.gif 18. Hit "Ok"
19. Hit "Ok" again
20. You now have a new IP address

With a little practice, you can easily get this process down to 15 seconds.

P.S:
This only changes your dynamic IP address, not your ISP/IP address. If you plan on hacking a website with this trick be extremely careful, because if they try a little, they can trace it back

How to Block Any Website Without Software in Windows XP Computer

Follow these simple steps:

1)Browse C:\WINDOWS\system32\drivers\etc
2) Find the file named "hosts"
3)Open it in notepad


4) Under "127.0.0.1 localhost" Add 127.0.0.2 www.thesiteyouwantblocked.com , and that site will no longer be accessible.
5) Save & Done!


[note]

  • If you want to block another site, just add "1" to the last number in the internal ip (127.0.0.2) and the website adress
  • Example:


  • I just try this trick on Windows XP and it's work.If someday you want to unblock this Blocked site,just delete the I.P and site address. Dont forget to save.

Tuesday, 4 September 2012

Mouse Hidden Tips and Tricks

1) Shift Key and Mouse Click.
Computer Mouse - Left Click
Many Text Editors and Programs allow us to Highlight All or Portions of Text using the Shift Key and the Mouse.
For an example and giving it a try, place the Cursor at the Beginning of a Paragraph, Hold down the Shift Key and Click at the End of the Paragraph to Highlight the Full Paragraph.

2) Take Full Advantage of the Scroll Wheel.
Computer Mouse - Scroll Click
We all know that the Mouse Wheel ( Scroll ) is used to Scroll Up and Down on a Page. However, this Wheel can also do Much more like :

>> The Mouse Wheel can also be used as a Button. Pressing down on the Wheel will act like a Third Mouse Button. This can be used to Open a Web Page in a New Tab. Simply Click the Wheel on any Link and the Web Page will be Opened in New Tab.
Computer Mouse - Ctrl plus Scroll
>> We can quickly Zoom In and Out on a Web Page, Word Document, Excel Spreadsheet, etc. by Holding down the Ctrl Key and Scrolling Up to Zoom In and Scrolling down to Zoom Out.

>> We can move Forward and Backwards while Browsing the Internet by simply Holding down the Shift Key and Scrolling Up and Down. Scrolling down goes Back and Scrolling Up goes Forward.

3) Select with Double and Triple Click.
Computer Mouse - Double Click
We can Select any Word by Double Clicking on that Word and if you want to Highlight the Whole Paragraph, click the Mouse Button Three times on any Text in the Paragraph.

4) Take Full Advantage of Right Click.
Computer Mouse - Right Click
If you Right Click on any File Drag it while holding the Right Button of Mouse, when you let go you will be given the Option to Move or Copy that File. This saves you the Extra Step of having to Right Click where you want to Paste the Item ( File ).

5) Ctrl Key and Mouse Click.

>> We can also Open a Web Page in New Tab, while in a Browser by Pressing and Holding Ctrl Key while Clicking on any Link..
Computer Mouse - Ctrl plus Click
>> While holding down the Ctrl key we can Left Click to Select Multiple Objects or Highlight Multiple Sections of Text.

6) Use Mouse Side Buttons.
Computer Mouse - Side Buttons
Many New Computer Mice have Buttons on the Side of the Mouse. These Buttons can be Programmed to do Anything ( all possible Navigation ), however by default the Left Thumb Button can be used to go Back in a Web Browser or Windows Explorer. This makes Browsing the Internet more Enjoyable since you do not need to move the Mouse Cursor to the Browser Back Arrow Icon in order to go back a Page.

7) Use the Windows " Snap To " Feature.
Computer Mouse - Snap To Feature
This Feature if enabled will Automatically move your Mouse to Buttons that appear in a Dialog Box.
For example, if you Delete a File or Close a Window you may get a Prompt asking you if you are sure you want to perform the Task. With the Snap To Feature Enabled, the Mouse Cursor Automatically moves to the Ok button, so all you will have to do is Click the Mouse Button if you Agree. This saves you the time of having to move the Mouse Cursor over to the Ok Button and then Click Ok.

To Enable the " Snap To " Feature follow these simple Steps :
>> Open Control Panel >> Mouse Properties >> Pointer Options >> Check the " Snap To " Check Box.

For more Productivity, we would suggest you to Modify some more Options available in Mouse Settings Like :
>> Increasing the Motion Speed of Mouse Pointer can also help Increase your Productivity while using the Mouse.

8) Manage the Open Window with the Mouse.
Computer Mouse - Maximize or Minimize Window
Double Click the Top of Title Bar of any Window to Maximize or Minimize a Window. You can also Double Click at the Top Left Corner of the Window to Close that Window instead of Clicking on Red Cross Button i.e. for Closing Window.

9) Move the Mouse with your Keyboard.
Computer Mouse - Use via Keyboard Number Pad
Instead of using the Mouse, we can also Enable Windows to use the Number Pad as a Mouse.

10) Customize the Mouse.
Computer Mouse - Customized
If you have New Mouse with more than Two Buttons, then Installing the Included Mouse Software will allow you to Customize the Mouse even more.
For Example, if you don't use the Side Buttons to Move Back and Forth in a Web Browser then you can Change it to something you do more often, such as Switching between Open Windows or Opening any of your Folder or File.

Friday, 31 August 2012

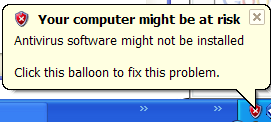
How to Easy Fix "Your Computer Might be at Risk"

Deactivate "Your Computer Might be at Risk" popup in Windows XP SP2


Is this often bother you? If your computer doesn't has antivirus software installed or out of dated antivirus, popup always shown at start up as default. Here are the tricks to disable it:
1. Go to Control Panel

2. Click Security Center icon

3. On the left side, you'll see a resources section, click link "Change the way Security Center Alerts Me" at the bottom.

4. You can choose which alert to disable here. Try them and see the differences
make-money-468x60